آموزش برنامه نویسی اندروید |
آموزش ColorStateList در کاتلین
سلام دوستان عزیز در این سری از آموزش برنامه نویسی اندروید به آموزش ColorStateList در کاتلین می پردازیم از ColorStateList به منظور سفارشی سازی Checkbox , سفارشی سازی Button و سفارشی سازی Radiobutton در اندروید استفاده می شود در ادامه با ما همراه باشید تا به سادگی و در اصطلاح programmatically این لیست را ایجاد کنیم.
ابتدا پیش نمایش مربوط به این آموزش را در ادامه می توانید مشاهده کنید.
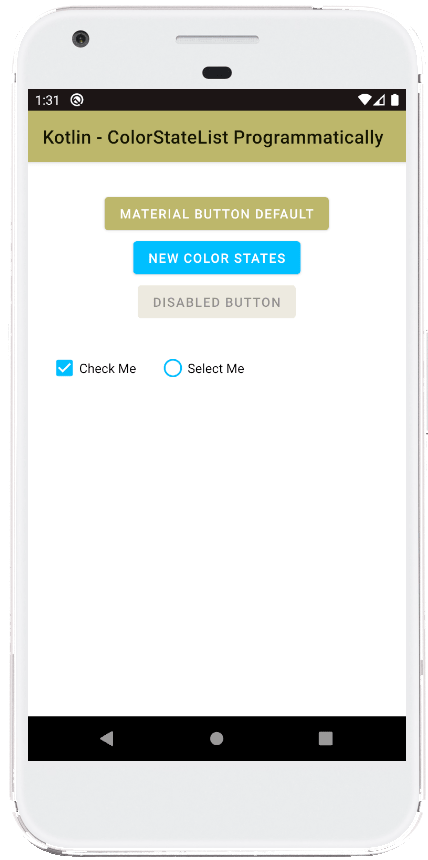
در این آموزش بدون تغییر دادن theme یا style برنانه می توانید Radiobutton و شئی های دیگری که ColorStateList پشتیبانی می کنند را سفارشی کنید.
اولین کاری که باید انجام دهید قرار دادن کدهای زیر در activity_main.xml است.
<?xml version="1.0" encoding="utf-8"?>
<androidx.constraintlayout.widget.ConstraintLayout
    xmlns:android="http://schemas.android.com/apk/res/android"
    xmlns:app="http://schemas.android.com/apk/res-auto"
    xmlns:tools="http://schemas.android.com/tools"
    android:id="@+id/constraintLayout"
    android:layout_width="match_parent"
    android:layout_height="match_parent"
    tools:context=".MainActivity">
    <com.google.android.material.button.MaterialButton
        android:id="@+id/button"
        android:layout_width="wrap_content"
        android:layout_height="wrap_content"
        android:layout_marginTop="32dp"
        android:text="Material Button Default"
        app:layout_constraintEnd_toEndOf="parent"
        app:layout_constraintStart_toStartOf="parent"
        app:layout_constraintTop_toTopOf="parent" />
    <com.google.android.material.button.MaterialButton
        android:id="@+id/button2"
        android:layout_width="wrap_content"
        android:layout_height="wrap_content"
        android:text="New Color States"
        app:layout_constraintEnd_toEndOf="parent"
        app:layout_constraintStart_toStartOf="parent"
        app:layout_constraintTop_toBottomOf="@+id/button" />
    <com.google.android.material.button.MaterialButton
        android:id="@+id/button3"
        android:layout_width="wrap_content"
        android:layout_height="wrap_content"
        android:text="Disabled Button"
        android:enabled="false"
        app:layout_constraintEnd_toEndOf="parent"
        app:layout_constraintStart_toStartOf="parent"
        app:layout_constraintTop_toBottomOf="@+id/button2" />
    <com.google.android.material.checkbox.MaterialCheckBox
        android:id="@+id/materialCheckBox1"
        android:layout_width="wrap_content"
        android:layout_height="wrap_content"
        android:layout_marginStart="24dp"
        android:layout_marginTop="24dp"
        android:text="Check Me"
        app:layout_constraintStart_toStartOf="parent"
        app:layout_constraintTop_toBottomOf="@+id/button3" />
    <com.google.android.material.radiobutton.MaterialRadioButton
        android:id="@+id/materialRadioButton"
        android:layout_width="wrap_content"
        android:layout_height="wrap_content"
        android:layout_marginStart="24dp"
        android:text="Select Me"
        app:layout_constraintBottom_toBottomOf="@+id/materialCheckBox1"
        app:layout_constraintStart_toEndOf="@+id/materialCheckBox1" />
</androidx.constraintlayout.widget.ConstraintLayout>
کدهای بالا یکسری ویو برای ما ایجاد می کند که آنها را در عکس قبلی مشاهده کردید.
بعد از اینکار وارد MainActivity.kt شده و کدهای زیر را قرار دهید.
package com.example.jetpack
import android.content.res.ColorStateList
import android.graphics.Color
import android.os.Bundle
import androidx.appcompat.app.AppCompatActivity
import kotlinx.android.synthetic.main.activity_main.*
class MainActivity : AppCompatActivity() {
    override fun onCreate(savedInstanceState: Bundle?) {
        super.onCreate(savedInstanceState)
        setContentView(R.layout.activity_main)
        button2.backgroundTintList = generateColorStateList()
        button3.backgroundTintList = generateColorStateList(
            disabledColor = Color.parseColor("#EDEAE0")
        )
        materialCheckBox1.buttonTintList = generateColorStateList()
        materialRadioButton.buttonTintList = generateColorStateList()
    }
}
// method to generate color state list programmatically
fun generateColorStateList(
    enabledColor:Int = Color.parseColor("#00BFFF"), // Capri
    disabledColor:Int = Color.parseColor("#A2A2D0"), // Blue bell
    checkedColor:Int = Color.parseColor("#7BB661"), // Bud green
    uncheckedColor:Int = Color.parseColor("#A3C1AD"), // Cambridge blue
    activeColor:Int = Color.parseColor("#1034A6"), // Egyptian blue
    inactiveColor:Int = Color.parseColor("#614051"), // Eggplant
    pressedColor:Int = Color.parseColor("#FFD300"), // Cyber yellow
    focusedColor:Int = Color.parseColor("#00FFFF") // Aqua
):ColorStateList{
    val states = arrayOf(
        intArrayOf(android.R.attr.state_enabled),
        intArrayOf(-android.R.attr.state_enabled),
        intArrayOf(android.R.attr.state_checked),
        intArrayOf(-android.R.attr.state_checked),
        intArrayOf(android.R.attr.state_active),
        intArrayOf(-android.R.attr.state_active),
        intArrayOf(android.R.attr.state_pressed),
        intArrayOf(android.R.attr.state_focused)
    )
    val colors = intArrayOf(
        enabledColor, // enabled
        disabledColor, // disabled
        checkedColor, // checked
        uncheckedColor, // unchecked
        activeColor, // active
        inactiveColor, // inactive
        pressedColor, // pressed
        focusedColor // focused
    )
    return ColorStateList(states, colors)
}
یک متد به نام generateColorStateList داریم در ابتدا ما باید رنگ های حالت های مختلف را ایجاد کنیم در بالا یکسری متغیر داریم و آنها را با رنگ پر کردیم بعد از آن آمدیم از کلاسی به نام ColorStateList استفاده کردیم و دو آرایه ایجاد کردیم این آرایه ها مقدار default ویژگی های یک View را نگه میدارد مثل حالت فعال غیر فعال , حالت check و unchecked و… بعد از اینکار این آرایه ها را به ColorStateList دادیم و تمام 🙂
در ابتدای برنامه می توانید ببینید که از متد generateColorStateList برای view هایی که در activity_main.xml تعریف شده استفاده کردیم.
موفق و پیروز باشید.