 آموزش برنامه نویسی اندروید |
آموزش Paint در برنامه نویسی اندروید
سلام دوستان در این سری از آموزش برنامه نویسی اندروید به آموزش Paint در برنامه نویسی اندروید می پردازیم البته خود برنامه Paint قابلیت های بسیار بالایی دارد ما در این آموزش به بخشی از آن خواهیم پرداخت همانند کشیدن خط (LINE) , دایره (CIRCLE) , مستطیل (RECTANGLE) , بیضی (ELLIPSE) خط مورب (QUADRATICBEZIER) در ادامه با ما همراه باشید.
این آموزش نیازمند یک کتاب خانه بسیار سبک است.
ابتدا وارد فایل Build.gradle از نوع Top Level شده سپس در بخش repositories خط زیر را اضافه کنید.
maven { url 'https://jitpack.io' }
حالا وارد فایل Build.gradle از نوع Module شده سپس در بخش dependencies خط زیر را اضافه کنید.
compile 'com.github.infotech-group:CanvasView:1.0.0'
سپس پروژه را sync کنید.
فرض کنید یک layout به نام activity_draw.xml داریم که کد زیر در آن قرار دارد .
<com.android.graphics.CanvasView
    android:id="@+id/canvas"
    android:layout_width="280dp"
    android:layout_height="280dp"
    android:layout_gravity="center_horizontal" />
ما در بالا یک CanvasView برای صفحه نقاشی قرار داده ایم بروی view هایی همانند CanvasView می توان هرچیزی را طراحی یا draw کرد.
و همینطور فرض کنید یک فایل جاوا که مربوط به activity_draw است به نام DrawActivity.java داریم.
// ...
import android.support.v7.app.AppCompatActivity;
import android.os.Bundle;
import com.android.graphics.CanvasView;
public class DrawActivity extends AppCompatActivity {
    private CanvasView canvas = null;
    @Override
    protected void onCreate(Bundle savedInstanceState) {
        super.onCreate(savedInstanceState);
        setContentView(R.layout.activity_draw);
        this.canvas = (CanvasView)this.findViewById(R.id.canvas);
    }
    // ...
}
در بالا ما فقط view مربوط به CanvasView را find کردیم.
در ادامه ما تمامی بخش هایی رو که برای طراحی , پاک کردن , Undo , Redo ,Mode را بررسی خواهیم کرد ما فقط کد را برای شما قرار میدهیم نحوه ارتباط آنها با خودتان البته کاری ندارد توصیه می کنم در رویداد کلیک هرکدام از کدهای زیر را تست کنید.
API
Undo / Redo / Clear (پاک کردن / رفتن به حالت قبلی / رفتن به حالت بعدی)
this.canvas.undo();   // Undo
this.canvas.redo();   // Redo
this.canvas.clear();  // Clear canvas
Mode
هنگامی می خواهید طراحی کنید سه mode وجود دارد.
this.canvas.setMode(CanvasView.Mode.DRAW);    // for drawing
this.canvas.setMode(CanvasView.Mode.TEXT);    // for drawing Text
this.canvas.setMode(CanvasView.Mode.ERASER);  // for using Eraser
Mode.DRAW : برای کشیدن.
Mode.TEXT : برای نوشتن.
Mode.ERASER : برای Erase (پاک) کردن.
Drawer
همانطور که در بالاتر گفتیم امکان طراحی اشکال مختلف وجود دارد برای اینکار باید یک Drawer انتخاب شود.
this.canvas.setDrawer(CanvasView.Drawer.PEN);               // Use Pen Tool
this.canvas.setDrawer(CanvasView.Drawer.LINE);              // Draw Line
this.canvas.setDrawer(CanvasView.Drawer.RECTANGLE);         // Draw Rectangle
this.canvas.setDrawer(CanvasView.Drawer.CIRCLE);            // Draw Circle
this.canvas.setDrawer(CanvasView.Drawer.ELLIPSE);           // Draw Ellipse (Oval)
this.canvas.setDrawer(CanvasView.Drawer.QUADRATIC_BEZIER);  // Draw Quadratic Bezier
PEN : مداد برای طراحی بروی Canvans انتخاب می شود.
LINE : برای کشیدن خط استفاده می شود.
RECTANGLE : برای کشیدن مربع یا مستطیل استفاده می شود.
CIRCLE : برای کشیدن دایره استفاده می شود.
ELLIPSE : برای کشیدن بیضی استفاده می شود.
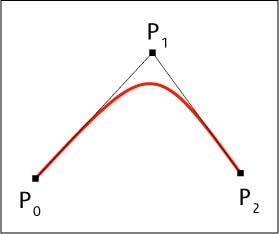
QUADRATIC_BEZIER : برای کشیدن خط مورب استفاده می شود همانند عکس زیر
برای تغییر رنگ پسزمینه از کد زیر باید استفاده شود.
this.canvas.setBaseColor(Color.WHITE);
در بالا رنگ سفید انتخاب شده است می تواند هر رنگی باشد.
برای اینکه مقدار غلظت رنگ را تغییر دهید می توانید از کد زیر استفاده کنید.
this.canvas.setOpacity(128); // between 0 and 255
و این غلظت رنگ بین 0 تا 255 است.
برای اینکه شئی طراحی شده را به شکل blur مانند در بیارید می توانید از کد زیر استفاده کنید.
this.canvas.setBlur(5F); // greater than or equal to 0
Draw Text (طراحی / نوشتن متن)
this.canvas.setText("Canvas View");
باید قبل از این کار mode تغییر کند سپس از کد بالا استفاده کنید.
تبدیل Canvas به Bitmap
Bitmap bitmap = this.canvas.getBitmap();
بعد از انجام کار بالا باید اندازه عکس را همانند زیر تنظیم کنیم.
Bitmap bitmap = this.canvas.getScaleBitmap(300, 200); // 300 x 200
در بالا 300 * 200 تنظیم شده است.
سپس آن را همانند زیر فشرده کنید.
byte[] bytes = this.canvas.getBitmapAsByteArray(CompressFormat.PNG, 100);
این آموزش هم به پایان رسید.
موفق و موید باشید.





سللم مرسی از آموزشی که گذاشتین. ببخشید چند تا سوال داشتم:
1) چطور میشود شکل هایی که ایجاد میکنیم قابلیت جابه جایی را داشته باشند(مثلا یک دایره را با انگشت از چپ به راست انتقال دهیم)؟
2) این امکان وجود دارد که شکل هایی که ایجاد میکنیم، اندازه مشخص یا رنگ خاصی داشته باشند؟ یا کاربر بتواند در آن ها متنی بنویسد؟
3) چطور میشود position شکل هایی که ایجاد کردیم را داشته باشیم تا در شرایطی خاص مثلا رنگ شکل دوم عوض شود.
با سپاس فراوان از شما.
سلام و درود
برای اینکه یک شکل یا یک view را جابه جا کنید کافی است از onTouchEvent استفاده کنید در ادامه یک کد کامل برای شما قرار میدهم (کد زیر یک view سفارشی است)
import android.content.Context;
import android.graphics.Canvas;
import android.graphics.drawable.BitmapDrawable;
import android.util.AttributeSet;
import android.util.Log;
import android.view.MotionEvent;
import android.view.ScaleGestureDetector;
import android.view.View;
public class MyImageView extends View {
private static final int INVALID_POINTER_ID = -1;
    private Drawable mImage;
    private float mPosX;
    private float mPosY;
    private float mLastTouchX;
    private float mLastTouchY;
    private int mActivePointerId = INVALID_POINTER_ID;
    private ScaleGestureDetector mScaleDetector;
    private float mScaleFactor = 1.f;
    public MyImageView(Context context) {
        this(context, null, 0);
    mImage = getResources().getDrawable(R.drawable.imagename);
        mImage.setBounds(0, 0, mImage.getIntrinsicWidth(), mImage.getIntrinsicHeight());
    }
    public MyImageView(Context context, AttributeSet attrs) {
        this(context, attrs, 0);
    }
    public MyImageView(Context context, AttributeSet attrs, int defStyle) {
        super(context, attrs, defStyle);
        mScaleDetector = new ScaleGestureDetector(context, new ScaleListener());
    }
    @Override
    public boolean onTouchEvent(MotionEvent ev) {
        // Let the ScaleGestureDetector inspect all events.
        mScaleDetector.onTouchEvent(ev);
        final int action = ev.getAction();
        switch (action & MotionEvent.ACTION_MASK) {
        case MotionEvent.ACTION_DOWN: {
            final float x = ev.getX();
            final float y = ev.getY();
            mLastTouchX = x;
            mLastTouchY = y;
            mActivePointerId = ev.getPointerId(0);
            break;
        }
        case MotionEvent.ACTION_MOVE: {
            final int pointerIndex = ev.findPointerIndex(mActivePointerId);
            final float x = ev.getX(pointerIndex);
            final float y = ev.getY(pointerIndex);
            // Only move if the ScaleGestureDetector isn't processing a gesture.
            if (!mScaleDetector.isInProgress()) {
                final float dx = x - mLastTouchX;
                final float dy = y - mLastTouchY;
                mPosX += dx;
                mPosY += dy;
                invalidate();
            }
            mLastTouchX = x;
            mLastTouchY = y;
            break;
        }
        case MotionEvent.ACTION_UP: {
            mActivePointerId = INVALID_POINTER_ID;
            break;
        }
        case MotionEvent.ACTION_CANCEL: {
            mActivePointerId = INVALID_POINTER_ID;
            break;
        }
        case MotionEvent.ACTION_POINTER_UP: {
            final int pointerIndex = (ev.getAction() & MotionEvent.ACTION_POINTER_INDEX_MASK)
                    >> MotionEvent.ACTION_POINTER_INDEX_SHIFT;
            final int pointerId = ev.getPointerId(pointerIndex);
            if (pointerId == mActivePointerId) {
                // This was our active pointer going up. Choose a new
                // active pointer and adjust accordingly.
                final int newPointerIndex = pointerIndex == 0 ? 1 : 0;
                mLastTouchX = ev.getX(newPointerIndex);
                mLastTouchY = ev.getY(newPointerIndex);
                mActivePointerId = ev.getPointerId(newPointerIndex);
            }
            break;
        }
        }
        return true;
    }
    @Override
    public void onDraw(Canvas canvas) {
        super.onDraw(canvas);
        canvas.save();
        Log.d("DEBUG", "X: "+mPosX+" Y: "+mPosY);
        canvas.translate(mPosX, mPosY);
        canvas.scale(mScaleFactor, mScaleFactor);
        mImage.draw(canvas);
        canvas.restore();
    }
    private class ScaleListener extends ScaleGestureDetector.SimpleOnScaleGestureListener {
        @Override
        public boolean onScale(ScaleGestureDetector detector) {
            mScaleFactor *= detector.getScaleFactor();
            // Don't let the object get too small or too large.
            mScaleFactor = Math.max(0.1f, Math.min(mScaleFactor, 10.0f));
            invalidate();
            return true;
        }
    }
}
و در جواب به سوال دومتان بله امکان پذیر است ولی اگر کمی دقت کنید اندازه توسط خود کاربر که در حال کشیدن آن است تنظیم می شود برای اینکه یک شکل مثلا دایره به اندازه خاص بکشید باید از کد زیر استفاده کنید
مثل زیر عمل کنید.
یک فایل جاوا به نام CirclesDrawingView.java ایجاد کرده کدهای زیر را در آن قرار دهید.
public class CirclesDrawingView extends View { private static final String TAG = "CirclesDrawingView"; /** Main bitmap */ private Bitmap mBitmap = null; private Rect mMeasuredRect; /** Stores data about single circle */ private static class CircleArea { int radius; int centerX; int centerY; CircleArea(int centerX, int centerY, int radius) { this.radius = radius; this.centerX = centerX; this.centerY = centerY; } @Override public String toString() { return "Circle[" + centerX + ", " + centerY + ", " + radius + "]"; } } /** Paint to draw circles */ private Paint mCirclePaint; private final Random mRadiusGenerator = new Random(); // Radius limit in pixels private final static int RADIUS_LIMIT = 100; private static final int CIRCLES_LIMIT = 3; /** All available circles */ private HashSet mCircles = new HashSet (CIRCLES_LIMIT);
private SparseArray mCirclePointer = new SparseArray (CIRCLES_LIMIT);
/**
* Default constructor
*
* @param ct {@link android.content.Context}
*/
public CirclesDrawingView(final Context ct) {
super(ct);
init(ct);
}
public CirclesDrawingView(final Context ct, final AttributeSet attrs) {
super(ct, attrs);
init(ct);
}
public CirclesDrawingView(final Context ct, final AttributeSet attrs, final int defStyle) {
super(ct, attrs, defStyle);
init(ct);
}
private void init(final Context ct) {
// Generate bitmap used for background
mBitmap = BitmapFactory.decodeResource(ct.getResources(), R.drawable.up_image);
mCirclePaint = new Paint();
mCirclePaint.setColor(Color.BLUE);
mCirclePaint.setStrokeWidth(40);
mCirclePaint.setStyle(Paint.Style.FILL);
}
@Override
public void onDraw(final Canvas canv) {
// background bitmap to cover all area
canv.drawBitmap(mBitmap, null, mMeasuredRect, null);
for (CircleArea circle : mCircles) {
canv.drawCircle(circle.centerX, circle.centerY, circle.radius, mCirclePaint);
}
}
@Override
public boolean onTouchEvent(final MotionEvent event) {
boolean handled = false;
CircleArea touchedCircle;
int xTouch;
int yTouch;
int pointerId;
int actionIndex = event.getActionIndex();
// get touch event coordinates and make transparent circle from it
switch (event.getActionMasked()) {
case MotionEvent.ACTION_DOWN:
// it's the first pointer, so clear all existing pointers data
clearCirclePointer();
xTouch = (int) event.getX(0);
yTouch = (int) event.getY(0);
// check if we've touched inside some circle
touchedCircle = obtainTouchedCircle(xTouch, yTouch);
touchedCircle.centerX = xTouch;
touchedCircle.centerY = yTouch;
mCirclePointer.put(event.getPointerId(0), touchedCircle);
invalidate();
handled = true;
break;
case MotionEvent.ACTION_POINTER_DOWN:
Log.w(TAG, "Pointer down");
// It secondary pointers, so obtain their ids and check circles
pointerId = event.getPointerId(actionIndex);
xTouch = (int) event.getX(actionIndex);
yTouch = (int) event.getY(actionIndex);
// check if we've touched inside some circle
touchedCircle = obtainTouchedCircle(xTouch, yTouch);
mCirclePointer.put(pointerId, touchedCircle);
touchedCircle.centerX = xTouch;
touchedCircle.centerY = yTouch;
invalidate();
handled = true;
break;
case MotionEvent.ACTION_MOVE:
final int pointerCount = event.getPointerCount();
Log.w(TAG, "Move");
for (actionIndex = 0; actionIndex < pointerCount; actionIndex++) {
// Some pointer has moved, search it by pointer id
pointerId = event.getPointerId(actionIndex);
xTouch = (int) event.getX(actionIndex);
yTouch = (int) event.getY(actionIndex);
touchedCircle = mCirclePointer.get(pointerId);
if (null != touchedCircle) {
touchedCircle.centerX = xTouch;
touchedCircle.centerY = yTouch;
}
}
invalidate();
handled = true;
break;
case MotionEvent.ACTION_UP:
clearCirclePointer();
invalidate();
handled = true;
break;
case MotionEvent.ACTION_POINTER_UP:
// not general pointer was up
pointerId = event.getPointerId(actionIndex);
mCirclePointer.remove(pointerId);
invalidate();
handled = true;
break;
case MotionEvent.ACTION_CANCEL:
handled = true;
break;
default:
// do nothing
break;
}
return super.onTouchEvent(event) || handled;
}
/**
* Clears all CircleArea - pointer id relations
*/
private void clearCirclePointer() {
Log.w(TAG, "clearCirclePointer");
mCirclePointer.clear();
}
/**
* Search and creates new (if needed) circle based on touch area
*
* @param xTouch int x of touch
* @param yTouch int y of touch
*
* @return obtained {@link CircleArea}
*/
private CircleArea obtainTouchedCircle(final int xTouch, final int yTouch) {
CircleArea touchedCircle = getTouchedCircle(xTouch, yTouch);
if (null == touchedCircle) {
touchedCircle = new CircleArea(xTouch, yTouch, mRadiusGenerator.nextInt(RADIUS_LIMIT) + RADIUS_LIMIT);
if (mCircles.size() == CIRCLES_LIMIT) {
Log.w(TAG, "Clear all circles, size is " + mCircles.size());
// remove first circle
mCircles.clear();
}
Log.w(TAG, "Added circle " + touchedCircle);
mCircles.add(touchedCircle);
}
return touchedCircle;
}
/**
* Determines touched circle
*
* @param xTouch int x touch coordinate
* @param yTouch int y touch coordinate
*
* @return {@link CircleArea} touched circle or null if no circle has been touched
*/
private CircleArea getTouchedCircle(final int xTouch, final int yTouch) {
CircleArea touched = null;
for (CircleArea circle : mCircles) {
if ((circle.centerX - xTouch) * (circle.centerX - xTouch) + (circle.centerY - yTouch) * (circle.centerY - yTouch) <= circle.radius * circle.radius) {
touched = circle;
break;
}
}
return touched;
}
@Override
protected void onMeasure(final int widthMeasureSpec, final int heightMeasureSpec) {
super.onMeasure(widthMeasureSpec, heightMeasureSpec);
mMeasuredRect = new Rect(0, 0, getMeasuredWidth(), getMeasuredHeight());
}
}
سپس برای استفاده از view سفارشی ساخته شده باید مثل زیر در layout قرار بگیرد
باید به جای ir.programchi نام پکیج خودتان را قرار دهید.
با canvas که در کد بالا توضیح دادم اگر کمی به کلاس های آن نگاه بیندازید متوجه می شوید چه طور می شود position هر کدام را به دست آورد.
در صورتی که سوالی داشتید در زیر همین مطلب قرار دهید تا جواب داده شود .
موفق باشید.
سلام و وقت به خیر مجدد.
این کد به خوبی کار میکند و از این بابت متشکرم.
فقط مشکلی که وجود دارد این است که با استفاده از این کد، فقط میتوان “دایره” ایجاد کرد. در حالیکه من میخواهم از “خط” هم استفاده کنم.
کد CircleDrawingView هم که در layout نوشته شده، تنها مختص دایره است.
امکانش هست کد دیگری هم برای استفاده از “خط” اضافه نمایید تا به طور همزمان بتوان هم از دایره و هم از خط در کنار یکدیگر استفاده کرد؟
سپاس بسیار از شما.
سلام بله امکان پذیر است برای ایجاد خط از کد زیر استفاده کنید و امکان پذی نیست در یک کلاس دو ابجکت باشد چون یک view محسوب می شوند .
قبل از اینکه یک view سفارشی را برای شما ایجاد کنم توصیه می کنم کد زیر را تست کنید.
فکر می کنم مشکل شما با کد بالا حل می شود در صورتی که مشکل حل نشد اعلام کنید view سفارشی برای شما ایجاد کنم.
موفق و پیروز باشید.
سلام. مرسی از زحماتتون.
اما این “خط” باید مثل canvas، توسط شخصی که از برنامه استفاده می کند، ایجاد شود نه توسط برنامه نویس
همچنین باید مثل کدی که برای “دایره” نوشتید، قابلیت جابه جا کردن توسط کاربر را داشته باشد.
در حقیقت میخواهم کاربر بتواند دایره ها را با خط به هم وصل کند و هر دو در یک ویو باشند.
با تشکر بسیار از زحماتتون.
سلام یک فایل به نام DrawView.java ایجاد کنید کد زیر را در آن قرار دهید.
package ir.programchi;
import android.content.Context;
import android.graphics.Canvas;
import android.graphics.Color;
import android.graphics.Paint;
import android.view.View;
public class DrawView extends View {
    Paint paint = new Paint();
    private void init() {
        paint.setColor(Color.BLACK);
    }
    public DrawView(Context context) {
        super(context);
        init();
    }
    public DrawView(Context context, AttributeSet attrs) {
        super(context, attrs);
        init();
    }
    public DrawView(Context context, AttributeSet attrs, int defStyle) {
        super(context, attrs, defStyle);
        init();
    }
    @Override
    public void onDraw(Canvas canvas) {
            canvas.drawLine(0, 0, 20, 20, paint);
            canvas.drawLine(20, 0, 0, 20, paint);
    }
}
برای اینکه view را در صفحه قرار بدید به دو شکل می توانید عمل کنید
یک
دوم
        DrawView drawView = new DrawView(this);
        drawView.setBackgroundColor(Color.WHITE);
        setContentView(drawView);
موفق باشید.
سلام
خیلی ممنون از آموزش خوبتون
من میخوام ی سری شکل پیش فرض داشته باشم(مثلا مستطیل افقی و عمودی) بعد این هارو با drag and drop کاربر بتونه روی یک صفحه بزاره چطوری میشه این کارو انجام داد ؟؟؟؟
اموزش زیر میتونه بهتون کمک کنه:
https://orjinakteb.com/2017/08/11/%d8%a2%d9%85%d9%88%d8%b2%d8%b4-drag-and-drop-%d8%af%d8%b1-%d8%a8%d8%b1%d9%86%d8%a7%d9%85%d9%87-%d9%86%d9%88%db%8c%d8%b3%db%8c-%d8%a7%d9%86%d8%af%d8%b1%d9%88%db%8c%d8%af/
سلام ببخشید یه سوال داشتم؟
چجوری میشه یک متن یا شکل را روی canvas قفل کرد؟
سلام متوجه سوالتون نمیشم قفل کردن یعنی چی ؟
یعنی وقتی کاربر روی یک دکمه کلیک کرد ، دیگه نشه اون متن را روی canvas تکون داد و اون متن در موقعیت خودش باقی بمونه
سلام یک آموزش در این رابطه قرار خواهیم داد.
سلام ، من می خواهم رنگ پس زمینه canvas را تشخیص بدم ، مانند ابزار Eyedropper در فتوشاپ
سلام فکر می کنم کد زیر بدردتون بخوره
سپس برای گرفتن رنگ ها مثل زیر می توانید عمل کنید.
موفق باشید.
سلام من می خوام وقتی پاک کن را روی متن کشیدیم متن را پاک کند ، چجوری باید این کار را انجام دهیم؟
سلام و درود
شما می توانید از کد زیر استفاده کنید.
ولی شما نیاز دارید به صورت نقطی ای این کار رو بکنید که باید از کد زیر استفاده کنید.
موفق باشید.
من میتونم ایدی تلگرام شما را داشته باشم ؟ چون چند تا چیز هست که باید ببینید
@bbong9811
سلام خسته نباشید
من وقتی میخوام رنگ رو تغییر بدم شکل قبلی هم که کشیدم به رنگ جدید تغییر میکنه، در صورتی که من فقط میخوام خط جدیدی که میکشم با تغییر رنگ رنگش تغییر کنه و شکل قبل با همون رنگی که قبلا کشیدم باقی بمونه.
لطفا راهنمایی کنید مرسی