 آموزش برنامه نویسی اندروید |
آموزش RecyclerView با کتاب خانه Retrofit
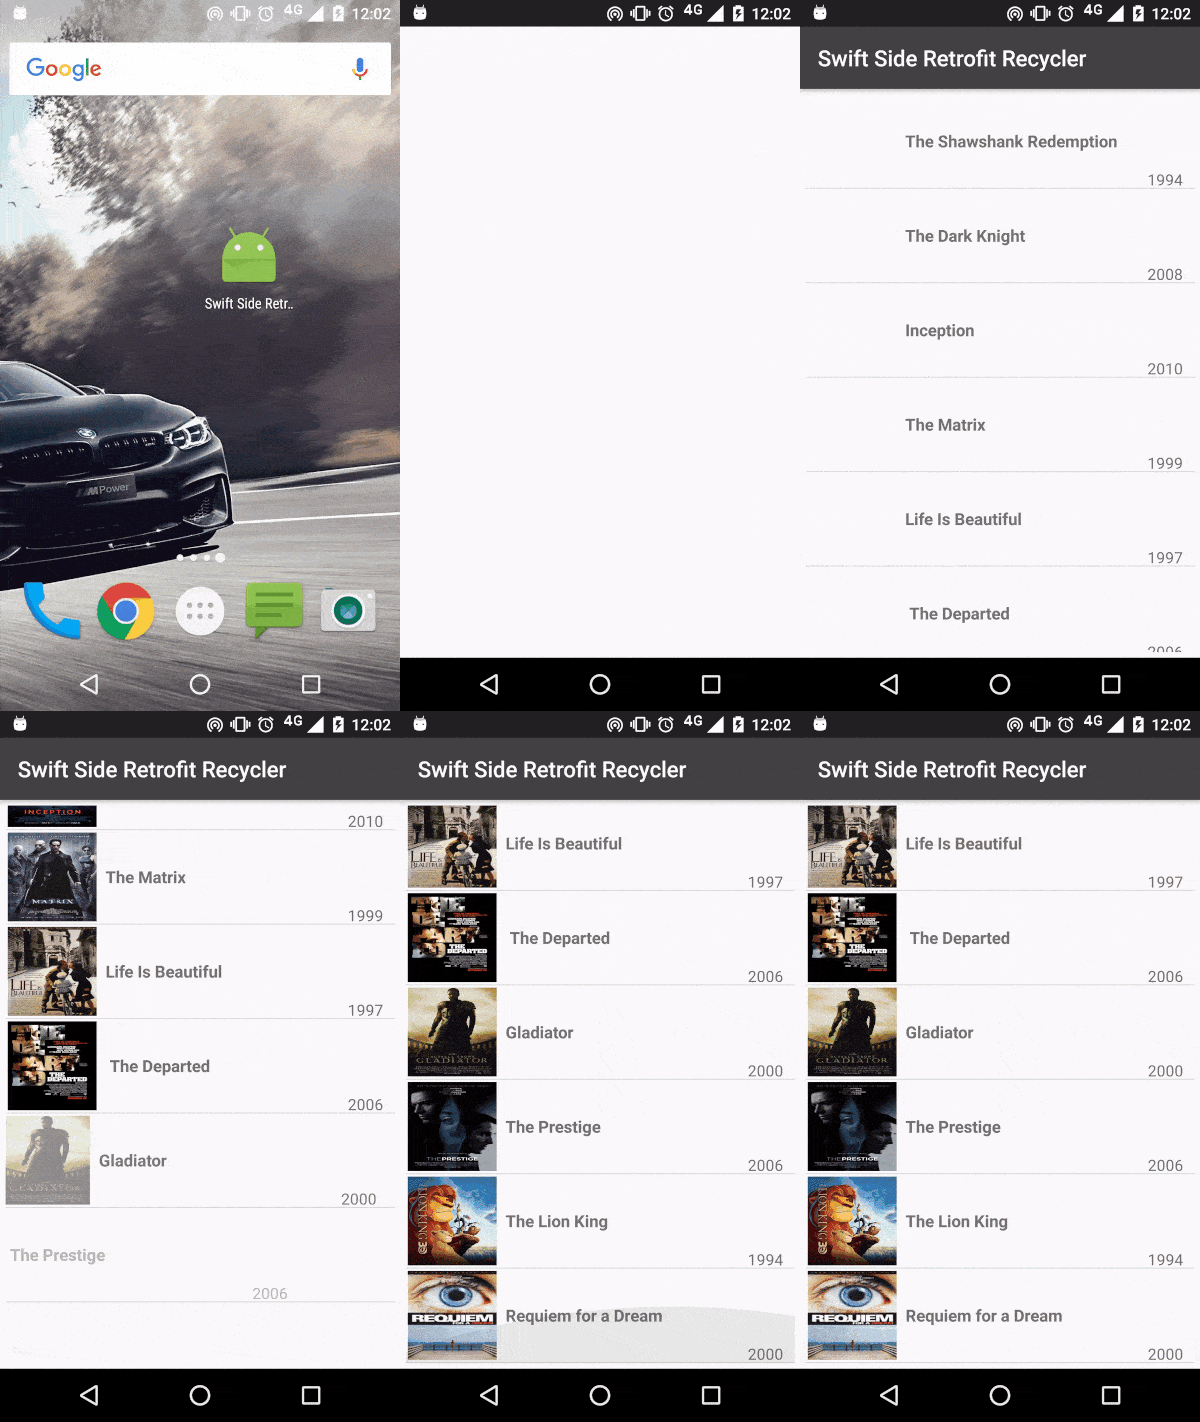
سلام دوستان در این سری از آموزش برنامه نویسی اندروید به آموزش RecyclerView با کتاب خانه Retrofit در برنامه نویسی اندروید می پردازیم در قبل آموزش های زیادی مربوط به RecyclerView را قرار دادیم و بیشتر بخش network آن را با کتاب خانه volley پیاده سازی کردیم امروز با کتاب خانه بسیار قدرتمند Retrofit بخش network آپ خودمان را پیاده سازی کنیم در ادامه می توانید پیش نمایشی از کار را مشاهده کنید با ما همراه باشید.
به علت بالا بودن حجم فایل gif از لینک زیر برای دیدن آن استفاده کنید.
لینک
قبلا Retrofit را بررسی کرده بودیم می تونید از لینک زیر آن را مطالعه کنید.
Retrofit چیست ؟
همانطور که قبلا هم گفتیم Retrofit کتاب خانه ای است بسیار سریع یعنی کار ها را در کمتر از چند ثانیه انجام میدهد (منظور بخش دریافت دیتا از وب سرور است).
ابتدا باید کتاب خانه های مربوطه را اضافه کنیم.
پس وارد فایل Build.gradle شده و در بخش dependencies خطاهای زیر را اضافه کنید.
   // recycler view
    compile 'com.android.support:recyclerview-v7:25.0.0'
    // retrofit, gson
    compile 'com.google.code.gson:gson:2.6.2'
    compile 'com.squareup.retrofit2:retrofit:2.0.2'
    compile 'com.squareup.retrofit2:converter-gson:2.0.2'
    //Picasso
    compile 'com.squareup.picasso:picasso:2.5.2'
پروژه را sync کنید.
وارد AndroidManifest.xml شده و دسترسی زیر را اضافه کنید.
<uses-permission android:name="android.permission.INTERNET" />
یک کلاس به نام Movie ایجاد کرده و کد های زیر را در آن قرار دهید.
import com.google.gson.annotations.SerializedName;
public class Movie {
    @SerializedName("title")
    private String mTitle;
    @SerializedName("image")
    private String mImageURL;
    @SerializedName("year")
    private String mProductionYear;
    public Movie(String title, String imageURL, String year) {
        this.mTitle = title;
        this.mImageURL = imageURL;
        this.mProductionYear = year;
    }
    public String getTitle() {
        return mTitle;
    }
    public void setTitle(String title) {
        this.mTitle = title;
    }
    public String getImageURL() {
        return mImageURL;
    }
    public void setImageURL(String imageURL) {
        this.mImageURL = imageURL;
    }
    public String getProductionYear() {
        return mProductionYear;
    }
    public void setProductionYear(String productionYear) {
        this.mProductionYear = productionYear;
    }
    @Override
    public String toString() {
        return "Movie{" +
                ", Title='" + mTitle + '\'' +
                ", Image_URL='" + mImageURL + '\'' +
                ", Production_Year='" + mProductionYear + '\'' +
                '}';
    }
}
این کلاس عنوان و ادرس عکس و سال تولید هر کدام از فیلم ها را برای قرار دادن در RecylerView آماده می کند.
یک کلاس دیگر به نام MoviesResponse.java ایجاد کنید و کد زیر را در آن قرار دهید.
import com.google.gson.annotations.SerializedName;
import java.util.List;
public class MoviesResponse {
    @SerializedName("movies")
    private List movies;
    public List getMovies() {
        return movies;
    }
}
در بالا کلاس model خودمان را ایجاد کردیم تا request به سرور ارسال شود.
یک کلاس دیگر به نام MovieAPI.java ایجا کنید و کد های زیر را در آن قرار دهید.
import retrofit2.Retrofit;
import retrofit2.converter.gson.GsonConverterFactory;
public class MovieAPI {
    private static final String BASE_URL = "http://orjinakteb.com/api/json.php";
    private static Retrofit retrofit = null;
    public static Retrofit getClient() {
        if (retrofit==null) {
            retrofit = new Retrofit.Builder()
                    .baseUrl(BASE_URL)
                    .addConverterFactory(GsonConverterFactory.create())
                    .build();
        }
        return retrofit;
    }
}
ادرس بالا json ما هست که ایجاد شده است اگر وارد لینک زیر شوید می توانید آن را ببینید.
http://orjinakteb.com/api/json.php
همانطور که بالا را مشاهده می کنید به چه سادگی json دریافت می شود.
حالا یک فایل از نوع Interface به نام ApiInterface ایجاد کرده و کد زیر را در آن قرا دهید.
import ir.programchi.MoviesResponse;
import retrofit2.Call;
import retrofit2.http.GET;
import retrofit2.http.Path;
public interface ApiInterface {
    @GET("movies/{which_list}")
    Call getMovies(@Path("which_list") String whichList);
}
در بالا تازه json دریافت می شود کد قبلی پیش زمینه برای دریافت را فراهم می کرد.
یک فایل به نام movie_list_item.java ایجاد کنید این فایل چیدمان هر آیتمی که در RecyclerView قرار می گیرد را تنظیم می کند (شکل قرار گیری عکس و متن ها در کنار هم)
<?xml version="1.0" encoding="utf-8"?>
<RelativeLayout xmlns:android="http://schemas.android.com/apk/res/android"
    android:layout_width="match_parent"
    android:layout_height="wrap_content"
    android:layout_margin="2dp">
    <!-- Movie image -->
    <ImageView
        android:id="@+id/movie_thumbnail"
        android:layout_width="80dp"
        android:layout_height="80dp"
        android:layout_alignParentLeft="true"
        android:layout_marginRight="8dp" />
    <!-- Movie title -->
    <TextView
        android:id="@+id/movie_title_text_view"
        android:layout_width="wrap_content"
        android:layout_height="wrap_content"
        android:layout_centerVertical="true"
        android:layout_toEndOf="@+id/movie_thumbnail"
        android:layout_toRightOf="@+id/movie_thumbnail"
        android:lines="1"
        android:paddingRight="2dp"
        android:textSize="15sp"
        android:textStyle="bold" />
    <TextView
        android:id="@+id/movie_year_production"
        android:layout_width="wrap_content"
        android:layout_height="15dp"
        android:layout_alignParentBottom="true"
        android:layout_alignParentRight="true"
        android:layout_marginBottom="8dp"
        android:layout_marginRight="8dp" />
</RelativeLayout>
همانطور که می بینید سه object در کنار هم قرار گرفته است.
مثل همیشه باید آداپتور سفارشی خودمان را ایجاد کنیم پس یک فایل به نام MviesAdapter.java ایجاد کنید و کد های زیر را در آن قرار دهید.
package ir.programchi;
import android.content.Context;
import android.support.v7.widget.RecyclerView;
import android.view.LayoutInflater;
import android.view.View;
import android.view.ViewGroup;
import android.view.animation.Animation;
import android.view.animation.AnimationUtils;
import android.widget.ImageView;
import android.widget.TextView;
import com.squareup.picasso.Picasso;
import com.swift.sight.retrofit.R;
import com.swift.sight.retrofit.model.Movie;
import java.util.List;
public class MoviesAdapter extends RecyclerView.Adapter<MoviesAdapter.MovieViewHolder> {
    private int mLastPosition = -1;
    static class MovieViewHolder extends RecyclerView.ViewHolder {
        private TextView movieTitle;
        private TextView productionYear;
        private ImageView movieThumbnail;
        private View mRootView;
        private MovieViewHolder(View itemView) {
            super(itemView);
            movieTitle = (TextView) itemView.findViewById(R.id.movie_title_text_view);
            productionYear = (TextView) itemView.findViewById(R.id.movie_year_production);
            movieThumbnail = (ImageView) itemView.findViewById(R.id.movie_thumbnail);
            mRootView = movieTitle.getRootView();
        }
        private void clearAnimation()
        {
            mRootView.clearAnimation();
        }
    }
    private List<Movie> movieList;
    private Context mContext;
    public MoviesAdapter(Context context, List<Movie> movies) {
        movieList = movies;
        mContext = context;
    }
    private Context getContext() {
        return mContext;
    }
    @Override
    public MoviesAdapter.MovieViewHolder onCreateViewHolder(ViewGroup parent, int viewType) {
        Context context = parent.getContext();
        LayoutInflater inflater = LayoutInflater.from(context);
        View movieView = inflater.inflate(R.layout.movie_list_item, parent, false);
        return new MovieViewHolder(movieView);
    }
    @Override
    public void onBindViewHolder(MoviesAdapter.MovieViewHolder viewHolder, int position) {
        Movie movie = movieList.get(position);
        TextView movieTextView = viewHolder.movieTitle;
        movieTextView.setText(movie.getTitle());
        TextView yearProductionTextView = viewHolder.productionYear;
        yearProductionTextView.setText(movie.getProductionYear());
        Picasso.with(getContext()).load(movie.getImageURL()).error(android.R.drawable.stat_notify_error).fit().into(viewHolder.movieThumbnail);
        setAnimation(viewHolder.itemView, position);
    }
    @Override
    public void onViewDetachedFromWindow(MovieViewHolder holder) {
        holder.clearAnimation();
        super.onViewDetachedFromWindow(holder);
    }
    @Override
    public int getItemCount() {
        return movieList.size();
    }
    private void setAnimation(View viewToAnimate, int position)
    {
        if (position > mLastPosition)
        {
            Animation animation = AnimationUtils.loadAnimation(mContext, android.R.anim.slide_in_left);
            viewToAnimate.startAnimation(animation);
            mLastPosition = position;
        }
    }
}
در بالا ممکن است stat_notify_error خطا دهد خودتان یک عکس با این نام قرار دهید (عکسی که در صورت خطا به جای هر آیتم نمایش داده می شود)
حالا در بخش activity_main.xml کد زیر را قرار دهید.
<LinearLayout xmlns:android="http://schemas.android.com/apk/res/android"
    xmlns:tools="http://schemas.android.com/tools"
    android:layout_width="match_parent"
    android:layout_height="match_parent"
    android:orientation="vertical"
    tools:context=".activity.MainActivity">
    <android.support.v7.widget.RecyclerView
        android:id="@+id/movies_recycler_view"
        android:layout_margin="5dp"
        android:layout_width="match_parent"
        android:layout_height="match_parent" />
</LinearLayout>
و در آخر MainActivity.java ما هم به شکل زیر می شود.
package ir.programchi;
import android.app.ProgressDialog;
import android.os.Bundle;
import android.support.v7.app.AppCompatActivity;
import android.support.v7.widget.DividerItemDecoration;
import android.support.v7.widget.LinearLayoutManager;
import android.support.v7.widget.RecyclerView;
import android.util.Log;
import java.util.List;
import ir.programchi.R;
import ir.programchi.MoviesAdapter;
import ir.programchi.Movie;
import ir.programchi.MoviesResponse;
import ir.programchi.ApiInterface;
import ir.programchi.MovieAPI;
import retrofit2.Call;
import retrofit2.Callback;
import retrofit2.Response;
public class MainActivity extends AppCompatActivity {
    private static final String TAG = MainActivity.class.getSimpleName();
    private List<Movie> mListMovies;
    private ProgressDialog pDialog;
    @Override
    protected void onCreate(Bundle savedInstanceState) {
        super.onCreate(savedInstanceState);
        setContentView(R.layout.activity_main);
        //Showing a progress bar while data are downloaded.
        pDialog = new ProgressDialog(this);
        pDialog.setMessage(getString(R.string.progress_bar_text));
        pDialog.show();
        initData();
    }
    private void initView() {
        RecyclerView moviesRecyclerView = (RecyclerView) findViewById(R.id.movies_recycler_view);
        MoviesAdapter adapter = new MoviesAdapter(this, mListMovies);
        moviesRecyclerView.setAdapter(adapter);
        moviesRecyclerView.setLayoutManager(new LinearLayoutManager(this));
        DividerItemDecoration dividerItemDecoration = new DividerItemDecoration(moviesRecyclerView.getContext(),
                DividerItemDecoration.VERTICAL);
        moviesRecyclerView.addItemDecoration(dividerItemDecoration);
    }
    private void initData() {
        ApiInterface apiService =
                MovieAPI.getClient().create(ApiInterface.class);
        Call<MoviesResponse> call = apiService.getMovies("top");
        call.enqueue(new Callback<MoviesResponse>() {
            @Override
            public void onResponse(Call<MoviesResponse> call, Response<MoviesResponse> response) {
                int responseCode = response.code();
                mListMovies = response.body().getMovies();
                initView();
                if (pDialog != null) {
                    pDialog.dismiss();
                }
            }
            @Override
            public void onFailure(Call<MoviesResponse> call, Throwable t) {
                Log.e(TAG, t.toString());
                if (pDialog != null) {
                    pDialog.dismiss();
                }
            }
        });
    }
}
و در آخر هم دیتاهای به دست آمده را در RecyclerView خود Populate می کنیم
فایل string.xml هم که شامل string است همانند زیر می شود.
<resources>
    <string name="app_name">orjinakteb.com Retrofit</string>
    <string name="progress_bar_text">please wait</string>
</resources>
این آموزش هم به پایان رسید.
موفق و موید باشید.


سلام خیلی ممنئن بابت آموزش آموزش RecyclerView با کتاب خانه Retrofit من یک سوال داشتم اونم اینکه سمت سرور اینhttp://orjinakteb.com/api/json.php خروجی رو با چه کدی گرفتین؟
سلام و درود
خواهش می کنم
یه فایل json ساده است هیچ کد خاصی در آن قرار نگرفته است شما می تونید یه فایل به نام Myjson.json یعنی پسوندش json باشه درست کنید و داده ها به صورت static قرار گرفته اند.
اگه امکانش هست محتوای این رو برام بفرستین http://orjinakteb.com/api/json.php
به ایمیلتات ارسال شد.
سلام. ممنونم بابت اموزش بسیار خوبتون.
بنده مشکی که دارم اینه که یک فایل با خروجی جیسون بصورت صیحیح دارم و دقیقا همین کار رو میخوام انجام بدم اما هیج چیزی دریافت نمیکنم و نمیدونم واقعا چرا.
ممنون میشم راهنماییم کنین لطفا
با تشکر
سلام و درود
logcat قرار دهید.
سلام وقت بخیر. من توی app از bottomnavigation و fragment ها استفاده کردم و توی فرگمنت Home از recyclerview استفاده کردم و دیتا هارو با رتروفیت از سرور میگیرم ولی بار اول که فرگمنت لود میشه دیتاهارو نمایش نمیده و ریسایکلر هیچ آیتمی نداره و وفتی لاگ هم گرفتم دیدم داده ها دریافت میشن و مشکلی از داده های سمت سرور نیست و مشکل از recyclerview هست و و قتی fragment رو رفرش میکنم دیتاها توی recyclerview لود میشن یعنی بار اول نمایش داده نمیشن ولی بار دوم نمایش داده میشن بنظر شما دلیلش چی میتونه باشه؟ ممنون میشم جواب بدید.