 آموزش برنامه نویسی اندروید |
آموزش FluentView در اندروید
سلام دوستان گرامی در این سری از آموزش برنامه اندروید به آموزش FluentView در اندروید می پردازیم در واقع از FluentView به منظور ساخت منو سفارسی در برنامه نویسی اندروید استفاده می شود در ادامه می توانید پیش نمایش FluentView را مشاهده کنید با ما همراه باشید تا نحوه پیاده سازی منو سفارشی (FluentView) را یاد گیرید. (منو متریال دیزاین در برنامه نویسی اندروید)
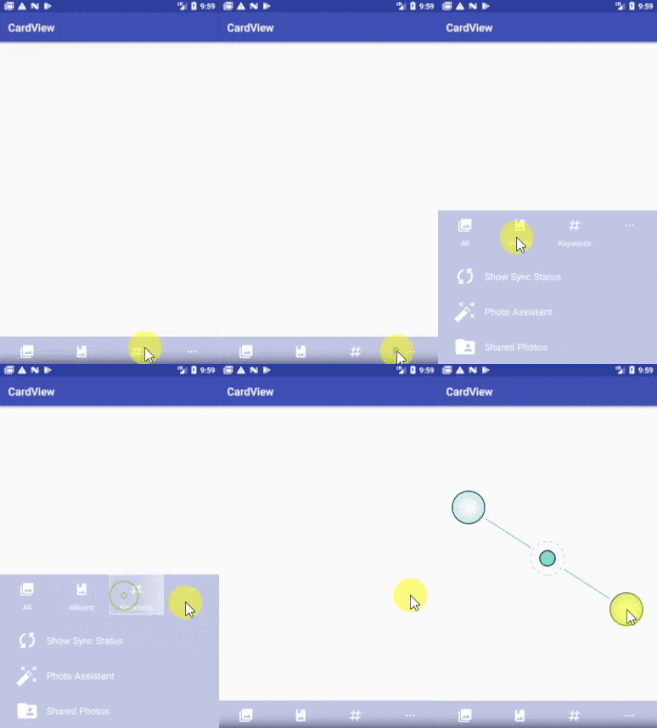
خب برای اینکه همچین منویی را پیاده سازی کنید. لازم است از یک کتاب خانه استفاده کنید
ابتدا وارد فایل Build.Gradle از نوع Module شده سپس در بخش dependencies خط های زیر را قرار دهید.
implementation 'com.vlstr:fluentappbar:1.1.0'
implementation 'com.android.support:recyclerview-v7:27.1.1'
پروژه را sync کنید قند شکن فراموش نشود xD
بعد از اینکار در layout خود از کد زیر برای نمایش menu استفاده کنید.
 FluentView" ><com.vlstr.fluentappbar.FluentAppBar
        android:id="@+id/fluent_app_bar"
        android:layout_width="match_parent"
        android:layout_height="wrap_content"
        app:fluent_background_colour="@color/colorPrimary"
        app:fluent_foreground_colour="#FFFFFF"
        app:fluent_app_bar_type="FULL_FLUENT"
        app:layout_behavior="android.support.design.widget.BottomSheetBehavior">
</com.vlstr.fluentappbar.FluentAppBar>
ویژگی های که در بالا استفاده شده برای تعیین رنگ background و همینطور تعیین نوع نمایش menu است.
وارد activity_main.xml شده و کدهای زیر را در آن قرار دهید.
<?xml version="1.0" encoding="utf-8"?>
<android.support.design.widget.CoordinatorLayout xmlns:android="http://schemas.android.com/apk/res/android"
    xmlns:app="http://schemas.android.com/apk/res-auto"
    xmlns:tools="http://schemas.android.com/tools"
    android:layout_width="match_parent"
    android:layout_height="match_parent"
    tools:context="com.vlstr.fluentappbarexample.MainActivity">
    <android.support.v7.widget.RecyclerView
        android:id="@+id/recyclerView"
        android:layout_width="match_parent"
        android:layout_height="match_parent" />
    <com.vlstr.fluentappbar.FluentAppBar
        android:id="@+id/fluent_app_bar"
        android:layout_width="match_parent"
        android:layout_height="wrap_content"
        app:fluent_background_colour="@color/colorPrimary"
        app:fluent_foreground_colour="#FFFFFF"
        app:fluent_app_bar_type="FULL_FLUENT"
        app:layout_behavior="android.support.design.widget.BottomSheetBehavior">
    </com.vlstr.fluentappbar.FluentAppBar>
</android.support.design.widget.CoordinatorLayout>
باید دو تا فایل منو در پوشه menu پروژه خودتان ایجاد کنید (اگر پوشه menu نبود خودتان درستش کنید)
قبل از این فایل عکس هایی که در پروژه استفاده شده را دانلود کنید و در پوشه drawable قرار دهید.
لینک دانلود
یک فایل menu ایجاد کنید نام آن را برابر با fluent_app_bar_main_menu.xml قرار داده و کدهای زیر را در آن قرار دهید.
<?xml version="1.0" encoding="utf-8"?>
<menu xmlns:android="http://schemas.android.com/apk/res/android">
    <item
        android:icon="@drawable/ic_all"
        android:id="@+id/nav_all"
        android:title="All" />
    <item
        android:icon="@drawable/ic_album"
        android:id="@+id/nav_album"
        android:title="Albums" />
    <item
        android:icon="@drawable/ic_keywords"
        android:id="@+id/nav_keywords"
        android:title="Keywords" />
</menu>
یک فایل دیگر در همان پوشه به نام fluent_app_bar_secondary_menu.xml ایجاد کرده و کدهای زیر را در آن قرار دهید.
<?xml version="1.0" encoding="utf-8"?>
<menu xmlns:android="http://schemas.android.com/apk/res/android">
    <item
        android:icon="@drawable/ic_sync"
        android:id="@+id/menu_sync"
        android:title="Show Sync Status" />
    <item
        android:icon="@drawable/ic_assistant"
        android:id="@+id/menu_assistant"
        android:title="Photo Assistant" />
    <item
        android:icon="@drawable/ic_shared"
        android:id="@+id/menu_shared"
        android:title="Shared Photos" />
</menu>
وارد پوشه layout شده یک فایل به نام item_photo.xml ایجاد کرده و کدهای زیر را در آن قرار دهید.
<?xml version="1.0" encoding="utf-8"?>
<LinearLayout xmlns:android="http://schemas.android.com/apk/res/android"
    xmlns:app="http://schemas.android.com/apk/res-auto"
    android:orientation="vertical" android:layout_width="match_parent"
    android:layout_height="wrap_content"
    android:layout_margin="1dp">
    <TextView
        android:layout_width="wrap_content"
        android:layout_height="40dp"
        android:text="July 15     20:20"
        android:textSize="19dp"
        android:gravity="center_vertical"
        android:layout_gravity="center"/>
    <ImageView
        android:id="@+id/photo"
        android:layout_width="match_parent"
        android:layout_height="wrap_content"
        android:adjustViewBounds="true"
        app:srcCompat="@drawable/fuerte" />
</LinearLayout>
و در آخر وارد MainActivity شده و کدهای زیر را برای آن قرار دهید.
package ir.programchi;
import android.graphics.Bitmap;
import android.graphics.BitmapFactory;
import android.graphics.drawable.Drawable;
import android.os.Bundle;
import android.support.v7.app.AppCompatActivity;
import android.support.v7.widget.GridLayoutManager;
import android.support.v7.widget.LinearLayoutManager;
import android.support.v7.widget.RecyclerView;
import android.view.Menu;
import android.view.MenuInflater;
import android.view.View;
import android.view.ViewGroup;
import android.widget.ImageView;
import android.widget.Toast;
import com.vlstr.fluentappbar.FluentAppBar;
import net.hockeyapp.android.CrashManager;
import static android.view.View.GONE;
public class MainActivity extends AppCompatActivity implements View.OnClickListener {
    private FluentAppBar fluentAppBar;
    @Override
    protected void onCreate(Bundle savedInstanceState) {
        super.onCreate(savedInstanceState);
        setContentView(R.layout.activity_main);
        setupPhotosRecyclerView();
        setupFluentAppBar();
    }
    // TERRIBLE CODE BUT I COULDN'T BE BOTHERED FOR THIS EXAMPLE ADAPTER. SORRY...
    private void setupPhotosRecyclerView() {
        RecyclerView recyclerView = (RecyclerView) findViewById(R.id.recyclerView);
        recyclerView.setLayoutManager(new GridLayoutManager(this, 2));
        recyclerView.setAdapter(new RecyclerView.Adapter<PhotoHolder>() {
            @Override
            public PhotoHolder onCreateViewHolder(ViewGroup parent, int viewType) {
                View view = getLayoutInflater().inflate(R.layout.item_photo, parent, false);
                return new PhotoHolder(view);
            }
            @Override
            public void onBindViewHolder(PhotoHolder holder, int position) {
                switch (position) {
                    case 0:
                        holder.photo.setImageBitmap(getSmallerImage(R.drawable.fuerte));
                        break;
                    case 1:
                        holder.photo.setImageBitmap(getSmallerImage(R.drawable.buddy));
                        break;
                    case 2:
                        holder.photo.setImageBitmap(getSmallerImage(R.drawable.lights1));
                        break;
                    case 3:
                        holder.photo.setImageBitmap(getSmallerImage(R.drawable.lights2));
                        break;
                    case 4:
                        holder.photo.setImageBitmap(getSmallerImage(R.drawable.sunset));
                        break;
                    case 5:
                        holder.photo.setImageBitmap(getSmallerImage(R.drawable.vulcan));
                        break;
                }
            }
            @Override
            public int getItemCount() {
                return 6;
            }
        });
        //recyclerView.setVisibility(GONE);
    }
    private void setupFluentAppBar() {
        fluentAppBar = (FluentAppBar) findViewById(R.id.fluent_app_bar);
        fluentAppBar.setNavigationMenu(R.menu.fluent_app_bar_main_menu, this);
        fluentAppBar.setSecondaryMenu(R.menu.fluent_app_bar_secondary_menu, this);
        fluentAppBar.setBlurRadius(10);
    }
    @Override
    public void onClick(View v) {
        int resId = (int) v.getTag();
        switch (resId){
            //Navigation Menu
            case R.id.nav_all:
                fluentAppBar.collapse();
                break;
            case R.id.nav_album:
                break;
            case R.id.nav_keywords:
                break;
            // Secondary Menu
            case R.id.menu_sync:
                fluentAppBar.collapse();
                break;
            case R.id.menu_assistant:
                break;
            case R.id.menu_shared:
                break;
        }
    }
    private class PhotoHolder extends RecyclerView.ViewHolder {
        ImageView photo;
        public PhotoHolder(View itemView) {
            super(itemView);
            photo = (ImageView) itemView.findViewById(R.id.photo);
        }
    }
    @Override
    public boolean onCreateOptionsMenu(Menu menu) {
        MenuInflater inflater = getMenuInflater();
        inflater.inflate(R.menu.fluent_app_bar_main_menu, menu);
        return true;
    }
    private Bitmap getSmallerImage(int drawableId) {
        Bitmap bitmap = BitmapFactory.decodeResource(getResources(), drawableId);
        int newHeight = (int)(bitmap.getHeight()*( 1000.0 / bitmap.getWidth()));
        Bitmap scaled = Bitmap.createScaledBitmap(bitmap,1000,newHeight,true);
        return scaled;
    }
}
این آموزش هم به پایان رسید.
موفق و پیروز باشید.




سلام. وقت بخیرو ممنون از آموزش خوبتون.
ممکنه لطفا بفرمایید شخصی سازی FluentView به چه صورت هست؟ میخوام در هر رو منو سایز متن و عکس و همینطور رنگ رو تغییر بدم.
متشکرم