 آموزش برنامه نویسی اندروید |
آموزش ساخت قطب نما در برنامه نویسی اندروید
سلام دوستان در این سری از آموزش برنامه نویسی اندروید به آموزش ساخت قطب نما در برنامه نویسی اندروید می پردازیم در این آموزش ما از sensor استفاده می کنیم تا قسمت اصلی یا عقربه اصلی جهت را به دست بیاریم در ادامه می توانید پیش نمایشی از آن را مشاهده می کنید با ما همراه باشید.
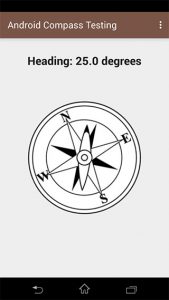
در ابتدا یک فایل به نام ACTIVITY_COMPASS.XML ایجاد کرده و کد زیر را در آن قرار دهید.
<RelativeLayout xmlns:android="http://schemas.android.com/apk/res/android"
    xmlns:tools="http://schemas.android.com/tools"
    android:layout_width="match_parent"
    android:layout_height="match_parent"
    tools:context="inducesmile.com.completeandroid.CompassActivity">
    <TextView
        android:id="@+id/angle"
        android:text="@string/compass"
        android:layout_width="wrap_content"
        android:layout_height="wrap_content"
        android:layout_alignParentTop="true"
        android:layout_centerHorizontal="true"
        android:textColor="@color/primary_text"
        android:textStyle="bold"
        android:textSize="24dp"
        android:layout_marginTop="32dp"/>
    <ImageView
        android:id="@+id/imageViewCompass"
        android:layout_width="wrap_content"
        android:layout_height="wrap_content"
        android:layout_centerInParent="true"
        android:src="@drawable/compass" />
</RelativeLayout>
حالا کد مربوط به آن همانند زیر می شود.
import android.content.Context;
import android.hardware.Sensor;
import android.hardware.SensorEvent;
import android.hardware.SensorEventListener;
import android.hardware.SensorManager;
import android.os.Bundle;
import android.support.v7.app.AppCompatActivity;
import android.view.Menu;
import android.view.MenuItem;
import android.view.animation.Animation;
import android.view.animation.RotateAnimation;
import android.widget.ImageView;
import android.widget.TextView;
public class CompassActivity extends AppCompatActivity implements SensorEventListener {
    private SensorManager sensorManager;
    private Sensor compass;
    private ImageView image;
    private TextView compassAngle;
    private float currentDegree = 0f;
    @Override
    protected void onCreate(Bundle savedInstanceState) {
        super.onCreate(savedInstanceState);
        setContentView(R.layout.activity_compass);
        image = (ImageView)findViewById(R.id.imageViewCompass);
        compassAngle = (TextView)findViewById(R.id.angle);
        sensorManager = (SensorManager)getSystemService(Context.SENSOR_SERVICE);
        compass = sensorManager.getDefaultSensor(Sensor.TYPE_LIGHT);
        if(compass != null){
            sensorManager.registerListener(this, compass, SensorManager.SENSOR_DELAY_NORMAL);
        }
    }
    @Override
    public boolean onCreateOptionsMenu(Menu menu) {
        // Inflate the menu; this adds items to the action bar if it is present.
        getMenuInflater().inflate(R.menu.menu_compass, menu);
        return true;
    }
    @Override
    public boolean onOptionsItemSelected(MenuItem item) {
        // Handle action bar item clicks here. The action bar will
        // automatically handle clicks on the Home/Up button, so long
        // as you specify a parent activity in AndroidManifest.xml.
        int id = item.getItemId();
        //noinspection SimplifiableIfStatement
        if (id == R.id.action_settings) {
            return true;
        }
        return super.onOptionsItemSelected(item);
    }
    @Override
    protected void onResume() {
        super.onResume();
        sensorManager.registerListener(this, compass, SensorManager.SENSOR_DELAY_NORMAL);
    }
    @Override
    protected void onPause() {
        super.onPause();
        sensorManager.unregisterListener(this);
    }
    @Override
    public void onSensorChanged(SensorEvent event) {
        float degree = Math.round(event.values[0]);
        compassAngle.setText("Heading: " + Float.toString(degree) + " degrees");
        // create a rotation animation (reverse turn degree degrees)
        RotateAnimation ra = new RotateAnimation(currentDegree, -degree, Animation.RELATIVE_TO_SELF, 0.5f, Animation.RELATIVE_TO_SELF, 0.5f);
        // how long the animation will take place
        ra.setDuration(210);
        // set the animation after the end of the reservation status
        ra.setFillAfter(true);
        // Start the animation
        image.startAnimation(ra);
        currentDegree = -degree;
    }
    @Override
    public void onAccuracyChanged(Sensor sensor, int accuracy) {
    }
}
این آموزش هم به پایان رسید.
موفق و موید باشید.




چطور باید جهت قبله رو مشخص کرد؟؟؟
سلام آموزش در این مورد قرار میدهیم.
باید به جای Sensor.TYPE_LIGHT از سنسور Sensor.TYPE_ORIENTATION استفاده کنید.