 آموزش برنامه نویسی اندروید |
قرار دادن Checkbox در Alertdialog در برنامه نویسی اندروید
سلام دوستان در این سری از آموزش برنامه نویسی اندروید به آموزش قرار دادن Checkbox در Alertdialog در برنامه نویسی اندروید می پردازیم قبلا آموزش های شبیه به این مانند قرار دادن radio button در Alertdialog پرداخته بودیم و امروز در صدد برآمدیم تا آموزش CheckBox آن را نیز قرار دهیم در ادامه با ما همراه باشید.
ابتدای کار وارد فایل layout خود شده در این جا نام layout برابر با activity_main.xml است سپس کد زیر را در آن قرار دهید.
 <RelativeLayout xmlns:android="http://schemas.android.com/apk/res/android"
 xmlns:tools="http://schemas.android.com/tools"
 android:layout_width="match_parent"
 android:layout_height="match_parent"
 tools:context=".MainActivity" >
 <Button
 android:id="@+id/button1"
 android:layout_width="wrap_content"
 android:layout_height="wrap_content"
 android:layout_centerHorizontal="true"
 android:layout_centerVertical="true"
 android:text="Show Alert" />
 <TextView
 android:id="@+id/textView1"
 android:layout_width="wrap_content"
 android:layout_height="wrap_content"
 android:layout_above="@+id/button1"
 android:layout_centerHorizontal="true"
 android:layout_marginBottom="52dp"
 android:text="Result :"
 android:textAppearance="?android:attr/textAppearanceLarge" />
</RelativeLayout>
در کد بالا یک دکمه قرار دارد که با کلیک بروی آن Alert ما به نمایش در می آید در Alert همانطور که گفتیم یکسری checkbox قرار دارد و یک TextView برای نمایش نتیجه checkbox های انتخاب شده در نظر گرفته ایم.
package ir.programchi;
import java.util.Arrays;
import java.util.List;
import android.app.Activity;
import android.app.AlertDialog;
import android.content.DialogInterface;
import android.os.Bundle;
import android.view.View;
import android.widget.Button;
import android.widget.TextView;
public class MainActivity extends Activity {
 Button button;
 TextView textview;
 AlertDialog.Builder alertdialogbuilder;
 String[] AlertDialogItems = new String[]{
 "Android",
 "PHP",
 "WordPress",
 "Swift"
 };
 List<String> ItemsIntoList;
 boolean[] Selectedtruefalse = new boolean[]{
 false,
 false,
 false,
 false,
 false
 };
 @Override
 protected void onCreate(Bundle savedInstanceState) {
 super.onCreate(savedInstanceState);
 setContentView(R.layout.activity_main);
 button = (Button)findViewById(R.id.button1);
 textview = (TextView)findViewById(R.id.textView1);
 button.setOnClickListener(new View.OnClickListener() {
 @Override
 public void onClick(View v) {
 textview.setText("");
 alertdialogbuilder = new AlertDialog.Builder(MainActivity.this);
 ItemsIntoList = Arrays.asList(AlertDialogItems);
 alertdialogbuilder.setMultiChoiceItems(AlertDialogItems, Selectedtruefalse, new DialogInterface.OnMultiChoiceClickListener() {
 @Override
 public void onClick(DialogInterface dialog, int which, boolean isChecked) {
 }
 });
 alertdialogbuilder.setCancelable(false);
 alertdialogbuilder.setTitle("Select Subjects Here");
 alertdialogbuilder.setPositiveButton("OK", new DialogInterface.OnClickListener() {
 @Override
 public void onClick(DialogInterface dialog, int which) {
 int a = 0;
 while(a < Selectedtruefalse.length)
 {
 boolean value = Selectedtruefalse[a];
 if(value){
 textview.setText(textview.getText() + ItemsIntoList.get(a) + "\n");
 }
 a++;
 }
 }
 });
 alertdialogbuilder.setNeutralButton("Cancel", new DialogInterface.OnClickListener() {
 @Override
 public void onClick(DialogInterface dialog, int which) {
 }
 });
 AlertDialog dialog = alertdialogbuilder.create();
 dialog.show();
 }
 });
 }
}
در ابتدا یک آرایه داریم که در آن متن مربوط به هر آیتم در یک اندیس قرار میگیرد. یک ارایه از نوع boolean که تعیین می کند که هر checkbox تیک خورده باشد یا خیر و برای اینکه نوع checkbox ی آن نمایش پیدا کند از setMultiChoiceItems استفاده کردیم برای اینکه اگر کاربر بیرون محوطه alert کلیک کرد alert ما از بین نره از ویژگی setCancelable استفاده شده است.
اون لیستی که در ابتدا ایجاد کردیم رو در Alert استفاده کردیم دقت کنید متوجه می شوید کدام بخش رو دارم عرض می کنم.
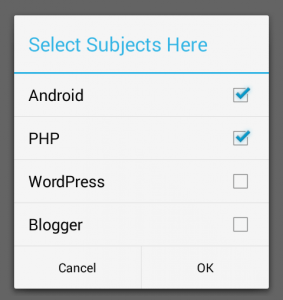
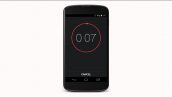
محاصل کار ما همانند زیر می شود.
این آموزش هم به پایان رسید.
موفق باشید.



باسلام
ممنون از سایت خوبتون.
سلام
می خوام بعد انتخاب گزینه چک بوکس مقدار آن ذخیره بشه و بعد باز و بس شدن بر نامه مقدار تغییر نکنه ، چکار کنم؟
با تشکر
سلام با shared preference می توانید این کار را انجام دهید در سایت جستجو کنید.
سلام و تشکر از سایت خوبتون
می خوام کاربر زمانی که دیالوگ باز می کنه ، یکی از گزینه ها را انتخاب کنه و نتونه با بک زدن یا لمس دور دیالوگ دیالوگ رو ببده ، خیلی برام مهمه کدش چی هست؟
سلام و درود
از ویژگی زیر استفاده کنید.
موفق باشید.
سلام ممنون بابت این پست و دیگر پست های سایتتون
کارتون خیلی درسته
چطوری میشه این دیالوگ را از راست به چپ کرد ( اصطلاحاً فارسیش کرد ) ؟
CheckBox که به صورت ساده نمیشه فارسی بشه ولی یک پست در اینباره تا فردا قرار می گیرد.
سلام ممنون
تشکر بابت اون پست جدید برای سفارشی و فارسی کردن چک باکس
توی استفاده از AlertDialog + checkbox ، چک باکس ها به صورت جدا تعریف نمیشن
من میخام یه لیستی رو از دیتا بیس بخونم و بعد توی یه ویوی راست به چپ همراه با چک باکس (اگه شد آلرت دیالوگ مالتی چویس) به کاربر نشون بده.
به نظرتون غیر از این به چه روش دیگه ای میشه این ویو را تهیه کرد که به ازای تعداد عناصر خونده شده از دیتابیس همون قدر هم چک باکس داشته باشیم
.
ببخشید توضیحات و سوال طولانی شد
ممنون
بالاخره درست شد .
با استفاده از متد OnShowListener میشه Alert dialog را راست چین کرد و همیچنین تغییرات دیگه
dialog = alertdialogbuilder.create();
dialog.setOnShowListener(new DialogInterface.OnShowListener() {
@Override
public void onShow(DialogInterface dlg) {
dialog.getButton(Dialog.BUTTON_POSITIVE).setTextSize(20);
dialog.getButton(Dialog.BUTTON_POSITIVE).setTextColor(Color.RED);
dialog.getButton(Dialog.BUTTON_NEGATIVE).setTextSize(20);
dialog.getButton(Dialog.BUTTON_NEGATIVE).setTextColor(Color.RED);
dialog.getWindow().getDecorView().setLayoutDirection(View.LAYOUT_DIRECTION_RTL);
}
});
dialog.show();
سلام
ببخشید من یک alert dialog نوشتم که به صورت radiobox یک سری آهنگ رو نشون میده و وقتی روی radiobox کلیک میکنم آهنگ شروع به پخش میشه و وقتی رو radiobox دیگه ای کلیک میکنم آهنگ قبلی stop نمیشه و هر دو پخش میشن و به همین ترتیب با کلیک بر روی بقیه همه پخش میشن چجوری میتونم بگم که آهنگ قبلی استاپ بشه؟؟
ممنون
سلام و درود
شما از چه کدی به منظور پخش استفاده کرید اگر فرض بگیریم شما از MediaPlayer استفاده می کنید.
class song extends Activity {
    MediaPlayer mediaPlayer;
    @Override
    protected void onCreate(Bundle savedInstanceState) {
        super.onCreate(savedInstanceState);
        setContentView(R.layout.activity_main);
        mediaPlayer = MediaPlayer.create(getApplicationContext(), R.raw.yoursong);
        mediaPlayer.start();
    }
    @Override
    protected void onPause() {
        super.onPause();
        mediaPlayer.stop();
        mediaPlayer.release();
    }
}
در کد بالا در بخش onstop صدا قطع می شود آنها را در radiobutton خود قرار بدید.
موفق باشید.
ببخشید استاد منظورم radiobutton هست اشتباه نوشتم