آموزش برنامه نویسی اندروید |
آموزش ساخت listview سفارشی با عکس و متن با استفاده از کتاب خانه volley
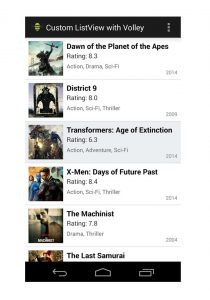
سلام ! با آموزش ساخت listview سفارشی با عکس و متن با استفاده از کتاب خانه volley در خدمتتون هستیم بهتر است ابتدا ماحصل نهایی رو ببینید !
ما از این فایل json نمونه برای لود کردن دیتا استفاده می کنیم شماهم می توانید از همان استفاده کنید.
نمونه فایل json شبیه زیر می باشد.
[
    {
        "title": "Dawn of the Planet of the Apes",
        "image": "http://api.androidhive.info/json/movies/1.jpg",
        "rating": 8.3,
        "releaseYear": 2014,
        "genre": ["Action", "Drama", "Sci-Fi"]
    },
    ....
    ....
]
فایل بالا شامل یک ارایه ای است که درون هر کدام از آنها یکسری خاصیت مشترک به نام های title , image , rating , releaseyaer و genre هست.
دومین کاری که باید بکنید کتاب خانه زیر را از همین جا دانلود کنید یا خط زیر را در بخش gradle قرار دهید.
لینک دانلود volley و یک نکته بگم شما کل اینترنت رو بگردید نمی توانید کتاب خانه volley را به صورت فایل java پیدا کنید و یعد از دانلود آن را در پوشه libs قرار دهید برای این کار می توانید از عکس زیر کمک بگیرید.
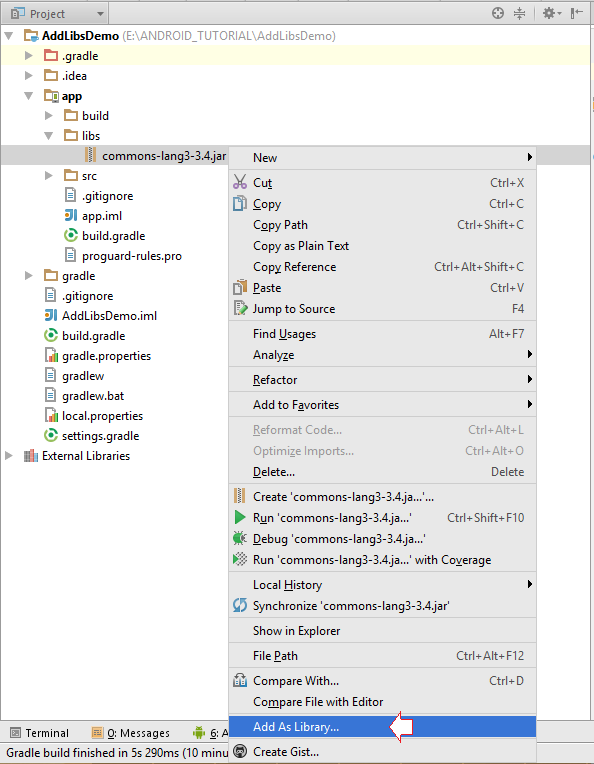
در صورتی که می خواهید از بخش gradle آن را اضافه کنید کافی است در بخش build.geadle خط زیر را اضافه کرده و سپس sync را بزنید ما قبلا دلایل sync نشدن را گفته ایم کافی است در سایت سرچ کنید.
compile 'com.android.volley:volley:1.0.0'
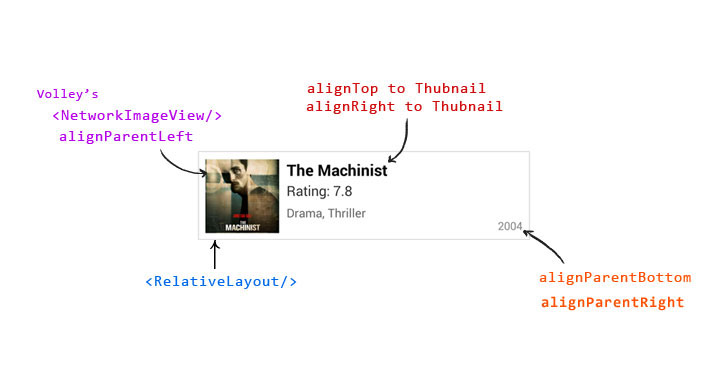
شکل کلی هر کدام همانند بالا می شود و هر بخش یک فاصله دارد به کلی می توان گفت متریال دیزان درآن پیاده سازی شده است.
حالا یک پروژه ایجاد کرده و تغییرات زیر را اعمال کنید.
فایل colors.xml را باز کرده کد های زیر را به آن اضافه کنید.
<?xml version="1.0" encoding="utf-8"?>
<resources>
    <color name="genre">#666666</color>
    <color name="year">#888888</color>
    <color name="list_divider">#d9d9d9</color>
    <color name="list_row_start_color">#ffffff</color>
    <color name="list_row_end_color">#ffffff</color>
    <color name="list_row_hover_start_color">#ebeef0</color>
    <color name="list_row_hover_end_color">#ebeef0</color>
</resources>
فایل dimens.xml را باز کرده / یا ایجاد کرده کد های زیر را در آن قرار دهید.
<resources>
    <dimen name="title">17dp</dimen>
    <dimen name="rating">15dip</dimen>
    <dimen name="genre">13dip</dimen>
    <dimen name="year">12dip</dimen>
</resources>
قبل از اینکه بخش کد java رو شروع کنیم دوست دارم بخش Ui رو تکمیل کنیم حال زمان آن رسیده بخش Ui رو ایجاد کنیم نه بخش اصلی بلکه بخش مربطو به listview را
دقت کنید فایل هایی رو که درحال ایجاد کردن آن هستید باید در بخش res ⇒ drawable باشد.
یک فایل به نام list_row_bg.xml ایجاد کنید کد زیر را که برای ایجاد یک رنگ کم رنگ است در آن قرار دهید.
<?xml version="1.0" encoding="utf-8"?>
<shape xmlns:android="http://schemas.android.com/apk/res/android"
    android:shape="rectangle">
  <gradient
      android:startColor="@color/list_row_start_color"
      android:endColor="@color/list_row_end_color"
      android:angle="270" />
</shape>
یک فایل به نام list_row_bg_hover.xml ایجاد کنید کد زیر را که برای ایجاد یک رنگ برای هر کلیک از لیست است را در زیر قرار دهید.
<?xml version="1.0" encoding="utf-8"?>
<shape xmlns:android="http://schemas.android.com/apk/res/android"
    android:shape="rectangle" >
    <gradient
        android:angle="270"
        android:endColor="@color/list_row_hover_end_color"
        android:startColor="@color/list_row_hover_start_color" />
</shape>
و حال زمان استفاده از آن دو فایلی است که در بالا آنها را تعریف کردیم. یک فایل به نام list_row_selector.xml ایجاد کنید و کد های زیر را در آن قرار دهید.
<?xml version="1.0" encoding="utf-8"?>
<selector xmlns:android="http://schemas.android.com/apk/res/android">
    <item android:drawable="@drawable/list_row_bg" android:state_pressed="false" android:state_selected="false"/>
    <item android:drawable="@drawable/list_row_bg_hover" android:state_pressed="true"/>
    <item android:drawable="@drawable/list_row_bg_hover" android:state_pressed="false" android:state_selected="true"/>
</selector>
حالا بخش activity_main.xml را باز کرده کد مربوط به ایجاد لیست را در آن قرار دهید.
<RelativeLayout xmlns:android="http://schemas.android.com/apk/res/android"
    xmlns:tools="http://schemas.android.com/tools"
    android:layout_width="match_parent"
    android:layout_height="match_parent"
    tools:context=".MainActivity" >
    <ListView
        android:id="@+id/list"
        android:layout_width="fill_parent"
        android:layout_height="wrap_content"
        android:divider="@color/list_divider"
        android:dividerHeight="1dp"
        android:listSelector="@drawable/list_row_selector" />
</RelativeLayout>
و ما برای اینکه عکس متن و… مربوط به لیست را نمایش دهیم یک فایل جداگانه ایجاد کرده سپس این موارد را در آن پیاده سازی می کنیم.نام فایل ما list_row.xml می باشد.
<?xml version="1.0" encoding="utf-8"?>
<RelativeLayout xmlns:android="http://schemas.android.com/apk/res/android"
    android:layout_width="fill_parent"
    android:layout_height="wrap_content"
    android:background="@drawable/list_row_selector"
    android:padding="8dp" >
    <!-- Thumbnail Image -->
    <com.android.volley.toolbox.NetworkImageView
        android:id="@+id/thumbnail"
        android:layout_width="80dp"
        android:layout_height="80dp"
        android:layout_alignParentLeft="true"
        android:layout_marginRight="8dp" />
    <!-- Movie Title -->
    <TextView
        android:id="@+id/title"
        android:layout_width="wrap_content"
        android:layout_height="wrap_content"
        android:layout_alignTop="@+id/thumbnail"
        android:layout_toRightOf="@+id/thumbnail"
        android:textSize="@dimen/title"
        android:textStyle="bold" />
    <!-- Rating -->
    <TextView
        android:id="@+id/rating"
        android:layout_width="fill_parent"
        android:layout_height="wrap_content"
        android:layout_below="@id/title"
        android:layout_marginTop="1dip"
        android:layout_toRightOf="@+id/thumbnail"
        android:textSize="@dimen/rating" />
    <!-- Genre -->
    <TextView
        android:id="@+id/genre"
        android:layout_width="fill_parent"
        android:layout_height="wrap_content"
        android:layout_below="@id/rating"
        android:layout_marginTop="5dp"
        android:layout_toRightOf="@+id/thumbnail"
        android:textColor="@color/genre"
        android:textSize="@dimen/genre" />
    <!-- Release Year -->
    <TextView
        android:id="@+id/releaseYear"
        android:layout_width="wrap_content"
        android:layout_height="wrap_content"
        android:layout_alignParentBottom="true"
        android:layout_alignParentRight="true"
        android:textColor="@color/year"
        android:textSize="@dimen/year" />
</RelativeLayout>
حال یک فولدر به نام util در بخش java ایجاد کرده سپس یه فایل به نام LruBitmapCache.java این کلاس عکس ها را در گوشی کاربر کش ( cache ) می می کند. package name ذکر نشده است ! دقن کنید.
import com.android.volley.toolbox.ImageLoader.ImageCache;
import android.graphics.Bitmap;
import android.support.v4.util.LruCache;
public class LruBitmapCache extends LruCache<String, Bitmap> implements
        ImageCache {
    public static int getDefaultLruCacheSize() {
        final int maxMemory = (int) (Runtime.getRuntime().maxMemory() / 1024);
        final int cacheSize = maxMemory / 8;
        return cacheSize;
    }
    public LruBitmapCache() {
        this(getDefaultLruCacheSize());
    }
    public LruBitmapCache(int sizeInKiloBytes) {
        super(sizeInKiloBytes);
    }
    @Override
    protected int sizeOf(String key, Bitmap value) {
        return value.getRowBytes() * value.getHeight() / 1024;
    }
    @Override
    public Bitmap getBitmap(String url) {
        return get(url);
    }
    @Override
    public void putBitmap(String url, Bitmap bitmap) {
        put(url, bitmap);
    }
}
یک کلاس جاوا به نام AppController.java ایجاد کرده این کلاس یک singleton است و هسته اصلی از object های کتاب خانه volley را به اصلاح بازآغازسازی می کند ( به زبان ساده اجرا می کند)
package info.androidhive.customlistviewvolley.app;
import info.androidhive.customlistviewvolley.util.LruBitmapCache;
import android.app.Application;
import android.text.TextUtils;
import com.android.volley.Request;
import com.android.volley.RequestQueue;
import com.android.volley.toolbox.ImageLoader;
import com.android.volley.toolbox.Volley;
public class AppController extends Application {
    public static final String TAG = AppController.class.getSimpleName();
    private RequestQueue mRequestQueue;
    private ImageLoader mImageLoader;
    private static AppController mInstance;
    @Override
    public void onCreate() {
        super.onCreate();
        mInstance = this;
    }
    public static synchronized AppController getInstance() {
        return mInstance;
    }
    public RequestQueue getRequestQueue() {
        if (mRequestQueue == null) {
            mRequestQueue = Volley.newRequestQueue(getApplicationContext());
        }
        return mRequestQueue;
    }
    public ImageLoader getImageLoader() {
        getRequestQueue();
        if (mImageLoader == null) {
            mImageLoader = new ImageLoader(this.mRequestQueue,
                    new LruBitmapCache());
        }
        return this.mImageLoader;
    }
    public <T> void addToRequestQueue(Request<T> req, String tag) {
        // set the default tag if tag is empty
        req.setTag(TextUtils.isEmpty(tag) ? TAG : tag);
        getRequestQueue().add(req);
    }
    public <T> void addToRequestQueue(Request<T> req) {
        req.setTag(TAG);
        getRequestQueue().add(req);
    }
    public void cancelPendingRequests(Object tag) {
        if (mRequestQueue != null) {
            mRequestQueue.cancelAll(tag);
        }
    }
}
حال باید این کلاس تعریف شده را در بخش androidmanifest برای execute شدن قرار دهیم به شکل زیر می شود.
<application
        android:name=".AppController"
..
.
/>
فایل androidmanifest.xml به شکل زیر می شود. یادتان نرود ما دسترسی اینترنت را اضافه کرده ایم اگر اضافه نشود برنامه force close می دهد.
<?xml version="1.0" encoding="utf-8"?>
<manifest xmlns:android="http://schemas.android.com/apk/res/android"
    package="info.androidhive.customlistviewvolley"
    android:versionCode="1"
    android:versionName="1.0" >
    <uses-sdk
        android:minSdkVersion="11"
        android:targetSdkVersion="18" />
    <uses-permission android:name="android.permission.INTERNET" />
    <application
        android:name="info.androidhive.customlistviewvolley.app.AppController"
        android:allowBackup="true"
        android:icon="@drawable/ic_launcher"
        android:label="@string/app_name"
        android:theme="@style/AppTheme" >
        <activity
            android:name="info.androidhive.customlistviewvolley.MainActivity"
            android:label="@string/app_name" >
            <intent-filter>
                <action android:name="android.intent.action.MAIN" />
                <category android:name="android.intent.category.LAUNCHER" />
            </intent-filter>
        </activity>
    </application>
</manifest>
حالا یه فولدر به نام model در بخش جاوا درست کرده و یک کلاس درون آن فولدر به نام Movie.java ایجاد کنید و کد های زیر را در آن قرار دهید.
package info.androidhive.customlistviewvolley.model;
import java.util.ArrayList;
public class Movie {
    private String title, thumbnailUrl;
    private int year;
    private double rating;
    private ArrayList<String> genre;
    public Movie() {
    }
    public Movie(String name, String thumbnailUrl, int year, double rating,
            ArrayList<String> genre) {
        this.title = name;
        this.thumbnailUrl = thumbnailUrl;
        this.year = year;
        this.rating = rating;
        this.genre = genre;
    }
    public String getTitle() {
        return title;
    }
    public void setTitle(String name) {
        this.title = name;
    }
    public String getThumbnailUrl() {
        return thumbnailUrl;
    }
    public void setThumbnailUrl(String thumbnailUrl) {
        this.thumbnailUrl = thumbnailUrl;
    }
    public int getYear() {
        return year;
    }
    public void setYear(int year) {
        this.year = year;
    }
    public double getRating() {
        return rating;
    }
    public void setRating(double rating) {
        this.rating = rating;
    }
    public ArrayList<String> getGenre() {
        return genre;
    }
    public void setGenre(ArrayList<String> genre) {
        this.genre = genre;
    }
}
حالا باید یک کلاس سفارشی برای feed کردن دیتا به فایل layout_row.xml ایجاد کنیم نام کلاس ما CustomListAdapter.java هست بعد از ایجاد کردن آن کد های زیر را در آن قرار دهید.
package info.androidhive.customlistviewvolley.adater;
import info.androidhive.customlistviewvolley.R;
import info.androidhive.customlistviewvolley.app.AppController;
import info.androidhive.customlistviewvolley.model.Movie;
import java.util.List;
import android.app.Activity;
import android.content.Context;
import android.view.LayoutInflater;
import android.view.View;
import android.view.ViewGroup;
import android.widget.BaseAdapter;
import android.widget.TextView;
import com.android.volley.toolbox.ImageLoader;
import com.android.volley.toolbox.NetworkImageView;
public class CustomListAdapter extends BaseAdapter {
    private Activity activity;
    private LayoutInflater inflater;
    private List<Movie> movieItems;
    ImageLoader imageLoader = AppController.getInstance().getImageLoader();
    public CustomListAdapter(Activity activity, List<Movie> movieItems) {
        this.activity = activity;
        this.movieItems = movieItems;
    }
    @Override
    public int getCount() {
        return movieItems.size();
    }
    @Override
    public Object getItem(int location) {
        return movieItems.get(location);
    }
    @Override
    public long getItemId(int position) {
        return position;
    }
    @Override
    public View getView(int position, View convertView, ViewGroup parent) {
        if (inflater == null)
            inflater = (LayoutInflater) activity
                    .getSystemService(Context.LAYOUT_INFLATER_SERVICE);
        if (convertView == null)
            convertView = inflater.inflate(R.layout.list_row, null);
        if (imageLoader == null)
            imageLoader = AppController.getInstance().getImageLoader();
        NetworkImageView thumbNail = (NetworkImageView) convertView
                .findViewById(R.id.thumbnail);
        TextView title = (TextView) convertView.findViewById(R.id.title);
        TextView rating = (TextView) convertView.findViewById(R.id.rating);
        TextView genre = (TextView) convertView.findViewById(R.id.genre);
        TextView year = (TextView) convertView.findViewById(R.id.releaseYear);
        // getting movie data for the row
        Movie m = movieItems.get(position);
        // thumbnail image
        thumbNail.setImageUrl(m.getThumbnailUrl(), imageLoader);
        // title
        title.setText(m.getTitle());
        // rating
        rating.setText("Rating: " + String.valueOf(m.getRating()));
        // genre
        String genreStr = "";
        for (String str : m.getGenre()) {
            genreStr += str + ", ";
        }
        genreStr = genreStr.length() > 0 ? genreStr.substring(0,
                genreStr.length() - 2) : genreStr;
        genre.setText(genreStr);
        // release year
        year.setText(String.valueOf(m.getYear()));
        return convertView;
    }
}
حال بخش MainActivity را باز کرده و کد های مورد نیاز را اضافه کنید.
package info.androidhive.customlistviewvolley;
import info.androidhive.customlistviewvolley.adater.CustomListAdapter;
import info.androidhive.customlistviewvolley.app.AppController;
import info.androidhive.customlistviewvolley.model.Movie;
import java.util.ArrayList;
import java.util.List;
import org.json.JSONArray;
import org.json.JSONException;
import org.json.JSONObject;
import android.app.Activity;
import android.app.ProgressDialog;
import android.graphics.Color;
import android.graphics.drawable.ColorDrawable;
import android.os.Bundle;
import android.util.Log;
import android.view.Menu;
import android.widget.ListView;
import com.android.volley.Response;
import com.android.volley.VolleyError;
import com.android.volley.VolleyLog;
import com.android.volley.toolbox.JsonArrayRequest;
public class MainActivity extends Activity {
    // Log tag
    private static final String TAG = MainActivity.class.getSimpleName();
    // Movies json url
    private static final String url = "http://api.androidhive.info/json/movies.json";
    private ProgressDialog pDialog;
    private List<Movie> movieList = new ArrayList<Movie>();
    private ListView listView;
    private CustomListAdapter adapter;
    @Override
    protected void onCreate(Bundle savedInstanceState) {
        super.onCreate(savedInstanceState);
        setContentView(R.layout.activity_main);
        listView = (ListView) findViewById(R.id.list);
        adapter = new CustomListAdapter(this, movieList);
        listView.setAdapter(adapter);
        pDialog = new ProgressDialog(this);
        // Showing progress dialog before making http request
        pDialog.setMessage("Loading...");
        pDialog.show();
        // changing action bar color
        getActionBar().setBackgroundDrawable(
                new ColorDrawable(Color.parseColor("#1b1b1b")));
        // Creating volley request obj
        JsonArrayRequest movieReq = new JsonArrayRequest(url,
                new Response.Listener<JSONArray>() {
                    @Override
                    public void onResponse(JSONArray response) {
                        Log.d(TAG, response.toString());
                        hidePDialog();
                        // Parsing json
                        for (int i = 0; i < response.length(); i++) {
                            try {
                                JSONObject obj = response.getJSONObject(i);
                                Movie movie = new Movie();
                                movie.setTitle(obj.getString("title"));
                                movie.setThumbnailUrl(obj.getString("image"));
                                movie.setRating(((Number) obj.get("rating"))
                                        .doubleValue());
                                movie.setYear(obj.getInt("releaseYear"));
                                // Genre is json array
                                JSONArray genreArry = obj.getJSONArray("genre");
                                ArrayList<String> genre = new ArrayList<String>();
                                for (int j = 0; j < genreArry.length(); j++) {
                                    genre.add((String) genreArry.get(j));
                                }
                                movie.setGenre(genre);
                                // adding movie to movies array
                                movieList.add(movie);
                            } catch (JSONException e) {
                                e.printStackTrace();
                            }
                        }
                        // notifying list adapter about data changes
                        // so that it renders the list view with updated data
                        adapter.notifyDataSetChanged();
                    }
                }, new Response.ErrorListener() {
                    @Override
                    public void onErrorResponse(VolleyError error) {
                        VolleyLog.d(TAG, "Error: " + error.getMessage());
                        hidePDialog();
                    }
                });
        // Adding request to request queue
        AppController.getInstance().addToRequestQueue(movieReq);
    }
    @Override
    public void onDestroy() {
        super.onDestroy();
        hidePDialog();
    }
    private void hidePDialog() {
        if (pDialog != null) {
            pDialog.dismiss();
            pDialog = null;
        }
    }
    @Override
    public boolean onCreateOptionsMenu(Menu menu) {
        // Inflate the menu; this adds items to the action bar if it is present.
        getMenuInflater().inflate(R.menu.main, menu);
        return true;
    }
}
دوستان به پایان رسید فقط دوستان دیگه بیشتر از این امکان توضیح وجود ندارد اگر بخواهیم هر بخش را به صورت کلی توضیح دهیم حداقل صفحه نیاز به توضیح دارد ولی در آینده ای نزدیک تمامی بخش ها رو توضیح خواهیم داد.