 آموزش برنامه نویسی اندروید |
ایجاد widget شناور برای اپلیکیشن اندروید
سلام به کاربران عزیز سایت programchi شاید بهتر باشد کمی درمورد ساخت صفحه material desgin بحث کنیم . متریال دیزاین جز مبحث های مهم در طراحی اپلیکیشن اندروید است و هرچقدر شما در بخش کدنویسی مهارت داشته باشید تا زمانی که نتوانید یک صفحه را به صورت متریال دیزان پیاده سازی کنید برنامه شما مورد قبول هیچ کس واقع نخواهد شد و یکی از قوانین ثبت اپلیکیشن در google play متریال دیزاین بودن آن است.در این بخش به آموزش ایجاد widget شناور برای اپلیکیشن اندروید می پردازیم.
ابتدا بهتر است شکل نهایی را ببینید تا کمی با آن آشناییت پیدا کنید.
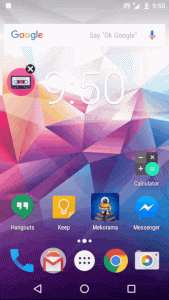
حال یک پروژه جدید ایجاد کرده سپس از این لینک فایل مورد نیاز را دانلود کرده و در پوشه res خود قرار دهید.این فایل شامل تمامی عکس های مورد نیاز و استفاده شده در این پروژه است.
یک فیل به نام layout_floating_widget.xml ایجاد کرده و کد های زیر را در آن قرار دهید و یم توضیح کوچولو بدم در مورد محتویات داخلی این اکتیویتی در کل این اکتیویتی شامل دو بخش می شود :
- Collapsed view
- Expanded View
<?xml version="1.0" encoding="utf-8"?>
<FrameLayout
    xmlns:android="http://schemas.android.com/apk/res/android"
    xmlns:tools="http://schemas.android.com/tools"
    android:layout_width="wrap_content"
    android:layout_height="wrap_content">
    <!--Root container-->
    <RelativeLayout
        android:id="@+id/root_container"
        android:layout_width="wrap_content"
        android:layout_height="wrap_content"
        tools:ignore="UselessParent">
        <!--View while view is collapsed-->
        <RelativeLayout
            android:id="@+id/collapse_view"
            android:layout_width="wrap_content"
            android:visibility="visible"
            android:layout_height="wrap_content"
            android:orientation="vertical">
            <!--Icon of floating widget -->
            <ImageView
                android:id="@+id/collapsed_iv"
                android:layout_width="60dp"
                android:layout_height="60dp"
                android:layout_marginTop="8dp"
                android:src="@drawable/ic_android_circle"
                tools:ignore="ContentDescription"/>
            <!--Close button-->
            <ImageView
                android:id="@+id/close_btn"
                android:layout_width="20dp"
                android:layout_height="20dp"
                android:layout_marginLeft="40dp"
                android:src="@drawable/ic_close"
                tools:ignore="ContentDescription"/>
        </RelativeLayout>
        <!--View while view is expanded-->
        <LinearLayout
            android:id="@+id/expanded_container"
            android:layout_width="wrap_content"
            android:layout_height="wrap_content"
            android:background="#F8BBD0"
            android:visibility="gone"
            android:orientation="horizontal"
            android:padding="8dp">
            <!--Album image for the song currently playing.-->
            <ImageView
                android:layout_width="80dp"
                android:layout_height="80dp"
                android:src="@drawable/music_player"
                tools:ignore="ContentDescription"/>
            <!--Previous button-->
            <ImageView
                android:id="@+id/prev_btn"
                android:layout_width="30dp"
                android:layout_height="30dp"
                android:layout_gravity="center_vertical"
                android:layout_marginLeft="20dp"
                android:src="@mipmap/ic_previous"
                tools:ignore="ContentDescription"/>
            <!--Play button-->
            <ImageView
                android:id="@+id/play_btn"
                android:layout_width="50dp"
                android:layout_height="50dp"
                android:layout_gravity="center_vertical"
                android:layout_marginLeft="10dp"
                android:src="@mipmap/ic_play"
                tools:ignore="ContentDescription"/>
            <!--Next button-->
            <ImageView
                android:id="@+id/next_btn"
                android:layout_width="30dp"
                android:layout_height="30dp"
                android:layout_gravity="center_vertical"
                android:layout_marginLeft="10dp"
                android:src="@mipmap/ic_play_next"
                tools:ignore="ContentDescription"/>
            <RelativeLayout
                android:layout_width="wrap_content"
                android:layout_height="match_parent"
                android:orientation="vertical">
                <ImageView
                    android:id="@+id/close_button"
                    android:layout_width="20dp"
                    android:layout_height="20dp"
                    android:src="@drawable/ic_close"/>
                <ImageView
                    android:id="@+id/open_button"
                    android:layout_width="20dp"
                    android:layout_height="20dp"
                    android:layout_alignParentBottom="true"
                    android:src="@drawable/ic_open"/>
            </RelativeLayout>
        </LinearLayout>
    </RelativeLayout>
</FrameLayout>
حال زمان ایجاد widget و هندل کردن درگ (جابه جایی) هستیم.
import android.app.Service;
import android.content.Intent;
import android.graphics.PixelFormat;
import android.opengl.Visibility;
import android.os.IBinder;
import android.view.Gravity;
import android.view.LayoutInflater;
import android.view.MotionEvent;
import android.view.View;
import android.view.WindowManager;
import android.widget.ImageView;
import android.widget.Toast;
public class FloatingViewService extends Service {
   private WindowManager mWindowManager;
   private View mFloatingView;
   public FloatingViewService() {
   }
   @Override
   public IBinder onBind(Intent intent) {
       return null;
   }
   @Override
   public void onCreate() {
       super.onCreate();
       //Inflate the floating view layout we created
       mFloatingView = LayoutInflater.from(this).inflate(R.layout.layout_floating_widget, null);
       //Add the view to the window.
       final WindowManager.LayoutParams params = new WindowManager.LayoutParams(
               WindowManager.LayoutParams.WRAP_CONTENT,
               WindowManager.LayoutParams.WRAP_CONTENT,
               WindowManager.LayoutParams.TYPE_PHONE,
               WindowManager.LayoutParams.FLAG_NOT_FOCUSABLE,
               PixelFormat.TRANSLUCENT);
       //Specify the view position
       params.gravity = Gravity.TOP | Gravity.LEFT;        //Initially view will be added to top-left corner
       params.x = 0;
       params.y = 100;
       //Add the view to the window
       mWindowManager = (WindowManager) getSystemService(WINDOW_SERVICE);
       mWindowManager.addView(mFloatingView, params);
       //The root element of the collapsed view layout
       final View collapsedView = mFloatingView.findViewById(R.id.collapse_view);
       //The root element of the expanded view layout
       final View expandedView = mFloatingView.findViewById(R.id.expanded_container);
       //Set the close button
       ImageView closeButtonCollapsed = (ImageView) mFloatingView.findViewById(R.id.close_btn);
       closeButtonCollapsed.setOnClickListener(new View.OnClickListener() {
           @Override
           public void onClick(View view) {
               //close the service and remove the from from the window
               stopSelf();
           }
       });
       //Set the view while floating view is expanded.
       //Set the play button.
       ImageView playButton = (ImageView) mFloatingView.findViewById(R.id.play_btn);
       playButton.setOnClickListener(new View.OnClickListener() {
           @Override
           public void onClick(View v) {
               Toast.makeText(FloatingViewService.this, "Playing the song.", Toast.LENGTH_LONG).show();
           }
       });
       //Set the next button.
       ImageView nextButton = (ImageView) mFloatingView.findViewById(R.id.next_btn);
       nextButton.setOnClickListener(new View.OnClickListener() {
           @Override
           public void onClick(View v) {
               Toast.makeText(FloatingViewService.this, "Playing next song.", Toast.LENGTH_LONG).show();
           }
       });
       //Set the pause button.
       ImageView prevButton = (ImageView) mFloatingView.findViewById(R.id.prev_btn);
       prevButton.setOnClickListener(new View.OnClickListener() {
           @Override
           public void onClick(View v) {
               Toast.makeText(FloatingViewService.this, "Playing previous song.", Toast.LENGTH_LONG).show();
           }
       });
       //Set the close button
       ImageView closeButton = (ImageView) mFloatingView.findViewById(R.id.close_button);
       closeButton.setOnClickListener(new View.OnClickListener() {
           @Override
           public void onClick(View view) {
               collapsedView.setVisibility(View.VISIBLE);
               expandedView.setVisibility(View.GONE);
           }
       });
       //Open the application on thi button click
       ImageView openButton = (ImageView) mFloatingView.findViewById(R.id.open_button);
       openButton.setOnClickListener(new View.OnClickListener() {
           @Override
           public void onClick(View view) {
               //Open the application  click.
               Intent intent = new Intent(FloatingViewService.this, MainActivity.class);
               intent.addFlags(Intent.FLAG_ACTIVITY_NEW_TASK);
               startActivity(intent);
               //close the service and remove view from the view hierarchy
               stopSelf();
           }
       });
       //Drag and move floating view using user's touch action.
       mFloatingView.findViewById(R.id.root_container).setOnTouchListener(new View.OnTouchListener() {
           private int initialX;
           private int initialY;
           private float initialTouchX;
           private float initialTouchY;
           @Override
           public boolean onTouch(View v, MotionEvent event) {
               switch (event.getAction()) {
                   case MotionEvent.ACTION_DOWN:
                       //remember the initial position.
                       initialX = params.x;
                       initialY = params.y;
                       //get the touch location
                       initialTouchX = event.getRawX();
                       initialTouchY = event.getRawY();
                       return true;
                   case MotionEvent.ACTION_UP:
                       int Xdiff = (int) (event.getRawX() - initialTouchX);
                       int Ydiff = (int) (event.getRawY() - initialTouchY);
                       //The check for Xdiff <10 && YDiff< 10 because sometime elements moves a little while clicking.
                       //So that is click event.
                       if (Xdiff < 10 && Ydiff < 10) {
                           if (isViewCollapsed()) {
                               //When user clicks on the image view of the collapsed layout,
                               //visibility of the collapsed layout will be changed to "View.GONE"
                               //and expanded view will become visible.
                               collapsedView.setVisibility(View.GONE);
                               expandedView.setVisibility(View.VISIBLE);
                           }
                       }
                       return true;
                   case MotionEvent.ACTION_MOVE:
                       //Calculate the X and Y coordinates of the view.
                       params.x = initialX + (int) (event.getRawX() - initialTouchX);
                       params.y = initialY + (int) (event.getRawY() - initialTouchY);
                       //Update the layout with new X & Y coordinate
                       mWindowManager.updateViewLayout(mFloatingView, params);
                       return true;
               }
               return false;
           }
       });
   }
   /**
    * Detect if the floating view is collapsed or expanded.
    *
    * @return true if the floating view is collapsed.
    */
   private boolean isViewCollapsed() {
       return mFloatingView == null || mFloatingView.findViewById(R.id.collapse_view).getVisibility() == View.VISIBLE;
   }
   @Override
   public void onDestroy() {
       super.onDestroy();
       if (mFloatingView != null) mWindowManager.removeView(mFloatingView);
   }
}
حال زمان اضافه کردن دسترسی برای ایجاد widget برروی صفحه گوشی کاربر است.
فایل AndroidManifest.xml را باز کرده و سپس کد زیر را درآن قرار دهید دقت کنید این کد باید قبل از باز شدن تگ application قرار گیرد.
<uses-permission android:name="android.permission.SYSTEM_ALERT_WINDOW"/>
و باید کد زیر را درون تگ application قرار دهیم این کد یک سرویس است ما این سرویس را دربالا ایجاد کردیم حال زمان استفاده از آن است.
<service
            android:name=".FloatingViewService"
            android:enabled="true"
            android:exported="false"/>
و در آخر هم بخش Mainactivity.java به شکل پایین می شود.
import android.content.Intent;
import android.net.Uri;
import android.os.Build;
import android.os.Bundle;
import android.provider.Settings;
import android.support.v7.app.AppCompatActivity;
import android.view.View;
import android.widget.Toast;
public class MainActivity extends AppCompatActivity {
   private static final int CODE_DRAW_OVER_OTHER_APP_PERMISSION = 2084;
   @Override
   protected void onCreate(Bundle savedInstanceState) {
       super.onCreate(savedInstanceState);
       setContentView(R.layout.activity_main);
       //Check if the application has draw over other apps permission or not?
       //This permission is by default available for API<23. But for API > 23
       //you have to ask for the permission in runtime.
       if (Build.VERSION.SDK_INT >= Build.VERSION_CODES.M && !Settings.canDrawOverlays(this)) {
           //If the draw over permission is not available open the settings screen
           //to grant the permission.
           Intent intent = new Intent(Settings.ACTION_MANAGE_OVERLAY_PERMISSION,
                   Uri.parse("package:" + getPackageName()));
           startActivityForResult(intent, CODE_DRAW_OVER_OTHER_APP_PERMISSION);
       } else {
           initializeView();
       }
   }
   /**
    * Set and initialize the view elements.
    */
   private void initializeView() {
       findViewById(R.id.notify_me).setOnClickListener(new View.OnClickListener() {
           @Override
           public void onClick(View view) {
               startService(new Intent(MainActivity.this, FloatingViewService.class));
               finish();
           }
       });
   }
   @Override
   protected void onActivityResult(int requestCode, int resultCode, Intent data) {
       if (requestCode == CODE_DRAW_OVER_OTHER_APP_PERMISSION) {
           //Check if the permission is granted or not.
           if (resultCode == RESULT_OK) {
               initializeView();
           } else { //Permission is not available
               Toast.makeText(this,
                       "Draw over other app permission not available. Closing the application",
                       Toast.LENGTH_SHORT).show();
               finish();
           }
       } else {
           super.onActivityResult(requestCode, resultCode, data);
       }
   }
برنامه به اتمام رسید ! tada مطمئن هستم به کارتون میاد هر وقت استفاده کردید به یاد ما باشید.
سلام وقت بخیر
یک view به اسم notify_me هستش ولی توی ریسورس ها همچین ویوی وجود نداره، متوجه هم نشدم که از چه نوع ویویی هستش که بسازمش.
چه نوعی هستش و کجا باید بذارمش ؟؟
ممنونم
سلام
یک دکمه در اکتیویتی تعریف کنید با آیدی notify_me
با تشکر از آموزش بسیار مفیدتون
این کد نیاز به یک تغییر در اندروید 8 داشت که در زیر درج کرده ام.
int layoutType;
if(Build.VERSION.SDK_INT < Build.VERSION_CODES.M) {
layoutType = WindowManager.LayoutParams.TYPE_PHONE;
} else {
layoutType = WindowManager.LayoutParams.TYPE_APPLICATION_OVERLAY;
}
//Add the view to the window.
final WindowManager.LayoutParams params = new WindowManager.LayoutParams(
WindowManager.LayoutParams.WRAP_CONTENT,
WindowManager.LayoutParams.WRAP_CONTENT,
layoutType,
WindowManager.LayoutParams.FLAG_NOT_FOCUSABLE,
PixelFormat.TRANSLUCENT);
با سلام و تشکر بابت مطالب مفید سایتتون
کدی که نوشتید یه ایراد کوچولو داره
که باعث میشه برنامه روی اندروید 6 و 7 اجرا نشه
برای اصلاحش
Build.VERSION_CODES.M
باید بشه
Build.VERSION_CODES.O