 آموزش برنامه نویسی اندروید |
اپلود عکس به سرور در اندروید
سلام
با سری از آموزش های اندروید باز برگشیتم این بار می خواهیم اپلود عکس به سرور رو آموزش بدیم.جزو سری از آموزش های پر مخاطب هست.
خب اول کار ما باید بخش اتصال به سرور رو درست کنیم ما برای این کار از xampp استفاده میکنیم و فرقی نمیکه با چه برنامه ای شما این کار رو می کنید و بگم این آموزش رو در سمت سرور نیز می تونید پیاده سازی کنید چون هیچ چیزی فرق نمی کنه در دو طرف. خب یک فایل به نام dbDetails.php ایجاد کنید و اطلاعات زیر را در آن وارد کنید.
<?php
define('HOST','localhost');
define('USER','root');
define('PASS','');
define('DB','db_images');
در بالا شما باید اطلاعات دیتابیسی که ساختید را قرار بدید (برای ایجاد دیتابیس یه سرچ کوچک بکنید !). (localhost نیاز به تغییر ندارد !)
بخش دیتا بیس به شکل زیر می شود. همه چیز را همانند شکل زیر تنظیم کنید.

سپس یه فایل به نام upload.php ایجاد کرده و کد زیر را در آن قرار دهید.
<?php
 //importing dbDetails file
 require_once 'dbDetails.php';
 //this is our upload folder
 $upload_path = 'uploads/';
 //Getting the server ip
 $server_ip = gethostbyname(gethostname());
 //creating the upload url
 $upload_url = 'http://'.$server_ip.'/AndroidImageUpload/'.$upload_path;
 //response array
 $response = array();
 if($_SERVER['REQUEST_METHOD']=='POST'){
 //checking the required parameters from the request
 if(isset($_POST['name']) and isset($_FILES['image']['name'])){
 //connecting to the database
 $con = mysqli_connect(HOST,USER,PASS,DB) or die('Unable to Connect...');
 //getting name from the request
 $name = $_POST['name'];
 //getting file info from the request
 $fileinfo = pathinfo($_FILES['image']['name']);
 //getting the file extension
 $extension = $fileinfo['extension'];
 //file url to store in the database
 $file_url = $upload_url . getFileName() . '.' . $extension;
 //file path to upload in the server
 $file_path = $upload_path . getFileName() . '.'. $extension;
 //trying to save the file in the directory
 try{
 //saving the file
 move_uploaded_file($_FILES['image']['tmp_name'],$file_path);
 $sql = "INSERT INTO `db_images`.`images` (`id`, `url`, `name`) VALUES (NULL, '$file_url', '$name');";
 //adding the path and name to database
 if(mysqli_query($con,$sql)){
 //filling response array with values
 $response['error'] = false;
 $response['url'] = $file_url;
 $response['name'] = $name;
 }
 //if some error occurred
 }catch(Exception $e){
 $response['error']=true;
 $response['message']=$e->getMessage();
 }
 //displaying the response
 echo json_encode($response);
 //closing the connection
 mysqli_close($con);
 }else{
 $response['error']=true;
 $response['message']='Please choose a file';
 }
 }
 /*
 We are generating the file name
 so this method will return a file name for the image to be upload
 */
 function getFileName(){
 $con = mysqli_connect(HOST,USER,PASS,DB) or die('Unable to Connect...');
 $sql = "SELECT max(id) as id FROM images";
 $result = mysqli_fetch_array(mysqli_query($con,$sql));
 mysqli_close($con);
 if($result['id']==null)
 return 1;
 else
 return ++$result['id'];
 }
ما در اینجا از یک script که به زبان php نوشته شده است برای اپلود عکس استفاده می کنیم.
حالا زمان تست script رسیده است ما با استفاده از rest client به نام postman این بخش را چک می کنم.
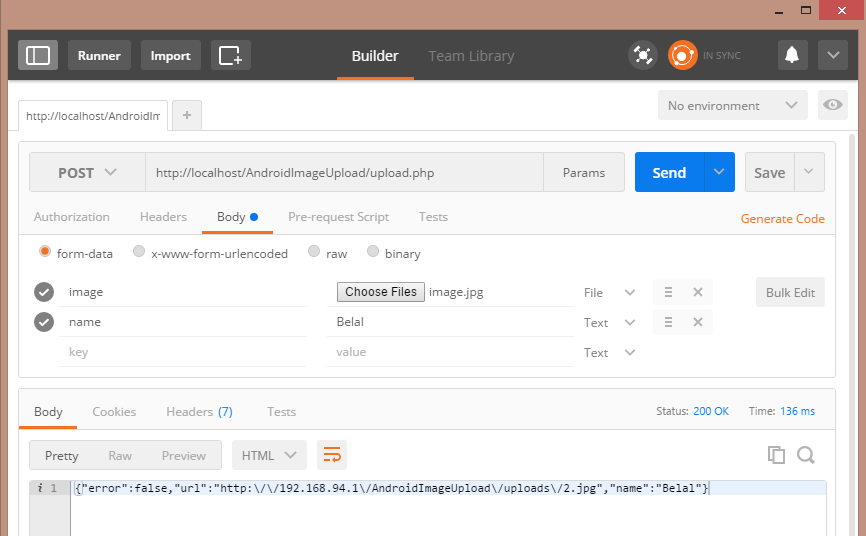
در بالا ما یک عکس را انتخاب کرده و به sctipt خود ارسال می کنیم
اگر دیتا به دیتابیس ارسال شود شما می توانید با چک کردن دیتابیس از کارکردن کد خود اطمینان خاطر پیدا کنید.
فایل دوم برای دریافت عکس است پس یک فایل به نام getImages.php ایجاد کرده و کد های زیر را در آن قرار دهید.
<?php
 require_once 'dbDetails.php';
 $con = mysqli_connect(HOST,USER,PASS,DB) or die('Unable to Connect...');
 $sql = "SELECT * FROM images";
 $result = mysqli_query($con,$sql);
 $response = array();
 $response['error'] = false;
 $response['images'] = array();
 while($row = mysqli_fetch_array($result)){
 $temp = array();
 $temp['id']=$row['id'];
 $temp['name']=$row['name'];
 $temp['url']=$row['url'];
 array_push($response['images'],$temp);
 }
 echo json_encode($response);
همانطور که گفتیم کد بالا برای دریافت عکس مورد استفاده قرار می گیرد.
خب بخش php به پایان رسید حالا زمان ساخت پروژه اندرویدیست یک پروژه ایجاد کرده و یک کلاس به نام Constants.java ایجاد کرده و کد زیرا را در آن قرار دهید.
/**
 * Created by Jfp on 6/10/2016.
 */
public class Constants {
    public static final String UPLOAD_URL = "http://192.168.94.1/AndroidImageUpload/upload.php";
    public static final String IMAGES_URL = "http://192.168.94.1/AndroidImageUpload/getImages.php";
}
دقت کنید در بالا ایپی local من قرار دارد برای به دست اوردن ایپی local خود در cmd کد IPCONFIG را تایپ کرده و ایپی خود را جایگزین کنید. و دقت کنید فایل ها را من در فولدری به نام AndroidImageUpload قرار داده ام.
حالا فایل build.gradle را باز کرده و به این شکل تغییر دهید.
dependencies {
    compile fileTree(dir: 'libs', include: ['*.jar'])
    testCompile 'junit:junit:4.12'
    compile 'com.android.support:appcompat-v7:23.4.0'
    compile 'net.gotev:uploadservice:2.1'
}
فقط باید یک خط بالا را قرار دهید براتون کامنت گذاشتم پروژه را بزنید sync شود (در صورتی که در sync شدن برنامه مشکل دارید این مطلب را مطالعه کنید).
تا اینجا که خوب پیش رفتیم
فایل activity_main.xml ما به این شکل می شود.
<?xml version="1.0" encoding="utf-8"?>
<LinearLayout xmlns:android="http://schemas.android.com/apk/res/android"
    xmlns:tools="http://schemas.android.com/tools"
    android:layout_width="match_parent"
    android:layout_height="match_parent"
    android:orientation="vertical"
    android:paddingBottom="@dimen/activity_vertical_margin"
    android:paddingLeft="@dimen/activity_horizontal_margin"
    android:paddingRight="@dimen/activity_horizontal_margin"
    android:paddingTop="@dimen/activity_vertical_margin"
    tools:context="net.simplifiedcoding.androidimageupload.MainActivity">
    <LinearLayout
        android:gravity="center_horizontal"
        android:layout_width="match_parent"
        android:layout_height="wrap_content"
        android:orientation="horizontal">
        <Button
            android:id="@+id/buttonChoose"
            android:layout_width="wrap_content"
            android:layout_height="wrap_content"
            android:text="Select" />
        <EditText
            android:id="@+id/editTextName"
            android:hint="Name For Image"
            android:layout_weight="1"
            android:layout_width="wrap_content"
            android:layout_height="wrap_content" />
        <Button
            android:id="@+id/buttonUpload"
            android:layout_width="wrap_content"
            android:layout_height="wrap_content"
            android:text="Upload" />
    </LinearLayout>
    <ImageView
        android:id="@+id/imageView"
        android:layout_width="match_parent"
        android:layout_height="match_parent" />
</LinearLayout>
و بخش Mainactivity.java
import android.Manifest;
import android.content.Intent;
import android.content.pm.PackageManager;
import android.database.Cursor;
import android.graphics.Bitmap;
import android.net.Uri;
import android.os.Bundle;
import android.provider.MediaStore;
import android.support.annotation.NonNull;
import android.support.v4.app.ActivityCompat;
import android.support.v4.content.ContextCompat;
import android.support.v7.app.AppCompatActivity;
import android.view.View;
import android.widget.Button;
import android.widget.EditText;
import android.widget.ImageView;
import android.widget.Toast;
import net.gotev.uploadservice.MultipartUploadRequest;
import net.gotev.uploadservice.UploadNotificationConfig;
import java.io.IOException;
import java.util.UUID;
public class MainActivity extends AppCompatActivity implements View.OnClickListener {
    private Button buttonChoose;
    private Button buttonUpload;
    private ImageView imageView;
    private EditText editText;
    //Image request code
    private int PICK_IMAGE_REQUEST = 1;
    private static final int STORAGE_PERMISSION_CODE = 123;
    //Bitmap to get image from gallery
    private Bitmap bitmap;
    //Uri to store the image uri
    private Uri filePath;
    @Override
    protected void onCreate(Bundle savedInstanceState) {
        super.onCreate(savedInstanceState);
        setContentView(R.layout.activity_main);
        //Requesting storage permission
        requestStoragePermission();
        //Initializing views
        buttonChoose = (Button) findViewById(R.id.buttonChoose);
        buttonUpload = (Button) findViewById(R.id.buttonUpload);
        imageView = (ImageView) findViewById(R.id.imageView);
        editText = (EditText) findViewById(R.id.editTextName);
        //Setting clicklistener
        buttonChoose.setOnClickListener(this);
        buttonUpload.setOnClickListener(this);
    }
    /*
    * This is the method responsible for image upload
    * We need the full image path and the name for the image in this method
    * */
    public void uploadMultipart() {
        //getting name for the image
        String name = editText.getText().toString().trim();
        //getting the actual path of the image
        String path = getPath(filePath);
        //Uploading code
        try {
            String uploadId = UUID.randomUUID().toString();
            //Creating a multi part request
            new MultipartUploadRequest(this, uploadId, Constants.UPLOAD_URL)
                    .addFileToUpload(path, "image") //Adding file
                    .addParameter("name", name) //Adding text parameter to the request
                    .setNotificationConfig(new UploadNotificationConfig())
                    .setMaxRetries(2)
                    .startUpload(); //Starting the upload
        } catch (Exception exc) {
            Toast.makeText(this, exc.getMessage(), Toast.LENGTH_SHORT).show();
        }
    }
    //method to show file chooser
    private void showFileChooser() {
        Intent intent = new Intent();
        intent.setType("image/*");
        intent.setAction(Intent.ACTION_GET_CONTENT);
        startActivityForResult(Intent.createChooser(intent, "Select Picture"), PICK_IMAGE_REQUEST);
    }
    //handling the image chooser activity result
    @Override
    protected void onActivityResult(int requestCode, int resultCode, Intent data) {
        super.onActivityResult(requestCode, resultCode, data);
        if (requestCode == PICK_IMAGE_REQUEST && resultCode == RESULT_OK && data != null && data.getData() != null) {
            filePath = data.getData();
            try {
                bitmap = MediaStore.Images.Media.getBitmap(getContentResolver(), filePath);
                imageView.setImageBitmap(bitmap);
            } catch (IOException e) {
                e.printStackTrace();
            }
        }
    }
    //method to get the file path from uri
    public String getPath(Uri uri) {
        Cursor cursor = getContentResolver().query(uri, null, null, null, null);
        cursor.moveToFirst();
        String document_id = cursor.getString(0);
        document_id = document_id.substring(document_id.lastIndexOf(":") + 1);
        cursor.close();
        cursor = getContentResolver().query(
                android.provider.MediaStore.Images.Media.EXTERNAL_CONTENT_URI,
                null, MediaStore.Images.Media._ID + " = ? ", new String[]{document_id}, null);
        cursor.moveToFirst();
        String path = cursor.getString(cursor.getColumnIndex(MediaStore.Images.Media.DATA));
        cursor.close();
        return path;
    }
    //Requesting permission
    private void requestStoragePermission() {
        if (ContextCompat.checkSelfPermission(this, Manifest.permission.READ_EXTERNAL_STORAGE) == PackageManager.PERMISSION_GRANTED)
            return;
        if (ActivityCompat.shouldShowRequestPermissionRationale(this, Manifest.permission.READ_EXTERNAL_STORAGE)) {
            //If the user has denied the permission previously your code will come to this block
            //Here you can explain why you need this permission
            //Explain here why you need this permission
        }
        //And finally ask for the permission
        ActivityCompat.requestPermissions(this, new String[]{Manifest.permission.READ_EXTERNAL_STORAGE}, STORAGE_PERMISSION_CODE);
    }
    //This method will be called when the user will tap on allow or deny
    @Override
    public void onRequestPermissionsResult(int requestCode, @NonNull String[] permissions, @NonNull int[] grantResults) {
        //Checking the request code of our request
        if (requestCode == STORAGE_PERMISSION_CODE) {
            //If permission is granted
            if (grantResults.length > 0 && grantResults[0] == PackageManager.PERMISSION_GRANTED) {
                //Displaying a toast
                Toast.makeText(this, "Permission granted now you can read the storage", Toast.LENGTH_LONG).show();
            } else {
                //Displaying another toast if permission is not granted
                Toast.makeText(this, "Oops you just denied the permission", Toast.LENGTH_LONG).show();
            }
        }
    }
    @Override
    public void onClick(View v) {
        if (v == buttonChoose) {
            showFileChooser();
        }
        if (v == buttonUpload) {
            uploadMultipart();
        }
    }
}
برای کاربران توضیحات اضافی رو کامنت کردم !
و در آخر باید دسترسی یا Permission های زیر را به بخش AndroidManifest.xml اضافه کنیم که به شکل زیر می شود.
<?xml version="1.0" encoding="utf-8"?>
<manifest xmlns:android="http://schemas.android.com/apk/res/android"
    package="net.simplifiedcoding.androidimageupload">
    <!-- add these permissions -->
    <uses-permission android:name="android.permission.INTERNET" />
    <uses-permission android:name="android.permission.READ_EXTERNAL_STORAGE" />
    <application
        android:allowBackup="true"
        android:icon="@mipmap/ic_launcher"
        android:label="@string/app_name"
        android:supportsRtl="true"
        android:theme="@style/AppTheme">
        <activity android:name=".MainActivity">
            <intent-filter>
                <action android:name="android.intent.action.MAIN" />
                <category android:name="android.intent.category.LAUNCHER" />
            </intent-filter>
        </activity>
    </application>
</manifest>
و تمام شد ! wow
انشاالله آموزش کامل و جامع و مفیدی بوده باشه.







سلام
در قسمت Constants.java فایل getiamge.php تو سایت در این قسمت آورده نشده مثل فایل آپلود بدون این فایل چطور اطلاعاتو بگیریم از سرور.لطفا کامل کنید ممنون.
کد تکمیل شد .
سلام خسته نباشید
ولی هیچ جا از IMAGES_URL که در Constants قرار دادید استفاده نشده !
سلام خسته نباشید
من در این اموزش یه مشکل دارم که داخل سایر اموزش های آپلود کردن عکس و متن به سرور داشتم
اپلود انجام میشه و در برنامه پیغام موفقیت آپلود داده میشه !
در جدول دیتا بیس یه سطر جدید با آیدی جدید و عنوان ارسالی و لینک عکس وجود داره و اضافه شده !
ولی من به عکس ارسالی دسترسی ندارم ! یعنی اون لینک هم فقط ایجاد شده و در اون مسیر عکسی وجود نداره !
اون عکس باید داخل همون فولدر داخل هاست باشه ؟ فولدر به صورت ساب دامین درست کردم !
ممنون میشم راهنمایی کنید .
سلام و تشکر
یه سوال داشتم برای اینکه متن فارسی بشه ارسال کرد باید چیکار کرد ؟
البته ارسال میشه ولی موقع نمایش به جاش علامت سوال میزاره
داخل جدول برای قسمت عنوان utf8_persian_ci فعال کردم
ولی انگار باید داخل کد تغییری داد !
خواهشا راهنمایی کنید ممنون .
این کد رو یه لاین قبل از کوئزی قرار بده: $conn->set_charset(“utf8”);
سلام خیلی ممنون بابت اموزش عالی
دو سوال داشتم. اگر بخواهم که قبل از ارسال نام عکس را عوض کنم که مانند اپ های اگهی اگر کاربر ها تصاویر اپلود کردند نام یکسان مشکلی ایجاد نکند باید به چه صورت عمل کنم و بهترین کار تعویض نام در سمت اپ اندرویدی هست و یا سرور؟
سوال دوم
برای اپلود اگر نیاز باشد که تصویرم را کامپرس کنم باید به چه صورت عمل کنم جستجو هایی کردم منتها در ان ها یک تصویر را فشرده می کردند و در یک شی از نوع بیت مپ می ریختند دیگر نمی دانم باید ادرس ان بیتمپ فشرده شده را بگیرم و ارسال کنم و بعد ان را پاک کنم و یا اینکه چه مسیری را باید بروم ممنون می شم استاد عزیز راهنمایی بفرمایید.
خدا قوت
سلام و دورد
در جواب سوال اول شما می توانید نام فایل را همین طرف ویراش کرده سپس آن را ارسال کنید.
و در جواب به سوال دوم فشرده سازی قبلا در سایت قرار گرفته است از جستجو کنید (فشرده سازی عکس)
موفق باشید.
ممنون بابت پاسخگویی بنده بررسی کردم اموزش فشرده سازی را منتها یک مشکلی هست وقتی عکس را از گالری انتخاب می کنم ان را به داخل متد فشرده سازی ارسال می کنم و یک بیتمپ دارم منتها برای ارسال مولتی پارت نیاز به یک ادرس دارم که برای ان هم URI را به ادرس تبدیل می کنم منتها عکس فشرده شده که یک ابجکت بیتمپ هست را نمی دنم به چه صورتی ادرسش را بدست بیاورم که بتوانم آن را به صورت مولتی پارت اپلود کنم
سلام .من احتیاج به کمک دارم…
کدهارو اضافه کردم..همه چیز اکیه…
حالا کد Php رو که با postman تست میکنم عکس ذخیره میشه..ولی از سمت اپ اندرویدم نه!
ازسمت برنامه که تست میکنم جدول image فقط آپدیت میشه و عکسی ذخیره نمیشه..
سلام کد بررسی شده و مشکلی ندارد به صورت debug جلو رفته و خطا داخلی رو حل کنید و runtime permission برای اندروید 6 به بالا فراموش نشود.
موفق باشید.
سلام خسته نباشید در این جا دقیقا چه مشخصاتی باید وار بشه؟
?>php
define('HOST','localhost');
define('USER','android');
define('PASS','12345');
define('DB','biterium_android_db');
دراجرا این خطارو میده
Warning: mysqli_connect(): (28000/1045): Access denied for user 'android'@'localhost' (using password: YES) in /home/biterium/public_html/getImages.php on line 5
Unable to Connect…
اگر در local دارید تست می گیرید که باید از مشخصات دیتابیسی را که در xampp یا wamp درست کردید قرار دهید به ترتیت از بالا به پایین
localhost
نام یوزر دیتابیستون
پسورد یوزر دیتابیستون
نام اصلی دیتابیستون
اگر در سرور در حال تست گیری هستید باید اطلاعات مورد نظر دیتابیسی که در سرور ساختید را قرار دهید.
چرا هیچ کجا از این دستور استفاده نشده؟
public static final String IMAGES_URL = “http://www/getImages.php”;
می تونید استفاده کنید !
همه چی به خوبی کار میکنه فقط درون دیتابیس اضافه نمیشه
#1048 – Column ‘id’ cannot be null
null قبول نمیکنه شماره هم میدم بجای null فقط یکی ساخته میشه
باید auto generate قرار دهید.
با سلام و تشکر از شما
من انجام دادم موفق شدم اپلود کنم
ولی سرور ما احراز هویت رو عوض کرد هر کاری میکنم درست نمیشه مثل قبل
“Cookie” , “PHP_AUTH_USER=”+Global.user.toString()+”; PHP_AUTH_PW=”+Global.pass.toString()
این احراز هوین منه
نمیدونم باید چطوری توی multipart بنویسم
اگه راهنماییم کنید ممنون میشم
سلام و درود
شما باید کلید هر user یا کلید کلی رو با url ارسال کنید تا اهراز هویت بشه.
با سلام و تشکر
پس از اپلود عکس قراره که بیشترین ip جدول و بگیره ،یکی اضافه کنه ولی هر آپلود جایگزین قبلی با همون نام میشه ، یعنی هر عکس با نام 1.jpg ذخیره میشه و جایگزین قبلی میشه،مشکل کجاست ؟ممنون از شما