آموزش برنامه نویسی اندروید |
آموزش متریال دیزاین CIRCULAR REVEAL در برنامه نویسی اندروید
سلام دوستان در این سری از آموزش برنامه نویسی اندروید به آموزش متریال دیزاین CIRCULAR REVEAL در برنامه نویسی اندروید می پردازیم متریال دیزاین اولین پارامتری است که هر برنامه نویس باید در برنامه خود به کار بگیرد در ادامه پیش نمایشی از آن را خواهید دید.
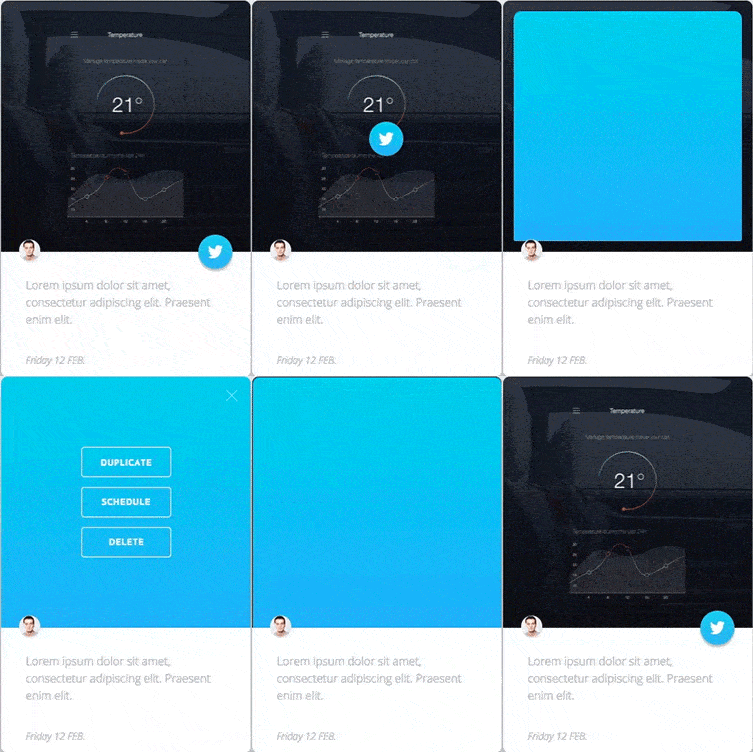
همانطور که میبینید بسیار زیبا است !
در ساخت این UI ما از چهار المنت استفاده می کنیم.
- CardView
- ImageView
- TextView’s
- FAB button
در انجام انیمیشن از سه بخش زیر تشکیل می شود که انیمیشن ها به صورت sequential های مختلف پشت سر هم اجر می شود
- Translate Animation
- Circular Reveal
- Alpha Animation
Translate Animation
برای اینکه بخش بالا آمدن fab انجام شود و در وسط Imageview ما قرار گیرد از این بخش Animation استفاده شده است.
برای اینکه وسط ImageView را پیدا کنیم از کد زیر استفاده کردم و خط دوم dp را به px تبدیل می کند.
x = imageView.getWidth() / 2;
x = x - ((16 * pixelDensity) + (28 * pixelDensity))
Circular Reveal
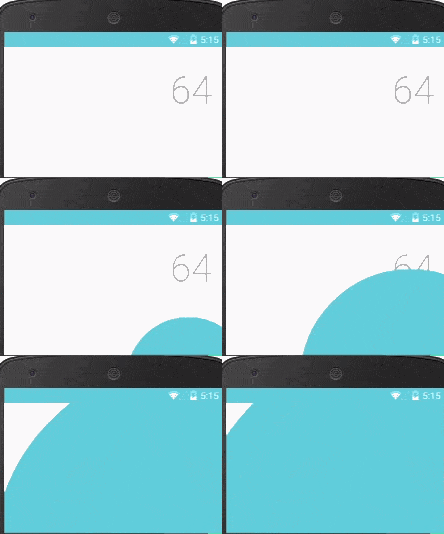
بعد از اینکه Fab در وسط ImageView قرار گرفت زمانی آن است که Reveal انجام شود. برای درک بهتر Reveal می توانید عکس زیر را مشاهده کنید.
Alpha Animation
از این بخش هم برای fade کردن استفاده کردیم
یک فولدر به نام anim درست کرده و ابتدا یک فایل به نام alpha_anim.xml ایجاد کرده کد زیر را در آن قرار دهید.
<?xml version="1.0" encoding="utf-8"?>
<set xmlns:android="http://schemas.android.com/apk/res/android">
    <alpha
        android:duration="100"
        android:fromAlpha="0.0"
        android:toAlpha="1.0" />
</set>
حالا در همان پوشه یک فایل به نام alpha_disappear.xml ایجاد کرده و کد زیر را در آن قرار دهید.
<?xml version="1.0" encoding="utf-8"?>
<set xmlns:android="http://schemas.android.com/apk/res/android">
    <alpha
        android:duration="100"
        android:fromAlpha="1.0"
        android:toAlpha="0.0" />
</set>
حالا وارد فایل drawable شده یک فایل به نام rounded_button.xml ایجاد کرده و سپس کد های زیر را در آن قرار دهید.
<?xml version="1.0" encoding="utf-8"?>
<shape
    xmlns:android="http://schemas.android.com/apk/res/android"
    android:shape="oval">
    <solid android:color="@color/twitter" />
</shape>
و در همان پوشه یک فایل دیگر به نام stroke_button.xml ایجاد کرده و کد زیر را در آن قرار دهید..
<shape xmlns:android="http://schemas.android.com/apk/res/android"
    android:shape="rectangle">
    <stroke android:color="@color/white"
        android:width="@dimen/dimen_1dp"/>
    <corners android:radius="@dimen/dimen_4dp" />
</shape>
در ادامه یک لینک شامل تعدادی عکس برای شما قرار می دهیم (عکس هایی که در پروژه استفاده شده است)
لینک دانلود
عکس های بالا را دانلود کرده و در پوشه mipmap یا drawable خود قرار دهید.
حالا وارد پوشه res/values شده و مقادیر زیر را در فایل dimens.xml قرار دهید رد صورتی که این فایل وجود نداشت آن را ایجاد کنید.
<resources>
    <!-- Default screen margins, per the Android Design guidelines. -->
    <dimen name="activity_vertical_margin">16dp</dimen>
    <dimen name="dimen_1dp">1dp</dimen>
    <dimen name="dimen_2dp">2dp</dimen>
    <dimen name="dimen_4dp">4dp</dimen>
    <dimen name="dimen_8dp">8dp</dimen>
    <dimen name="dimen_16sp">16sp</dimen>
    <dimen name="dimen_24dp">24dp</dimen>
    <dimen name="dimen_32dp">32dp</dimen>
    <dimen name="dimen_48dp">48dp</dimen>
    <dimen name="dimen_56dp">56dp</dimen>
</resources>
و حالا وارد فایل colors.xml شده و رنگ های زیر را اضافه کنید.
<?xml version="1.0" encoding="utf-8"?>
<resources>
    <color name="colorPrimary">#F44336</color>
    <color name="colorPrimaryDark">#D32F2F</color>
    <color name="grey">#BEBEBE</color>
    <color name="twitter">#23C4FF</color>
    <color name="twitter_transparency">#23C4FF</color>
    <color name="white">#FFFFFF</color>
</resources>
و در آخر هم وارد فایل string.xml شده و string های زیر را در آن تعریف کنید.
<resources>
    <string name="app_name">Material Card Animation</string>
    <string name="image">image</string>
    <string name="desc">Being the savage\'s bowsman, that is, the person who pulled the
    bow-oar in his boat. Dolor sit amet.</string>
    <string name="italic">Friday 12 FEB.</string>
    <string name="duplicate">DUPLICATE</string>
    <string name="schedule">SCHEDULE</string>
    <string name="delete">DELETE</string>
</resources>
و حالا زمان آن است که اکتیویتی اصلی خودمان را ایجاد کنیم برای اینکار یک فایل به نام activity_main.xml ایجاد کرده و کدهای زیر را در آن قرار دهید.
<ScrollView xmlns:android="http://schemas.android.com/apk/res/android"
    android:layout_width="match_parent"
    android:layout_height="match_parent"
    android:scrollbars="none">
    <LinearLayout
        android:layout_width="match_parent"
        android:layout_height="wrap_content"
        android:paddingBottom="@dimen/activity_vertical_margin"
        android:paddingTop="@dimen/activity_vertical_margin"
        android:paddingLeft="@dimen/dimen_8dp"
        android:paddingRight="@dimen/dimen_8dp" >
        <android.support.v7.widget.CardView xmlns:cardview="http://schemas.android.com/apk/res-auto"
            android:layout_width="match_parent"
            android:layout_height="wrap_content"
            cardview:cardCornerRadius="@dimen/dimen_2dp"
            cardview:cardElevation="@dimen/dimen_4dp"
            cardview:cardUseCompatPadding="true" >
            <RelativeLayout
                android:layout_width="match_parent"
                android:layout_height="match_parent"
                android:orientation="vertical">
                <FrameLayout
                    android:id="@+id/frameLayout"
                    android:layout_width="match_parent"
                    android:layout_height="wrap_content">
                    <ImageView
                        android:id="@+id/imageView"
                        android:layout_width="match_parent"
                        android:layout_height="wrap_content"
                        android:adjustViewBounds="true"
                        android:contentDescription="@string/image"
                        android:scaleType="fitXY"
                        android:src="@mipmap/image" />
                    <RelativeLayout
                        android:id="@+id/linearView"
                        android:layout_width="match_parent"
                        android:layout_height="0dp"
                        android:background="@color/twitter_transparency"
                        android:orientation="vertical"
                        android:visibility="gone">
                        <ImageButton
                            android:id="@+id/closeButton"
                            style="?android:borderlessButtonStyle"
                            android:layout_width="wrap_content"
                            android:layout_height="wrap_content"
                            android:layout_alignParentEnd="true"
                            android:adjustViewBounds="true"
                            android:contentDescription="@string/image"
                            android:onClick="closeTwitter"
                            android:src="@mipmap/close_button"
                            android:textColor="@color/white"
                            android:visibility="gone" />
                        <LinearLayout
                            android:id="@+id/layoutButtons"
                            android:layout_width="wrap_content"
                            android:layout_height="wrap_content"
                            android:layout_centerInParent="true"
                            android:orientation="vertical"
                            android:visibility="gone">
                            <Button
                                style="@style/Button"
                                android:layout_marginBottom="@dimen/activity_vertical_margin"
                                android:text="@string/duplicate" />
                            <Button
                                style="@style/Button"
                                android:layout_marginBottom="@dimen/activity_vertical_margin"
                                android:text="@string/schedule" />
                            <Button
                                style="@style/Button"
                                android:text="@string/delete" />
                        </LinearLayout>
                    </RelativeLayout>
                </FrameLayout>
                <TextView
                    android:id="@+id/textView"
                    android:layout_width="match_parent"
                    android:layout_height="wrap_content"
                    android:layout_below="@id/frameLayout"
                    android:fontFamily="sans-serif-light"
                    android:lineSpacingExtra="@dimen/dimen_4dp"
                    android:paddingBottom="@dimen/dimen_24dp"
                    android:paddingLeft="@dimen/dimen_24dp"
                    android:paddingRight="@dimen/dimen_24dp"
                    android:paddingTop="@dimen/dimen_48dp"
                    android:text="@string/desc"
                    android:textColor="@color/grey"
                    android:textSize="@dimen/dimen_16sp"
                    android:textStyle="bold" />
                <TextView
                    android:layout_width="match_parent"
                    android:layout_height="wrap_content"
                    android:layout_below="@id/textView"
                    android:fontFamily="sans-serif-medium"
                    android:paddingBottom="@dimen/activity_vertical_margin"
                    android:paddingLeft="@dimen/dimen_24dp"
                    android:paddingRight="@dimen/dimen_24dp"
                    android:paddingTop="@dimen/dimen_24dp"
                    android:text="@string/italic"
                    android:textColor="@color/grey"
                    android:textSize="@dimen/dimen_16sp"
                    android:textStyle="italic" />
                <ImageButton
                    android:id="@+id/launchTwitterAnimation"
                    android:layout_width="@dimen/dimen_56dp"
                    android:layout_height="@dimen/dimen_56dp"
                    android:layout_alignBottom="@id/frameLayout"
                    android:layout_alignParentEnd="true"
                    android:layout_marginBottom="-28dp"
                    android:layout_marginEnd="@dimen/activity_vertical_margin"
                    android:adjustViewBounds="true"
                    android:background="@drawable/rounded_button"
                    android:contentDescription="@string/image"
                    android:elevation="@dimen/dimen_4dp"
                    android:onClick="launchTwitter"
                    android:src="@mipmap/twitter_logo" />
            </RelativeLayout>
        </android.support.v7.widget.CardView>
    </LinearLayout>
</ScrollView>
و در آخر هم کد مربوط به MainActivity.java
package ir.programchi;
import android.animation.Animator;
import android.animation.ObjectAnimator;
import android.app.Activity;
import android.os.Bundle;
import android.view.View;
import android.view.ViewAnimationUtils;
import android.view.animation.Animation;
import android.view.animation.AnimationUtils;
import android.widget.FrameLayout;
import android.widget.ImageButton;
import android.widget.ImageView;
import android.widget.LinearLayout;
import android.widget.RelativeLayout;
public class MainActivity extends Activity {
    ImageView imageView;
    ImageButton imageButton, closeButton;
    RelativeLayout revealView;
    LinearLayout layoutButtons;
    Animation alphaAppear, alphaDisappear;
    int x, y, width, height, hypotenuse;
    float pixelDensity;
    @Override
    protected void onCreate(Bundle savedInstanceState) {
        super.onCreate(savedInstanceState);
        setContentView(R.layout.activity_main);
        pixelDensity = getResources().getDisplayMetrics().density;
        imageView = (ImageView) findViewById(R.id.imageView);
        imageButton = (ImageButton) findViewById(R.id.launchTwitterAnimation);
        closeButton = (ImageButton) findViewById(R.id.closeButton);
        revealView = (RelativeLayout) findViewById(R.id.linearView);
        layoutButtons = (LinearLayout) findViewById(R.id.layoutButtons);
        alphaAppear = AnimationUtils.loadAnimation(this, R.anim.alpha_anim);
        alphaDisappear = AnimationUtils.loadAnimation(this, R.anim.alpha_disappear);
    }
    public void launchTwitter(View view) {
        /*
         MARGIN_RIGHT = 16dp
         FAB_BUTTON_RADIUS = 28dp
         */
        width = imageView.getWidth();
        height = imageView.getHeight();
        x = width / 2;
        y = height / 2;
        hypotenuse = (int) Math.hypot(x, y);
        x = (int) (x - ((16 * pixelDensity) + (28 * pixelDensity)));
        FrameLayout.LayoutParams parameters = (FrameLayout.LayoutParams)
                revealView.getLayoutParams();
        parameters.height = imageView.getHeight();
        revealView.setLayoutParams(parameters);
        imageButton.animate()
            .translationX(-x)
            .translationY(-y)
            .setDuration(200)
            .setListener(new Animator.AnimatorListener() {
            @Override
            public void onAnimationStart(Animator animator) {
            }
            @Override
            public void onAnimationEnd(Animator animator) {
                Animator anim = ViewAnimationUtils.createCircularReveal(revealView, width / 2, height / 2, 28 * pixelDensity, hypotenuse);
                anim.setDuration(350);
                anim.addListener(new Animator.AnimatorListener() {
                    @Override
                    public void onAnimationStart(Animator animator) {
                    }
                    @Override
                    public void onAnimationEnd(Animator animator) {
                        layoutButtons.setVisibility(View.VISIBLE);
                        closeButton.setVisibility(View.VISIBLE);
                        layoutButtons.startAnimation(alphaAppear);
                        closeButton.startAnimation(alphaAppear);
                    }
                    @Override
                    public void onAnimationCancel(Animator animator) {
                    }
                    @Override
                    public void onAnimationRepeat(Animator animator) {
                    }
                });
                imageButton.setVisibility(View.GONE);
                revealView.setVisibility(View.VISIBLE);
                anim.start();
            }
            @Override
            public void onAnimationCancel(Animator animator) {
            }
            @Override
            public void onAnimationRepeat(Animator animator) {
            }
        });
    }
    public void closeTwitter(View view) {
        alphaDisappear.setAnimationListener(new Animation.AnimationListener() {
            @Override
            public void onAnimationStart(Animation animation) {
            }
            @Override
            public void onAnimationEnd(Animation animation) {
                Animator anim = ViewAnimationUtils.createCircularReveal(revealView, width / 2, height / 2, hypotenuse, 28 * pixelDensity);
                anim.setDuration(350);
                anim.addListener(new Animator.AnimatorListener() {
                    @Override
                    public void onAnimationStart(Animator animator) {
                    }
                    @Override
                    public void onAnimationEnd(Animator animator) {
                        revealView.setVisibility(View.GONE);
                        imageButton.setVisibility(View.VISIBLE);
                        imageButton.animate()
                          .translationX(0f)
                          .translationY(0f)
                          .setDuration(200);
                    }
                    @Override
                    public void onAnimationCancel(Animator animator) {
                    }
                    @Override
                    public void onAnimationRepeat(Animator animator) {
                    }
                });
                anim.start();
            }
            @Override
            public void onAnimationRepeat(Animation animation) {
            }
        });
        layoutButtons.setVisibility(View.GONE);
        closeButton.setVisibility(View.GONE);
        layoutButtons.startAnimation(alphaDisappear);
        closeButton.startAnimation(alphaDisappear);
    }
}
این آموزش هم به پایان رسید.
موفق باشید.