 آموزش برنامه نویسی اندروید |
آموزش قرار دادن اطلاعات Sqlite در RecyclerView در برنامه نویسی اندروید
سلام دوستان در این سری از آموزش های برنامه نویسی اندروید به آموزش قرار دادن اطلاعات Sqlite در RecyclerView در برنامه نویسی اندروید می پردازیم در این آموزش ما سه کار انجام میدهیم یک دیتا رو در دیتابیس insert می کنیم دیتا را در RecyclerView قرار می دهیم در آخر برای cardview کلیک سفارشی درست می کنیم تا با هر بار کلیک بروی خر آیتم اطلاعات به یک اکتیویتی دیگر ارسال شود. در ادامه با همراه باشید.
مثل همیشه ابتدا باید کتاب خانه های مورد نیاز را اضافه کنیم پس وارد فایل build.gradle شده بخش moudle در قسمت dependencies خط های زیر را اضافه کنید.
    compile 'com.android.support:appcompat-v7:23.2.1'
    compile 'com.android.support:design:23.2.1'
    compile 'com.android.support:cardview-v7:23.2.1'
    compile 'com.android.support:recyclerview-v7:23.2.1'
ممکن است خط اول کتاب خانه وجود داشته باشد در صورت وجود از خط دوم به بعد را اضافه کنید. (علت خطاهای گریدل را قبلتر بررسی کردیم در سایت جستجو کنید)
کد مربوط به Activity_main.xml همانند زیر می شود.
<LinearLayout xmlns:android="http://schemas.android.com/apk/res/android"
    xmlns:tools="http://schemas.android.com/tools"
    android:layout_width="match_parent"
    android:layout_height="match_parent"
    xmlns:app="http://schemas.android.com/apk/res-auto"
    android:orientation="vertical">
    <android.support.design.widget.AppBarLayout
        android:id="@+id/appbar"
        android:layout_width="match_parent"
        android:layout_height="wrap_content"
        android:theme="@style/ThemeOverlay.AppCompat.Dark.ActionBar">
        <android.support.v7.widget.Toolbar
            android:id="@+id/toolbar"
            android:layout_width="match_parent"
            android:layout_height="?attr/actionBarSize"
            android:background="?attr/colorPrimary"
            app:popupTheme="@style/ThemeOverlay.AppCompat.Light"
            app:layout_scrollFlags="scroll|enterAlways" />
    </android.support.design.widget.AppBarLayout>
    <LinearLayout
        android:layout_width="fill_parent"
        android:layout_height="wrap_content"
        android:orientation="horizontal">
        <TextView
            android:layout_width="wrap_content"
            android:layout_height="wrap_content"
            android:text="Enter Name"/>
        <EditText
            android:id="@+id/etName"
            android:layout_width="fill_parent"
            android:layout_height="wrap_content"/>
    </LinearLayout>
    <LinearLayout
        android:layout_width="fill_parent"
        android:layout_height="wrap_content"
        android:orientation="horizontal">
        <TextView
            android:layout_width="wrap_content"
            android:layout_height="wrap_content"
            android:text="Enter Roll"/>
        <EditText
            android:id="@+id/etRoll"
            android:layout_width="fill_parent"
            android:layout_height="wrap_content"/>
    </LinearLayout>
    <LinearLayout
        android:layout_width="fill_parent"
        android:layout_height="wrap_content"
        android:orientation="horizontal">
        <TextView
            android:layout_width="wrap_content"
            android:layout_height="wrap_content"
            android:text="Enter Address"/>
        <EditText
            android:id="@+id/etAddress"
            android:layout_width="fill_parent"
            android:layout_height="wrap_content"/>
    </LinearLayout>
    <LinearLayout
        android:layout_width="fill_parent"
        android:layout_height="wrap_content"
        android:orientation="horizontal">
        <TextView
            android:layout_width="wrap_content"
            android:layout_height="wrap_content"
            android:text="Enter Branch"/>
        <EditText
            android:id="@+id/etBranch"
            android:layout_width="fill_parent"
            android:layout_height="wrap_content"/>
    </LinearLayout>
    <LinearLayout
        android:layout_width="fill_parent"
        android:layout_height="wrap_content"
        android:orientation="horizontal">
        <TextView
            android:layout_width="wrap_content"
            android:layout_height="wrap_content"
            android:text="Enter Email"/>
        <EditText
            android:id="@+id/etEmail"
            android:layout_width="fill_parent"
            android:layout_height="wrap_content"/>
    </LinearLayout>
    <LinearLayout
        android:layout_width="fill_parent"
        android:layout_height="wrap_content"
        android:orientation="horizontal">
        <Button
            android:id="@+id/btnSubmit"
            android:layout_width="match_parent"
            android:layout_height="match_parent"
            android:text="Submit"
            android:textColor="#ffffff"
            android:background="@color/colorPrimary"/>
    </LinearLayout>
    <LinearLayout
        android:layout_width="fill_parent"
        android:layout_height="wrap_content"
        android:layout_marginTop="10dp"
        android:orientation="horizontal">
        <Button
            android:id="@+id/btngetdata"
            android:layout_width="match_parent"
            android:layout_height="match_parent"
            android:text="Get Data"
            android:textColor="#ffffff"
            android:background="@color/colorPrimary"/>
    </LinearLayout>
</LinearLayout>
پیش نمایش آن همانند زیر است که شامل پنج EditText که برای گرفتن ورودی استفاده می شود و دو دکمه برای انجام عملیات.
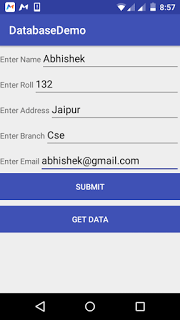
بعد از آن به بخش MainActivtiy.java میرسیم که همانند زیر می شود
package ir.programchi;
import android.content.Intent;
import android.support.v7.app.AppCompatActivity;
import android.os.Bundle;
import android.support.v7.widget.Toolbar;
import android.view.Menu;
import android.view.MenuItem;
import android.view.View;
import android.widget.Button;
import android.widget.EditText;
import android.widget.Toast;
import java.util.ArrayList;
import java.util.List;
public class MainActivity extends AppCompatActivity {
    EditText etName,etRoll,etAddress,etBranch,etEmail;
    Button btnSubmit,btngetdata;
    DatabaseHelpher helpher;
    List<DatabaseModel> dbList;
    @Override
    protected void onCreate(Bundle savedInstanceState) {
        super.onCreate(savedInstanceState);
        setContentView(R.layout.activity_main);
        Toolbar toolbar = (Toolbar) findViewById(R.id.toolbar);
        setSupportActionBar(toolbar);
        dbList= new ArrayList<DatabaseModel>();
        etName = (EditText)findViewById(R.id.etName);
        etRoll = (EditText)findViewById(R.id.etRoll);
        etAddress =(EditText)findViewById(R.id.etAddress);
        etBranch = (EditText)findViewById(R.id.etBranch);
        etEmail = (EditText)findViewById(R.id.etEmail);
        btnSubmit  =(Button)findViewById(R.id.btnSubmit);
        btngetdata =(Button)findViewById(R.id.btngetdata);
        btngetdata.setOnClickListener(new View.OnClickListener() {
            @Override
            public void onClick(View v) {
                startActivity(new Intent(MainActivity.this, SecondActivity.class));
               // startActivity(new Intent(MainActivity.this, DetailsActivity.class));
            }
        });
        btnSubmit.setOnClickListener(new View.OnClickListener() {
            @Override
            public void onClick(View v) {
                String name=etName.getText().toString();
                String email=etEmail.getText().toString();
                String roll=etRoll.getText().toString();
                String address=etAddress.getText().toString();
                String branch=etBranch.getText().toString();
            if(name.equals("") || email.equals("") || roll.equals("") ||address.equals("")||branch.equals("")){
                Toast.makeText(MainActivity.this,"Please fill all the fields",Toast.LENGTH_LONG).show();
            }else {
                helpher = new DatabaseHelpher(MainActivity.this);
                helpher.insertIntoDB(name, email, roll, address, branch);
            }
                etName.setText("");
                etRoll.setText("");
                etAddress.setText("");
                etBranch.setText("");
                etEmail.setText("");
                Toast.makeText(MainActivity.this, "insert value", Toast.LENGTH_LONG);
            }
        });
    }
}
و باید کلاس به نام DatabaseHelper.java ایجاد کنیم و در اینجا به توضیح دیتابیس نمی پردازیم آموزش دیتابیس Sqlite در سایت قرار گرفته است کی توانید آن را مطالعه کنید.
package ir.programchi;
import android.content.ContentValues;
import android.content.Context;
import android.database.Cursor;
import android.database.sqlite.SQLiteDatabase;
import android.database.sqlite.SQLiteOpenHelper;
import android.util.Log;
import android.widget.Toast;
import java.util.ArrayList;
import java.util.List;
/**
 * Created by Jefferson on 11/12/2017.
 */
public class DatabaseHelpher extends SQLiteOpenHelper {
    private static final String DATABASE_NAME="student";
    private static final int DATABASE_VERSION = 1;
    private static final String STUDENT_TABLE = "stureg";
    private static final String STU_TABLE = "create table "+STUDENT_TABLE +"(name TEXT,email TEXT primary key,roll TEXT,address TEXT,branch TEXT)";
Context context;
    public DatabaseHelpher(Context context) {
        super(context, DATABASE_NAME, null, DATABASE_VERSION);
        this.context = context;
    }
    @Override
    public void onCreate(SQLiteDatabase db) {
        db.execSQL(STU_TABLE);
    }
    @Override
    public void onUpgrade(SQLiteDatabase db, int oldVersion, int newVersion) {
        db.execSQL("DROP TABLE IF EXISTS " + STUDENT_TABLE);
        // Create tables again
        onCreate(db);
    }
/* Insert into database*/
    public void insertIntoDB(String name,String email,String roll,String address,String branch){
        Log.d("insert", "before insert");
        // 1. get reference to writable DB
        SQLiteDatabase db = this.getWritableDatabase();
        // 2. create ContentValues to add key "column"/value
        ContentValues values = new ContentValues();
        values.put("name", name);
        values.put("email", email);
        values.put("roll", roll);
         values.put("address", address);
        values.put("branch", branch);
        // 3. insert
        db.insert(STUDENT_TABLE, null, values);
        // 4. close
        db.close();
        Toast.makeText(context, "insert value", Toast.LENGTH_LONG);
        Log.i("insert into DB", "After insert");
    }
/* Retrive  data from database */
    public List<DatabaseModel> getDataFromDB(){
        List<DatabaseModel> modelList = new ArrayList<DatabaseModel>();
        String query = "select * from "+STUDENT_TABLE;
        SQLiteDatabase db = this.getWritableDatabase();
Cursor cursor = db.rawQuery(query,null);
        if (cursor.moveToFirst()){
            do {
                DatabaseModel model = new DatabaseModel();
                model.setName(cursor.getString(0));
                model.setEmail(cursor.getString(1));
                model.setRoll(cursor.getString(2));
                model.setAddress(cursor.getString(3));
                model.setBranch(cursor.getString(4));
                modelList.add(model);
            }while (cursor.moveToNext());
        }
        Log.d("student data", modelList.toString());
        return modelList;
    }
    /*delete a row from database*/
    public void deleteARow(String email){
        SQLiteDatabase db= this.getWritableDatabase();
        db.delete(STUDENT_TABLE, "email" + " = ?", new String[] { email });
        db.close();
    }
}
ولی اگر بخواهیم سریع آن را توضیح دهیم برای انجام عملیات insert , delete و آپدیت استفاده می شود.
حالا باید یک کلاس برای انجام عملیات getter و setter درست کنیم نام آن را برابر با DatabaseModel.java قرار می دهیم .
package ir.programchi;
/**
 * Created by Jefferson on 11/12/2017.
 */
public class DatabaseModel {
    private String name;
    private String roll;
    private String address;
    private String branch;
    private String email;
    public String getName() {
        return name;
    }
    public void setName(String name) {
        this.name = name;
    }
    public String getRoll() {
        return roll;
    }
    public void setRoll(String roll) {
        this.roll = roll;
    }
    public String getAddress() {
        return address;
    }
    public void setAddress(String address) {
        this.address = address;
    }
    public String getBranch() {
        return branch;
    }
    public void setBranch(String branch) {
        this.branch = branch;
    }
    public String getEmail() {
        return email;
    }
    public void setEmail(String email) {
        this.email = email;
    }
}
حالا باید یک آداپتور برای کلاس Recyclerview خود درست کنیم (آداپتور رو قبلا توضیح داده ایم جستجو کنید ) در اینجا آداپتور دیتا ها را برای ما جابه جا می کند. کلیک بروی هر Recyceler را درست می کند و موقعیت هر کدام از آنها را برمی گرداند.
package ir.programchi;
import android.content.Context;
import android.content.Intent;
import android.os.Bundle;
import android.support.v7.widget.RecyclerView;
import android.view.LayoutInflater;
import android.view.View;
import android.view.ViewGroup;
import android.widget.TextView;
import android.widget.Toast;
import java.util.ArrayList;
import java.util.List;
/**
 * Created by Jefferson on 11/14/17.
 */
public class RecyclerAdapter extends RecyclerView.Adapter<RecyclerAdapter.ViewHolder> {
  static   List<DatabaseModel> dbList;
    static  Context context;
    RecyclerAdapter(Context context, List<DatabaseModel> dbList ){
        this.dbList = new ArrayList<DatabaseModel>();
        this.context = context;
        this.dbList = dbList;
    }
    @Override
    public RecyclerAdapter.ViewHolder onCreateViewHolder(ViewGroup parent, int viewType) {
        View itemLayoutView = LayoutInflater.from(parent.getContext()).inflate(
                R.layout.item_row, null);
        // create ViewHolder
        ViewHolder viewHolder = new ViewHolder(itemLayoutView);
        return viewHolder;
    }
    @Override
    public void onBindViewHolder(RecyclerAdapter.ViewHolder holder, int position) {
        holder.name.setText(dbList.get(position).getName());
        holder.email.setText(dbList.get(position).getEmail());
    }
    @Override
    public int getItemCount() {
        return dbList.size();
    }
    public static class ViewHolder extends RecyclerView.ViewHolder implements View.OnClickListener {
        public TextView name,email;
        public ViewHolder(View itemLayoutView) {
            super(itemLayoutView);
            name = (TextView) itemLayoutView
                    .findViewById(R.id.rvname);
            email = (TextView)itemLayoutView.findViewById(R.id.rvemail);
            itemLayoutView.setOnClickListener(this);
        }
        @Override
        public void onClick(View v) {
            Intent intent = new Intent(context,DetailsActivity.class);
            Bundle extras = new Bundle();
            extras.putInt("position",getAdapterPosition());
            intent.putExtras(extras);
            /*
            int i=getAdapterPosition();
            intent.putExtra("position", getAdapterPosition());*/
            context.startActivity(intent);
            Toast.makeText(RecyclerAdapter.context, "you have clicked Row " + getAdapterPosition(), Toast.LENGTH_LONG).show();
        }
    }
}
حالا باید اکتویتی های دیگر را درست کنیم .
که با اضافه کردن هر هر آیتم آن ایتم داخل اکتیوتی دوم ما خواهد بود پس activity_second.xml همانند زیر می شود.
<LinearLayout xmlns:android="http://schemas.android.com/apk/res/android"
    xmlns:tools="http://schemas.android.com/tools"
    android:layout_width="match_parent"
    android:layout_height="match_parent"
    xmlns:app="http://schemas.android.com/apk/res-auto"
    android:orientation="vertical">
    <android.support.design.widget.AppBarLayout
        android:id="@+id/appbar"
        android:layout_width="match_parent"
        android:layout_height="wrap_content"
        android:theme="@style/ThemeOverlay.AppCompat.Dark.ActionBar">
        <android.support.v7.widget.Toolbar
            android:id="@+id/toolbar"
            android:layout_width="match_parent"
            android:layout_height="?attr/actionBarSize"
            android:background="?attr/colorPrimary"
            app:popupTheme="@style/ThemeOverlay.AppCompat.Light"
            app:layout_scrollFlags="scroll|enterAlways" />
    </android.support.design.widget.AppBarLayout>
    <LinearLayout
        android:layout_width="fill_parent"
        android:layout_height="wrap_content"
        android:orientation="horizontal">
        <android.support.v7.widget.RecyclerView
            android:id="@+id/recycleview"
            android:layout_width="match_parent"
            android:layout_height="match_parent"/>
    </LinearLayout>
    </LinearLayout>
که در آن Recyclerview قرار دارد.
پیش نمایش
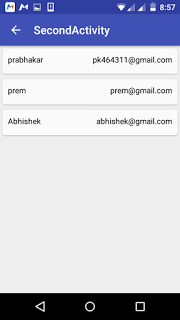
و بعد از نوبت به کد های SecondActivity.java می رسد.
package ir.programchi;
import android.support.v7.app.AppCompatActivity;
import android.os.Bundle;
import android.support.v7.widget.LinearLayoutManager;
import android.support.v7.widget.RecyclerView;
import android.support.v7.widget.Toolbar;
import android.view.Menu;
import android.view.MenuItem;
import java.util.ArrayList;
import java.util.List;
public class SecondActivity extends AppCompatActivity {
    DatabaseHelpher helpher;
    List<DatabaseModel> dbList;
    RecyclerView mRecyclerView;
    private RecyclerView.Adapter mAdapter;
    private RecyclerView.LayoutManager mLayoutManager;
    @Override
    protected void onCreate(Bundle savedInstanceState) {
        super.onCreate(savedInstanceState);
        setContentView(R.layout.activity_second);
        Toolbar toolbar = (Toolbar) findViewById(R.id.toolbar);
        setSupportActionBar(toolbar);
        getSupportActionBar().setDisplayHomeAsUpEnabled(true);
        helpher = new DatabaseHelpher(this);
        dbList= new ArrayList<DatabaseModel>();
        dbList = helpher.getDataFromDB();
        mRecyclerView = (RecyclerView)findViewById(R.id.recycleview);
        mRecyclerView.setHasFixedSize(true);
        // use a linear layout manager
        mLayoutManager = new LinearLayoutManager(this);
        mRecyclerView.setLayoutManager(mLayoutManager);
        // specify an adapter (see also next example)
        mAdapter = new RecyclerAdapter(this,dbList);
        mRecyclerView.setAdapter(mAdapter);
    }
}
دوستان ما تمامی کدهای بالا را به صورت مجزا قبلا توضیح داده ایم فکر نکنید چیزی گفته نشده است فقط کافی است یک سرچ کوچکی در سایت ما بکنید تمامی مطالب با حساسیت بالا برای شما قرار گرفته است .
حالا زمان ایجاد آداپتور برای Recylerview است .
import android.content.Context;
import android.content.Intent;
import android.os.Bundle;
import android.support.v7.widget.RecyclerView;
import android.view.LayoutInflater;
import android.view.View;
import android.view.ViewGroup;
import android.widget.TextView;
import android.widget.Toast;
import java.util.ArrayList;
import java.util.List;
/**
 * Created by Jefferson on 11/14/17.
 */
public class RecyclerAdapter extends RecyclerView.Adapter<RecyclerAdapter.ViewHolder> {
  static   List<DatabaseModel> dbList;
    static  Context context;
    RecyclerAdapter(Context context, List<DatabaseModel> dbList ){
        this.dbList = new ArrayList<DatabaseModel>();
        this.context = context;
        this.dbList = dbList;
    }
    @Override
    public RecyclerAdapter.ViewHolder onCreateViewHolder(ViewGroup parent, int viewType) {
        View itemLayoutView = LayoutInflater.from(parent.getContext()).inflate(
                R.layout.item_row, null);
        // create ViewHolder
        ViewHolder viewHolder = new ViewHolder(itemLayoutView);
        return viewHolder;
    }
    @Override
    public void onBindViewHolder(RecyclerAdapter.ViewHolder holder, int position) {
        holder.name.setText(dbList.get(position).getName());
        holder.email.setText(dbList.get(position).getEmail());
    }
    @Override
    public int getItemCount() {
        return dbList.size();
    }
    public static class ViewHolder extends RecyclerView.ViewHolder implements View.OnClickListener {
        public TextView name,email;
        public ViewHolder(View itemLayoutView) {
            super(itemLayoutView);
            name = (TextView) itemLayoutView
                    .findViewById(R.id.rvname);
            email = (TextView)itemLayoutView.findViewById(R.id.rvemail);
            itemLayoutView.setOnClickListener(this);
        }
        @Override
        public void onClick(View v) {
            Intent intent = new Intent(context,DetailsActivity.class);
            Bundle extras = new Bundle();
            extras.putInt("position",getAdapterPosition());
            intent.putExtras(extras);
            /*
            int i=getAdapterPosition();
            intent.putExtra("position", getAdapterPosition());*/
            context.startActivity(intent);
            Toast.makeText(RecyclerAdapter.context, "you have clicked Row " + getAdapterPosition(), Toast.LENGTH_LONG).show();
        }
    }
}
حالا باید اکتویتی سوم خودمان را ایجاد کنیم کاربر زمانی وارد این اکتیویتی می شود که بروی هر کدام از ایتم های Recylerview کلیک کند. یک فایل به نام activity_details.xml ایجاد کرده کدهای زیر را در آن قرار دهید.
<LinearLayout
    xmlns:android="http://schemas.android.com/apk/res/android"
    xmlns:app="http://schemas.android.com/apk/res-auto"
    android:layout_width="match_parent"
    android:layout_height="match_parent"
    android:orientation="vertical">
    <android.support.design.widget.AppBarLayout
        android:id="@+id/appbar"
        android:layout_width="match_parent"
        android:layout_height="wrap_content"
        android:theme="@style/ThemeOverlay.AppCompat.Dark.ActionBar">
        <android.support.v7.widget.Toolbar
            android:id="@+id/toolbar"
            android:layout_width="match_parent"
            android:layout_height="?attr/actionBarSize"
            android:background="?attr/colorPrimary"
            app:popupTheme="@style/ThemeOverlay.AppCompat.Light"
            app:layout_scrollFlags="scroll|enterAlways" />
    </android.support.design.widget.AppBarLayout>
    <TextView
        android:id="@+id/name"
        android:layout_width="match_parent"
        android:layout_height="wrap_content"
        android:text="name"/>
    <TextView
        android:id="@+id/roll"
        android:layout_width="match_parent"
        android:layout_height="wrap_content"
        android:text="Roll"/>
    <TextView
        android:id="@+id/address"
        android:layout_width="match_parent"
        android:layout_height="wrap_content"
        android:text="Address"/>
    <TextView
        android:id="@+id/branch"
        android:layout_width="match_parent"
        android:layout_height="wrap_content"
        android:text="Branch"/>
    <TextView
        android:id="@+id/email"
        android:layout_width="match_parent"
        android:layout_height="wrap_content"
        android:text="Email"/>
    </LinearLayout>
پیش نمایش آن
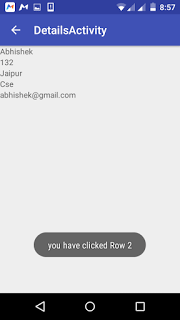
کد مربوط به بخش DetailsActivity.java هم همانند زیر می شود.
package ir.programchi;
import android.content.Intent;
import android.support.v7.app.AppCompatActivity;
import android.os.Bundle;
import android.support.v7.widget.Toolbar;
import android.view.Menu;
import android.view.MenuItem;
import android.widget.TextView;
import android.widget.Toast;
import java.util.ArrayList;
import java.util.List;
public class DetailsActivity extends AppCompatActivity {
    DatabaseHelpher helpher;
    List<DatabaseModel> dbList;
    int position;
    TextView tvname,tvemail,tvroll,tvaddress,tvbranch;
    @Override
    protected void onCreate(Bundle savedInstanceState) {
        super.onCreate(savedInstanceState);
        setContentView(R.layout.activity_details);
        Toolbar toolbar = (Toolbar) findViewById(R.id.toolbar);
        setSupportActionBar(toolbar);
        getSupportActionBar().setDisplayHomeAsUpEnabled(true);
        Intent intent = getIntent();
        Bundle bundle = intent.getExtras();
        // 5. get status value from bundle
         position = bundle.getInt("position");
        tvname =(TextView)findViewById(R.id.name);
        tvemail =(TextView)findViewById(R.id.email);
        tvroll =(TextView)findViewById(R.id.roll);
        tvaddress =(TextView)findViewById(R.id.address);
        tvbranch =(TextView)findViewById(R.id.branch);
        helpher = new DatabaseHelpher(this);
        dbList= new ArrayList<DatabaseModel>();
        dbList = helpher.getDataFromDB();
        if(dbList.size()>0){
            String name= dbList.get(position).getName();
            String email=dbList.get(position).getEmail();
            String roll=dbList.get(position).getRoll();
            String address=dbList.get(position).getAddress();
            String branch=dbList.get(position).getBranch();
            tvname.setText(name);
            tvemail.setText(email);
            tvroll.setText(roll);
            tvaddress.setText(address);
            tvbranch.setText(branch);
        }
        Toast.makeText(DetailsActivity.this, dbList.toString(), Toast.LENGTH_LONG);
    }
}
یادمان نرود که آیتم Recylerview را درست کنیم که در اینجا ما از Cardview استفاده کرده ایم پس یک فایل به نام item_row.xml در فولدر layout ایجاد کرده کد های زیر را در آن قرار دهید.
<?xml version="1.0" encoding="utf-8"?>
<android.support.v7.widget.CardView xmlns:android="http://schemas.android.com/apk/res/android"
    xmlns:card_view="http://schemas.android.com/apk/res-auto"
    android:layout_width="match_parent"
    android:layout_height="match_parent"
    android:layout_margin="5dp"
    android:orientation="horizontal"
    card_view:cardCornerRadius="5dp"
    card_view:cardUseCompatPadding="true" >
    <RelativeLayout
        android:layout_width="match_parent"
        android:layout_height="match_parent"
        android:background="?android:selectableItemBackground"  >
        <TextView
            android:id="@+id/rvname"
            android:layout_width="wrap_content"
            android:layout_height="45dp"
            android:gravity="left"
            android:padding="10dp"
            android:textAlignment="center"
            android:text="Name"
            android:textColor="@android:color/black"
             />
        <TextView
            android:id="@+id/rvemail"
            android:layout_width="fill_parent"
            android:layout_height="45dp"
            android:textAlignment="center"
            android:padding="10dp"
            android:gravity="right"
            android:text="Email"
            android:textColor="@android:color/black"
            android:layout_marginLeft="10dp"
             />
    </RelativeLayout>
</android.support.v7.widget.CardView>
این آموزش هم به پایان رسید.
موفق باشید.





سلام
تشکر عالیه
فقط ببخشید بخش ExtandList رو جدا می زارید؟!
سلام
بله
سلام خسته نباشید
برا من getAdapterPosition رو ارور میده
سلام ممنون کد مشکلی نداره دوباره بررسی کنید.
میبخشید این آموزش قرار دادن اطلاعات در دیتا بیس هستش نه آموزش قرار دادن اطلاعات دیتا بیس در ریسایکلر ویوو .
لطفا آموزش در رابطه با عنوان بزارید
لطفا اگه برنامه نویسی بلد نیستی چیزی نگو . من خودم دو ساله برنامه نویس هستم . این اموزش با عنوانش کاملا مطابقت داره.
سلام . اگه ریسورس پروژه ها رو بزارید ممنون میشم . با تشکر از زحمات شما.