 آموزش برنامه نویسی اندروید |
ساخت اسلایدر ورود به برنامه برای اندروید
سلام دوستان با آموزش ساخت اسلایدر در خدمتون هستیم.
پیش نمایشی از اسلایدر (intro) در برنامه نویسی اندروید.
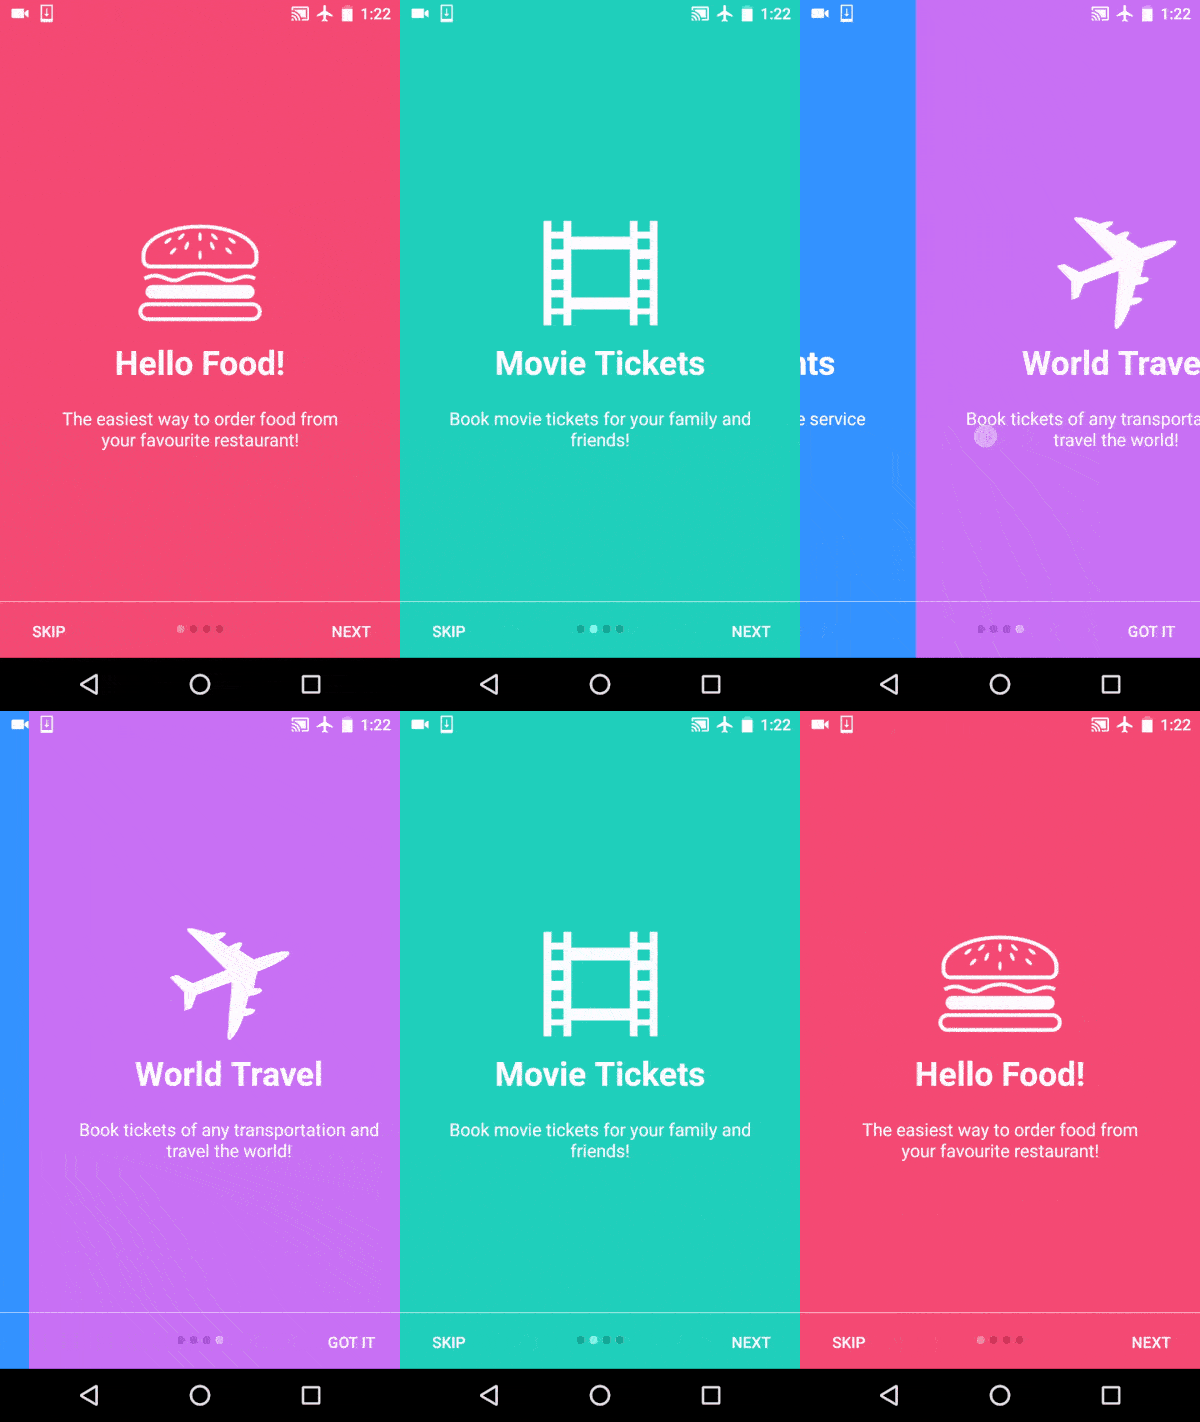
خوب دوستان همینطور که می بینید کاملا متریال دیزاین پیاده سازی شده در ادامه با ما همراه باشید.
یک پروژه اندروید ایجاد کنید.
سپس در بخش colors کد های زیر را قرار دهید
<?xml version="1.0" encoding="utf-8"?>
<resources>
<color name="colorPrimary">#3F51B5</color>
<color name="colorPrimaryDark">#303F9F</color>
<color name="colorAccent">#FF4081</color>
<!-- Screens background color-->
<color name="bg_screen1">#f64c73</color>
<color name="bg_screen2">#20d2bb</color>
<color name="bg_screen3">#3395ff</color>
<color name="bg_screen4">#c873f4</color>
<!-- dots inactive colors -->
<color name="dot_dark_screen1">#d1395c</color>
<color name="dot_dark_screen2">#14a895</color>
<color name="dot_dark_screen3">#2278d4</color>
<color name="dot_dark_screen4">#a854d4</color>
<!-- dots active colors -->
<color name="dot_light_screen1">#f98da5</color>
<color name="dot_light_screen2">#8cf9eb</color>
<color name="dot_light_screen3">#93c6fd</color>
<color name="dot_light_screen4">#e4b5fc</color>
<array name="array_dot_active">
<item>@color/dot_light_screen1</item>
<item>@color/dot_light_screen2</item>
<item>@color/dot_light_screen3</item>
<item>@color/dot_light_screen4</item>
</array>
<array name="array_dot_inactive">
<item>@color/dot_dark_screen1</item>
<item>@color/dot_dark_screen2</item>
<item>@color/dot_dark_screen3</item>
<item>@color/dot_dark_screen4</item>
</array>
</resources>
و بخش string را باز کرده و کد های زیر را به آن اضافه کنید.
<resources>
<stringname="app_name">Intro Slider</string>
<stringname="title_activity_welcome">Home Screen</string>
<stringname="next">NEXT</string>
<stringname="skip">SKIP</string>
<stringname="start">GOT IT</string>
<stringname="slide_1_title">Hello Food!</string>
<stringname="slide_1_desc">The easiest way to order food from your favourite restaurant!</string>
<stringname="slide_2_title">Movie Tickets</string>
<stringname="slide_2_desc">Book movie tickets for your family and friends!</string>
<stringname="slide_3_title">Great Discounts</string>
<stringname="slide_3_desc">Best discounts on every single service we offer!</string>
<stringname="slide_4_title">World Travel</string>
<stringname="slide_4_desc">Book tickets of any transportation and travel the world!</string>
<stringname="play_again_desc">To see the welcome slider again, goto Settings -> apps -> welcome slider -> clear data</string>
<stringname="play_again">Play Again</string>
</resources>
فایل dimens را باز کرده و کد های زیر را به آن اضافه کنید.
<resources>
<!-- Default screen margins, per the Android Design guidelines. -->
<dimenname="activity_horizontal_margin">16dp</dimen>
<dimenname="activity_vertical_margin">16dp</dimen>
<dimenname="fab_margin">16dp</dimen>
<dimenname="dots_height">30dp</dimen>
<dimenname="dots_margin_bottom">20dp</dimen>
<dimenname="img_width_height">120dp</dimen>
<dimenname="slide_title">30dp</dimen>
<dimenname="slide_desc">16dp</dimen>
<dimenname="desc_padding">40dp</dimen>
</resources>
فایل style را باز کرده و تغییرات زیر را اعمال کنید.این تغییراتی سلیقه ای بوده و ملزم به تغییرات استایل نیستید.
<resources>
<!-- Base application theme. -->
<stylename="AppTheme"parent="Theme.AppCompat.Light.DarkActionBar">
<!-- Customize your theme here. -->
<itemname="colorPrimary">@color/colorPrimary</item>
<itemname="colorPrimaryDark">@color/colorPrimaryDark</item>
<itemname="colorAccent">@color/colorAccent</item>
<itemname="windowActionBar">false</item>
<itemname="windowNoTitle">true</item>
</style>
<stylename="AppTheme.AppBarOverlay"parent="ThemeOverlay.AppCompat.Dark.ActionBar"/>
<stylename="AppTheme.PopupOverlay"parent="ThemeOverlay.AppCompat.Light"/>
</resources>
یک فایل جاوا به نام PrefManager ایجاد کنید این فایل جاوا حاوی بخشی است که بررسی می کند ایا برنامه یک بار اجرا شده است یا چون بهتر است صفحه ی intro فقط یک بار برای کاربر نمایش داده شود.
 import android.content.Context;
import android.content.SharedPreferences;/**
* Created by jfp on 05/05/16.
*/
public class PrefManager {
SharedPreferences pref;
SharedPreferences.Editor editor;
Context _context;// shared pref mode
int PRIVATE_MODE = 0;// Shared preferences file name
private static final String PREF_NAME = "androidhive-welcome";private static final String IS_FIRST_TIME_LAUNCH = "IsFirstTimeLaunch";
public PrefManager(Context context) {
this._context = context;
pref = _context.getSharedPreferences(PREF_NAME, PRIVATE_MODE);
editor = pref.edit();
}
public void setFirstTimeLaunch(boolean isFirstTime) {
editor.putBoolean(IS_FIRST_TIME_LAUNCH, isFirstTime);
editor.commit();
}
public boolean isFirstTimeLaunch() {
return pref.getBoolean(IS_FIRST_TIME_LAUNCH, true);
}
}
خوب ما نیاز به 4 اکتیویتی مختلف داریم منظور اکتیویتی صفحه xml هست و نام های آنها به شکل زیر میشه
- welcome_side1.xml
- welcome_side2.xml
- welcome_side3.xml
- welcome_side4.xml
که به ترتیب همانند زیر می شود .
صفحه یک اسلاید
<?xml version="1.0" encoding="utf-8"?>
<RelativeLayout xmlns:android="http://schemas.android.com/apk/res/android"
android:layout_width="match_parent"
android:layout_height="match_parent"
android:background="@color/bg_screen1">
<LinearLayout
android:layout_width="wrap_content"
android:layout_height="wrap_content"
android:layout_centerInParent="true"
android:gravity="center_horizontal"
android:orientation="vertical">
<ImageView
android:layout_width="@dimen/img_width_height"
android:layout_height="@dimen/img_width_height"
android:src="@drawable/ic_food" />
<TextView
android:layout_width="wrap_content"
android:layout_height="wrap_content"
android:text="@string/slide_1_title"
android:textColor="@android:color/white"
android:textSize="@dimen/slide_title"
android:textStyle="bold" />
<TextView
android:layout_width="wrap_content"
android:layout_height="wrap_content"
android:layout_marginTop="20dp"
android:paddingLeft="@dimen/desc_padding"
android:paddingRight="@dimen/desc_padding"
android:text="@string/slide_1_desc"
android:textAlignment="center"
android:textColor="@android:color/white"
android:textSize="@dimen/slide_desc" />
</LinearLayout>
</RelativeLayout>
صفحه 2 اسلاید
<?xmlversion="1.0"encoding="utf-8"?>
<RelativeLayoutxmlns:android="http://schemas.android.com/apk/res/android"
android:layout_width="match_parent"
android:layout_height="match_parent"
android:background="@color/bg_screen2">
<LinearLayout
android:layout_width="wrap_content"
android:layout_height="wrap_content"
android:layout_centerInParent="true"
android:gravity="center_horizontal"
android:orientation="vertical">
<ImageView
android:layout_width="@dimen/img_width_height"
android:layout_height="@dimen/img_width_height"
android:src="@drawable/ic_movie"/>
<TextView
android:layout_width="wrap_content"
android:layout_height="wrap_content"
android:text="@string/slide_2_title"
android:textColor="@android:color/white"
android:textSize="@dimen/slide_title"
android:textStyle="bold"/>
<TextView
android:layout_width="wrap_content"
android:layout_height="wrap_content"
android:layout_marginTop="20dp"
android:paddingLeft="@dimen/desc_padding"
android:paddingRight="@dimen/desc_padding"
android:text="@string/slide_2_desc"
android:textAlignment="center"
android:textColor="@android:color/white"
android:textSize="@dimen/slide_desc"/>
</LinearLayout>
</RelativeLayout>
صفحه 3 اسلاید
<?xmlversion="1.0"encoding="utf-8"?>
<RelativeLayoutxmlns:android="http://schemas.android.com/apk/res/android"
android:layout_width="match_parent"
android:layout_height="match_parent"
android:background="@color/bg_screen3">
<LinearLayout
android:layout_width="wrap_content"
android:layout_height="wrap_content"
android:layout_centerInParent="true"
android:gravity="center_horizontal"
android:orientation="vertical">
<ImageView
android:layout_width="@dimen/img_width_height"
android:layout_height="@dimen/img_width_height"
android:src="@drawable/ic_discount"/>
<TextView
android:layout_width="wrap_content"
android:layout_height="wrap_content"
android:text="@string/slide_3_title"
android:textColor="@android:color/white"
android:textSize="@dimen/slide_title"
android:textStyle="bold"/>
<TextView
android:layout_width="wrap_content"
android:layout_height="wrap_content"
android:layout_marginTop="20dp"
android:paddingLeft="@dimen/desc_padding"
android:paddingRight="@dimen/desc_padding"
android:text="@string/slide_3_desc"
android:textAlignment="center"
android:textColor="@android:color/white"
android:textSize="@dimen/slide_desc"/>
</LinearLayout>
</RelativeLayout>
و در نهایت صفحه 4 اسلاید
<?xmlversion="1.0"encoding="utf-8"?>
<RelativeLayoutxmlns:android="http://schemas.android.com/apk/res/android"
android:layout_width="match_parent"
android:layout_height="match_parent"
android:background="@color/bg_screen4">
<LinearLayout
android:layout_width="wrap_content"
android:layout_height="wrap_content"
android:layout_centerInParent="true"
android:gravity="center_horizontal"
android:orientation="vertical">
<ImageView
android:layout_width="@dimen/img_width_height"
android:layout_height="@dimen/img_width_height"
android:src="@drawable/ic_travel"/>
<TextView
android:layout_width="wrap_content"
android:layout_height="wrap_content"
android:text="@string/slide_4_title"
android:textColor="@android:color/white"
android:textSize="@dimen/slide_title"
android:textStyle="bold"/>
<TextView
android:layout_width="wrap_content"
android:layout_height="wrap_content"
android:layout_marginTop="20dp"
android:paddingLeft="@dimen/desc_padding"
android:paddingRight="@dimen/desc_padding"
android:text="@string/slide_4_desc"
android:textAlignment="center"
android:textColor="@android:color/white"
android:textSize="@dimen/slide_desc"/>
</LinearLayout>
</RelativeLayout>
سپس یه اکتیویتی دیگر به نام WelcomeActivity درست می کنیم دقت کنید ما نیاز به یک اکتیویتی با فایل جاوا داریم پس نام فایل جاوا برابر با WelcomeActivity نام layout را برابر با activity_welcome قرار می دهیم .
بخش activity_welcome.xml را باز کرده و کد های زیر را به ان اضافه نمایید.
<?xml version="1.0" encoding="utf-8"?>
<RelativeLayout xmlns:android="http://schemas.android.com/apk/res/android"
xmlns:app="http://schemas.android.com/apk/res-auto"
xmlns:tools="http://schemas.android.com/tools"
android:layout_width="match_parent"
android:layout_height="match_parent"
tools:showIn="@layout/activity_welcome"><android.support.v4.view.ViewPager
android:id="@+id/view_pager"
android:layout_width="match_parent"
android:layout_height="match_parent" /><LinearLayout
android:id="@+id/layoutDots"
android:layout_width="match_parent"
android:layout_height="@dimen/dots_height"
android:layout_alignParentBottom="true"
android:layout_marginBottom="@dimen/dots_margin_bottom"
android:gravity="center"
android:orientation="horizontal"></LinearLayout><View
android:layout_width="match_parent"
android:layout_height="1dp"
android:alpha=".5"
android:layout_above="@id/layoutDots"
android:background="@android:color/white" /><Button
android:id="@+id/btn_next"
android:layout_width="wrap_content"
android:layout_height="wrap_content"
android:layout_alignParentBottom="true"
android:layout_alignParentRight="true"
android:background="@null"
android:text="@string/next"
android:textColor="@android:color/white" /><Button
android:id="@+id/btn_skip"
android:layout_width="wrap_content"
android:layout_height="wrap_content"
android:layout_alignParentBottom="true"
android:layout_alignParentLeft="true"
android:background="@null"
android:text="@string/skip"
android:textColor="@android:color/white" /></RelativeLayout>
فایل welcomeactivity را باز کنید و کد های زیر در ان وارد کنید این کد تمامی بخش های viewpager را تشکیل می دهد.
import android.content.Context;
import android.content.Intent;
import android.graphics.Color;
import android.os.Build;
import android.os.Bundle;
import android.support.v4.view.PagerAdapter;
import android.support.v4.view.ViewPager;
import android.support.v7.app.AppCompatActivity;
import android.text.Html;
import android.view.LayoutInflater;
import android.view.View;
import android.view.ViewGroup;
import android.view.Window;
import android.view.WindowManager;
import android.widget.Button;
import android.widget.LinearLayout;
import android.widget.TextView;
public class WelcomeActivity extends AppCompatActivity {
private ViewPager viewPager;
private MyViewPagerAdapter myViewPagerAdapter;
private LinearLayout dotsLayout;
private TextView[] dots;
private int[] layouts;
private Button btnSkip, btnNext;
private PrefManager prefManager;
@Override
protected void onCreate(Bundle savedInstanceState) {
super.onCreate(savedInstanceState);
// Checking for first time launch - before calling setContentView()
prefManager = new PrefManager(this);
if (!prefManager.isFirstTimeLaunch()) {
launchHomeScreen();
finish();
}
// Making notification bar transparent
if (Build.VERSION.SDK_INT >= 21) {
getWindow().getDecorView().setSystemUiVisibility(View.SYSTEM_UI_FLAG_LAYOUT_STABLE | View.SYSTEM_UI_FLAG_LAYOUT_FULLSCREEN);
}
setContentView(R.layout.activity_welcome);
viewPager = (ViewPager) findViewById(R.id.view_pager);
dotsLayout = (LinearLayout) findViewById(R.id.layoutDots);
btnSkip = (Button) findViewById(R.id.btn_skip);
btnNext = (Button) findViewById(R.id.btn_next);
// layouts of all welcome sliders
// add few more layouts if you want
layouts = new int[]{
R.layout.welcome_slide1,
R.layout.welcome_slide2,
R.layout.welcome_slide3,
R.layout.welcome_slide4};
// adding bottom dots
addBottomDots(0);
// making notification bar transparent
changeStatusBarColor();
myViewPagerAdapter = new MyViewPagerAdapter();
viewPager.setAdapter(myViewPagerAdapter);
viewPager.addOnPageChangeListener(viewPagerPageChangeListener);
btnSkip.setOnClickListener(new View.OnClickListener() {
@Override
public void onClick(View v) {
launchHomeScreen();
}
});
btnNext.setOnClickListener(new View.OnClickListener() {
@Override
public void onClick(View v) {
// checking for last page
// if last page home screen will be launched
int current = getItem(+1);
if (current < layouts.length) {
// move to next screen
viewPager.setCurrentItem(current);
} else {
launchHomeScreen();
}
}
});
}
private void addBottomDots(int currentPage) {
dots = new TextView[layouts.length];
int[] colorsActive = getResources().getIntArray(R.array.array_dot_active);
int[] colorsInactive = getResources().getIntArray(R.array.array_dot_inactive);
dotsLayout.removeAllViews();
for (int i = 0; i < dots.length; i++) {
dots[i] = new TextView(this);
dots[i].setText(Html.fromHtml("•"));
dots[i].setTextSize(35);
dots[i].setTextColor(colorsInactive[currentPage]);
dotsLayout.addView(dots[i]);
}
if (dots.length > 0)
dots[currentPage].setTextColor(colorsActive[currentPage]);
}
private int getItem(int i) {
return viewPager.getCurrentItem() + i;
}
private void launchHomeScreen() {
prefManager.setFirstTimeLaunch(false);
startActivity(new Intent(WelcomeActivity.this, MainActivity.class));
finish();
}
// viewpager change listener
ViewPager.OnPageChangeListener viewPagerPageChangeListener = new ViewPager.OnPageChangeListener() {
@Override
public void onPageSelected(int position) {
addBottomDots(position);
// changing the next button text 'NEXT' / 'GOT IT'
if (position == layouts.length - 1) {
// last page. make button text to GOT IT
btnNext.setText(getString(R.string.start));
btnSkip.setVisibility(View.GONE);
} else {
// still pages are left
btnNext.setText(getString(R.string.next));
btnSkip.setVisibility(View.VISIBLE);
}
}
@Override
public void onPageScrolled(int arg0, float arg1, int arg2) {
}
@Override
public void onPageScrollStateChanged(int arg0) {
}
};
/**
* Making notification bar transparent
*/
private void changeStatusBarColor() {
if (Build.VERSION.SDK_INT >= Build.VERSION_CODES.LOLLIPOP) {
Window window = getWindow();
window.addFlags(WindowManager.LayoutParams.FLAG_DRAWS_SYSTEM_BAR_BACKGROUNDS);
window.setStatusBarColor(Color.TRANSPARENT);
}
}
/**
* View pager adapter
*/
public class MyViewPagerAdapter extends PagerAdapter {
private LayoutInflater layoutInflater;
public MyViewPagerAdapter() {
}
@Override
public Object instantiateItem(ViewGroup container, int position) {
layoutInflater = (LayoutInflater) getSystemService(Context.LAYOUT_INFLATER_SERVICE);
View view = layoutInflater.inflate(layouts[position], container, false);
container.addView(view);
return view;
}
@Override
public int getCount() {
return layouts.length;
}
@Override
public boolean isViewFromObject(View view, Object obj) {
return view == obj;
}
@Override
public void destroyItem(ViewGroup container, int position, Object object) {
View view = (View) object;
container.removeView(view);
}
}
}
و بخش androidmanifest را همانند زیر تکمیل می کنیم.
<?xml version="1.0" encoding="utf-8"?>
<manifest xmlns:android="http://schemas.android.com/apk/res/android"
package="info.androidhive.introslider">
<application
android:allowBackup="true"
android:icon="@mipmap/ic_launcher"
android:label="@string/app_name"
android:supportsRtl="true"
android:theme="@style/AppTheme">
<activity android:name="info.androidhive.introslider.WelcomeActivity">
<intent-filter>
<action android:name="android.intent.action.MAIN" />
<category android:name="android.intent.category.LAUNCHER" />
</intent-filter>
</activity>
<activity
android:name="info.androidhive.introslider.MainActivity"
android:label="@string/title_activity_welcome"
android:theme="@style/AppTheme.NoActionBar"></activity>
</application>
</manifest>





سلام . وقت بخیر .
من طبق این آموزش پیش رفتم و بدون مشکل برنامه م ران شد . مشکل اینجاست که اینترو اجرا میشه ، ولی وقتی skip یا do it رو میزنم به صفحه اصلی برنامه برنمی گرده و دوباره اینترو از اول اجرا میشه ؟ کد هامو چند بار چک کردم و مشکلی ندیدم . به نظرتون اینکه از اسپلش استفاده می کنم مشکل ساز شده ؟ کلاس ولکام اکتیویتی رو به عنوان یه اکتیویتی معمولی به مانیفست معرفی کردم .
prefManager.setFirstTimeLaunch(false);
startActivity(new Intent(WelcomeActivity.this, MainActivity.class));
finish();
متاسفانه جواب نمی ده ! نمیفهمم مشکل از کجاست .
سورس رو تست کردم مشکلی وجود نداره
با سلام و خسته نباشید
آقا من از این آموزش استفاده کردم و خیلی خوب بود ولی خواستم صفحات بیشتری اضافه کنم که کرش میکنه
چکار باید بکنم؟
سلام دوست عزیز کد کرش را در بخش سوالات مطرح کنید به این شکل نمیشه به سوال شما پاسخ داد چون log برنامه باید قرارد داده شود.
به احتمال خیلی زیاد شما فقط آرایه layout هارو داخل فایل WelcomeActivity.java بیشتر میکنید در حالی که باید برای آرایه رنگ Dot ها هم داخل که داخل ریسورس Color.xml هست به تعداد layout های موجود تو پیجر رنگ اضافه بشه. اگه تعداد Dot ها با تعداد layout ها برابر نباشه داخل تابع addBottomDots ارور outOfBound اتفاق میفته و برنامه کرش میکنه.
سلام
وقت بخیر
چطور باید کاستوم فونت به اجزای فرگمنت ها اضافه کرد؟
چون تابعش رو که نوشتم موقع ران چه در کلاس adapter چه در کلاس intro و حتی کلاس خود فرگمنت
فونت بدون هیچ گونه اروری اعمال نمیشه! اصلا نمیشه تغییراتی داد بهش مثلا به صورت کدنویسی شده متن رو عوض کرد
راه حلی اگر دارید لطف بفرمایید ، ممنون میشم
مثل زیر عمل کنید
@Override
public View onCreateView(LayoutInflater inflater, ViewGroup container,Bundle     savedInstanceState) {
       View v = inflater.inflate(R.layout.fragment_layout, container, false);
       TextView txt = (TextView) v.findViewById(R.id.Zipcode);
       Typeface font = Typeface.createFromAsset(getActivity().getAssets(), "fonts/customfont.ttf");
       txt.setTypeface(font);
       return v;
}
باید در پوشه assets یک پوشه به نام fonts ایجاد کرده و تغییرات را اعمال کنید.
موفق باشید.
ممنونم
اما همین کارو هم کردم ولی جواب نداد متاسفانه !
log قرار دهید تا بررسی کنم.
یک لاگ تست هنگام اجرای onCreateView نوشتم تا موقعی که اجرا شد اطلاع بده
اما از لاگ پیداست اصلا onCreateView اجرا نمیشه !
بخش کد فرگمنتتون را قرار دهید.
package ir.m4rzb4ni.demopayment;
import android.content.Context;
import android.graphics.Typeface;
import android.net.Uri;
import android.os.Bundle;
import android.support.v4.app.Fragment;
import android.util.Log;
import android.view.LayoutInflater;
import android.view.View;
import android.view.ViewGroup;
import android.widget.TextView;
/**
 * A simple {@link Fragment} subclass.
 * Activities that contain this fragment must implement the
 * {@link intro_1.OnFragmentInteractionListener} interface
 * to handle interaction events.
 * Use the {@link intro_1#newInstance} factory method to
 * create an instance of this fragment.
 */
public class intro_1 extends Fragment {
    // TODO: Rename parameter arguments, choose names that match
    // the fragment initialization parameters, e.g. ARG_ITEM_NUMBER
    private static final String ARG_PARAM1 = "param1";
    private static final String ARG_PARAM2 = "param2";
    // TODO: Rename and change types of parameters
    private String mParam1;
    private String mParam2;
    private OnFragmentInteractionListener mListener;
    public intro_1() {
        // Required empty public constructor
    }
    /**
     * Use this factory method to create a new instance of
     * this fragment using the provided parameters.
     *
     * @param param1 Parameter 1.
     * @param param2 Parameter 2.
     * @return A new instance of fragment intro_1.
     */
    // TODO: Rename and change types and number of parameters
    public static intro_1 newInstance(String param1, String param2) {
        intro_1 fragment = new intro_1();
        Bundle args = new Bundle();
        args.putString(ARG_PARAM1, param1);
        args.putString(ARG_PARAM2, param2);
        fragment.setArguments(args);
        return fragment;
    }
    @Override
    public void onCreate(Bundle savedInstanceState) {
        super.onCreate(savedInstanceState);
        if (getArguments() != null) {
            mParam1 = getArguments().getString(ARG_PARAM1);
            mParam2 = getArguments().getString(ARG_PARAM2);
        }
    }
    @Override
    public View onCreateView(LayoutInflater inflater, ViewGroup container,Bundle savedInstanceState) {
        View v = inflater.inflate(R.layout.fragment_intro_1, container, false);
        TextView txt = (TextView) v.findViewById(R.id.intro_titie);
        Typeface font = Typeface.createFromAsset(getActivity().getAssets(), "fonts/BYekan+.ttf");
        txt.setTypeface(font);
        Log.w("FontReady","Executed");
        return v;
    }
    // TODO: Rename method, update argument and hook method into UI event
    public void onButtonPressed(Uri uri) {
        if (mListener != null) {
            mListener.onFragmentInteraction(uri);
        }
    }
    @Override
    public void onAttach(Context context) {
        super.onAttach(context);
        if (context instanceof OnFragmentInteractionListener) {
            mListener = (OnFragmentInteractionListener) context;
        } else {
            throw new RuntimeException(context.toString()
                    + " must implement OnFragmentInteractionListener");
        }
    }
    @Override
    public void onDetach() {
        super.onDetach();
        mListener = null;
    }
    /**
     * This interface must be implemented by activities that contain this
     * fragment to allow an interaction in this fragment to be communicated
     * to the activity and potentially other fragments contained in that
     * activity.
     *
     * See the Android Training lesson Communicating with Other Fragments for more information.
     */
    public interface OnFragmentInteractionListener {
        // TODO: Update argument type and name
        void onFragmentInteraction(Uri uri);
    }
}
بفرمایید
سلام
علت خطای شما را پیدا کردم اولین اینکه علامت هایی مانند + باعث ایجاد خطا در برنامه می شود باید حرف + را حذف کنید دوم نام فونت را با حروف کوچک بنوسید مثلا بزارید yekan.ttf
موفق و پیروز باشید.
همین روش توی قسمت های دیگه برنامه جواب میده! اصلاحم کردم باز فرقی نکرد
ممنون از اینکه وقت گذاشتید
خطایی که در Android Monitor نمایش داده می شود را قرار دهید تا بررسی کنم چک کردم مشکلی در کد شما نبود.
به نظرم از این آموزش زیر استفاده کنید تست کردم برای فرگمنت نیز جواب داد
https://orjinakteb.com/2017/04/16/%d8%a8%d8%a7%d8%b1%da%af%d8%b0%d8%a7%d8%b1%db%8c-%d9%81%d9%88%d9%86%d8%aa-%d8%af%d8%b1-%d8%a8%d8%b1%d9%86%d8%a7%d9%85%d9%87-%d9%86%d9%88%db%8c%d8%b3%db%8c-%d8%a7%d9%86%d8%af%d8%b1%d9%88%db%8c%d8%af/
سلام
چیجوری فونت برای این اسلایدر ها اضافه کنیم ؟!
همچنین اون بخش که نوشتید باید 4 تا فایل xml درست کنیم نام هارو یک l کم زدین ، side1 -> slide1 🙂
بله دیده بودم به خاطر کار زیاد زمان برای تغییر آنها پیش نیامد.
ممنون از اطلاع رسانی.
برای اضافه کردن فونت آموزش های زیر را بررسی کنید.
آموزش فونت در برنامه نویسی اندروید
https://orjinakteb.com/2017/08/08/%d8%a2%d9%85%d9%88%d8%b2%d8%b4-%d9%81%d9%88%d9%86%d8%aa-%d8%af%d8%b1-%d8%a8%d8%b1%d9%86%d8%a7%d9%85%d9%87-%d9%86%d9%88%db%8c%d8%b3%db%8c-%d8%a7%d9%86%d8%af%d8%b1%d9%88%db%8c%d8%af/
بارگذاری فونت در برنامه نویسی اندروید
https://orjinakteb.com/2017/04/16/%d8%a8%d8%a7%d8%b1%da%af%d8%b0%d8%a7%d8%b1%db%8c-%d9%81%d9%88%d9%86%d8%aa-%d8%af%d8%b1-%d8%a8%d8%b1%d9%86%d8%a7%d9%85%d9%87-%d9%86%d9%88%db%8c%d8%b3%db%8c-%d8%a7%d9%86%d8%af%d8%b1%d9%88%db%8c%d8%af/
موفق باشید.
سلام
ممنون از پاسختون ، اما فونت رو بلدم اضافه کنم ، برای این بخش بلد نیستم !
داخل فایل java میزارم اپ بیلد میشه ولی میپره بیرون موقع اجرا .. ، برای هر فایل xml همون صفحه باید یک فایل java بسازم ؟!
سلام
خیر باید یک بار ایجاد کنید برای کل اپلیکیشن لود خواهد شد آموزش اول کامل است اگر می خواهید برای هر بخش تک تک فونت رو لود کنید مثل زیر عمل کنید.
باید در داخل پوشه assets فونت را قرار دهید سپس مثل زیر عمل کنید (فقط بخشی از کد رو منظورمه)
public class HomeFragment extends Fragment {
  public HomeFragment(){}
@Override
public View onCreateView(LayoutInflater inflater, ViewGroup container,
Bundle savedInstanceState) {
    View rootView = inflater.inflate(R.layout.fragment_home, container, false);
    TextView txt = (TextView) rootView.findViewById(R.id.textViewHome);
    Typeface font = Typeface.createFromAsset(getActivity().getAssets(), "impact.ttf");
    txt.setTypeface(font);
    return rootView;
}
}
در بالا نام فونت impact.ttf شما باید نام فونتتون را در اینجا بزارید.
موفق باشید.
ممنون از آموزش خوبتون،در قسمتی به مشکل برخوردم که لیوت های اسلایدر (Layot) رو شناسایی نمیکنه با اینکه در فایل R.java هم تعریف شدن خطا میده در صورتی که در سورس اصلی برنامه که دریافت کردم و اجرا کردم هیچ گونه خطایی رخ نمیده و بدون خطا Build میشه.
توی قسمت زیر خطا میده توی فایل WelcomActivity و تکه کدهای زیر.
⇩⇩⇩⇩⇩⇩
R.layout.welcome_slide1,
R.layout.welcome_slide2,
R.layout.welcome_slide3,
R.layout.welcome_slide4};
به دو صورت Public Static int و Public Static Final int هم تعریفشون کردم بازم خطا دادن موقع اجرا…راهنمایی کنید لطفا.
سلام
باید اکتویتی های بالا رو در AndroidManifest نیز تعریف کنید.
سلام آقای جعفری پور،منظورتون از اکتویتی ها همون Layout هاست؟من اکتویتی ها رو معرفی کردم به این شکل ⇩⇩⇩
برای برنامه نویسی سایت کدام زبان رو
پیشنهاد می کنید
PHP , Asp.net
اقا دستتون درد نکنه خسته نباشید
عالیییی بود
سلام خسته نباشید ممنون از این آموزشتون خیلی عالی بود
یه سوال داشتم این که اگه بخوام بعد از اسلاید آخر وارد یه اکتیویتی جدید(مثلا لاگین) بشم چیکار باید بکنم؟
می تونید به صورت منطقی چک کنید که اگر آخرین صحفه بود بعد از چند ثانیه با استفاده از یک handler وارد اکتیویتی که می خواهید شوید.
ممنون از آموزشهای خوبتون.
اگر بخواهیم اسلایدها حرکتشون از چپ به راست بشه باید چکار کرد؟